How to churn your own Butter and make Buttermilk – Back to Basics

image

Homemade soda bread and butter at the ready!

Homemade Butter

Homemade Butter

Not wanting to let any food go to waste I realised I had a pot of double cream sitting in the fridge almost ready to be thrown away. So what to do with left over cream?? Why not teach myself how to churn butter at home?

Bread and butter. The perfect combination

Bread and butter. The perfect combination

Having a kitchenaid stand mixer makes this so easy, however I know you can make your own butter by sloshing cream around in a jar too. One guy attached a sealed jar of cream to his very active toddlers back and as the child frolicked he churned butter as he went. Now that’s multi tasking.

image

I didn’t employ any small children in the making of this butter. Rather I set my kitchenaid to work for less than 20 minutes and produced a patty of butter and a bowl of buttermilk. Magic.

There’s 6 clear stages in the butter development which is quite exciting to watch.  Starting with 350ml of double (or heavy) cream just whack it in your mixer with the beater attachment and let it go.

Double cream at the ready

Double cream at the ready

As it’s quite liquid to start with I gradually increased the speed working my way up to high and left it running whilst I made myself a cup of tea and treat Super Hans to a dollop of leftover cream. I could then marvel at the wonder of butter making, stopping only to sip my tea and take photos.

If you start off too high the liquid will escape from the bowl and not end up in your butter. I want to maximise my butter intake so slow and steady it goes. The cream will thicken as it fluffs up with air.

Stage 1: Bubbly Cream

Stage 1: Bubbly Cream

Stage 1. White bubbly cream.

Whipped cream! Keep going

Whipped cream! Keep going

Stage 2. Thick whipped cream. Delicious on scones but not what we’re looking for.

Not quite ready... starting to become yellow and thick

Not quite ready… starting to become yellow and thick

Stage 3. It’s getting exciting. The cream takes on a yellow hue and is very thick.

Starting to separate into butter and milk

Starting to separate into butter and milk

Stage 4. It starts to look a bit scrambled as the cream begins to separate into butter and milk. Don’t worry it’s meant to look a bit grainy!

Ready!

Ready! We have Butter!

Stage 5. WE HAVE BUTTER! And a beautiful buttermilk by product.  It separates fully into a lump of butter sloshing around the bowl with buttermilk. Take it easy at this stage as you’ll lose the precious buttermilk if you beat the butter too vigorously.  Once the butter comes together in a patty it’s ready to drain.

Squish out the excess buttermilk

Squish out the excess buttermilk

Stage 6. Drain the buttermilk out of the bowl and save it for later. (This is a triumph. I’ve not been able to find real buttermilk in the shops so now I have genuine buttermilk to work with and make proper Soda Bread!) Squish the butter by hand to remove the excess milk and hey presto your butter is ready. You can also leave it drain in a sieve over a bowl.

And as if by magic we have Butter and Buttermilk

And as if by magic we have Butter and Buttermilk

Stage 7. Roll into a nice patty shape inside some greaseproof paper and pop it in the fridge to set. You could add flavourings at this stage too if you fancy, herbs, garlic, salt. As I’m going to use this in a pie crust I’m keeping mine pure and simple.

Butter me up

Butter me up

Before even starting the washing up I calculated the ratio of flour needed for the amount of buttermilk I had made (162ml of buttermilk to be exact) to whip up a quick soda bread!

Butter patty at the ready with Soda Bread for the oven

Butter patty at the ready with Soda Bread for the oven

I just threw all the flour back into the mixing bowl and made a half size loaf. I guessed just under half the amount of flour was needed. Now we have a full on snack from one pot of cream that was just going to be thrown in the bin. Using every single bit of the ingredient so nothing goes to waste. Economical and environmentally friendly baking. Now that’s my kind of cooking.

Homemade butter and soda bread!

Homemade butter and soda bread!

Things I used to make my butter

  • 350ml double or heavy cream (any amount would do, but the more cream you have the greater the amount of butter you will make with better value for your time and electricity bill…)
  • Kitchenaid (or you could shake it up in a jar or use a hand whisk if you’re feeling energetic)
  • You coud add herbs, garlic or salt to flavour your butter)

After 20 minutes of beating I made

52. Armenian Orange and Almond Cake (incidentally also Gluten Free)

Armenian Orange and Almond Cake

Armenian Orange and Almond Cake

This Armenian Orange and Almond cake almost screams health (in a rather pretty way). It contains 2 whole oranges! (yes that’s right the pith and peel and everything), no butter, a relatively small amount of sugar and a whole bunch of almonds. Of course almonds are full of minerals and vitamins (vitamin E and Bs) and healthy fats that you need to live a lovely life, so surely this is a cake that you should be eating as part of you balanced healthy lifestyle! Oh and I did I mention it’s also gluten free? No flour required so even better for those with gluten intolerances/allergies too.

A very moist slice of Armenian Orange and Almond Cake

A very moist slice of Armenian Orange and Almond Cake

We’re flying into the final 28 bakes of my aroundtheworldin80bakes adventure now and what a cake to take us up to bake 52. This recipe was very kindly given to me by a fantastic lady that I work with who is from Armenia. I asked if she had any traditional cake recipes that I could try as it’s another country that I’m still yet to visit and she produced this from her repertoire.

I Heart Cake. Do you?

I Heart Cake. Do you? You could win a lovely cake mould if so!

I lovingly recreated the handwritten recipe in my kitchen using a pretty heart shaped mould that Mustard Gifts sent me to try. Thank you very much! I love my heart shaped cake mould. Next on my list of things to try is a heart shaped jelly. Not only does it look pretty whole (part of me wanted to decorate it like a flower!) but when you cut yourself a nice wedge it comes out as a perfect heart shape. The cake will make 6 heart shaped slices or 12 finger shaped sliced (depends on how much you love your friends and family as to how big a slice you’d like to give them…) You could also win one of these gorgeous cake moulds worth £15! (Competition has now closed.)

My orangey bakey heart

My orangey bakey heart

I knew I had to bake this cake to take along with me to the Clandestine Cake Club gathering this week, at the Knit Studio at Blackfriars. Our theme this week was history. I thought the Armenian Orange Cake would be a great recipe for me to use, full of Armenian tradition and handed down to my friend through her family. It did not disappoint. I managed to work my through the entire cake collection sampling a wonderful array of cakes along the way. I love Cake Club!

Clandestine Cake Club Newcastle - History theme

A fine selection of cakes at our History themed Clandestine Cake Club Newcastle, at the Knit Studio, Blackfriars

One of my favourite things about this cake is that it’s really quick to make. Boiling the whole oranges is the most time consuming part of this entire cake. They need to be boiled for 2 hours, covered in water and with a  lid on the pan to help retain the heat. I boiled my oranges the day before so I was extra prepared.

Boil 2 whole oranges for 2 hours. Simple

Boil 2 whole oranges for 2 hours. Simple

Once the oranges have reached boiling point allow them to simmer on a low heat for the full 2 hours. The oranges smell amazing, and it floats around the house carried by the steam from the pan. Leave them to cool (so you don’t burn yourself) and then blend them up to a pulp.

Soft boiled oranges

Soft boiled oranges

They’re so soft and tender they pretty much fall apart in your hands. I used a stick blender to blitz mine into a thick smooth orange paste. You could also use a food processor.

Blitz the boiled oranges to a smooth paste

Blitz the boiled oranges to a smooth paste

Next thing is to basically whisk all of the eggs together with the sugar until frothy and a little air is incorporated. Then whisk in the ground almonds and baking powder. Then whisk in the orange paste. No fuss, just whisk the entire thing in one bowl. Even better there’s not a lot of washing up involved in this cake!

Whisking up all the eggs

Whisking up all the eggs and sugar

The cake batter doesn’t take long to whisk together. Whisk it until it is a beautifully smooth, thick and glossy. You will see the gorgeous orange flecks throughout the batter. It’s very easy to pour and spread into the shapely mould.

A thick, glossy smooth orange flecked batter. Easy to pour and spread into the shapely mould

A thick, glossy smooth orange flecked batter. Easy to pour and spread into the shapely mould

Once everything is fully incorporated simply pour it into your greased baking tin/mould and bake in a preheated oven for 30-45 minutes at 200 degrees C /400F

Thoroughly greased I Heart Cake Mould

Thoroughly greased I Heart Cake Mould

I like to use spray on cake release to grease my cake tins and having not had much success with silicon bakeware in the past I may have gone a tad overboard with the old grease spray here. The I Heart Cake mould worked like a dream, the cake baked evenly and not a single bit of the cake stuck to the mould. Success!

Ready for the oven

Ready for the oven on a pre heated baking tray

One way to ensure your silicon mould is supported and heated evenly I’ve found, is to pop it directly on to a baking tray that has been heated as the oven warms. This makes it even easier to lift the supple mould in and out of the oven and ensures the heat touches the mould evenly.

Fresh from the oven - Armenian Orange and Almond Cake

Fresh from the oven – Armenian Orange and Almond Cake

Now I did think when I read the recipe that 200 degrees C is rather a high temperature for a cake, normally a sponge with baking powder might bake at 180 C as a maximum. 200 C is more like a bread baking temperature which can take that kind of heat, however I wanted to follow the recipe to the letter. I was slightly alarmed to see how dark the cake had turned in the oven however it didn’t make the slightest bit of difference, it tasted perfect and was moist all the way through. Not a dry edge in sight, but just for peace of mind I might reduce the heat next time to 180 after the first 15 minutes of baking.

Cooling gently on a greaseproof covered cooling rack

Cooling gently on a greaseproof covered cooling rack

I left the cake to cool slightly in the mould to retain it’s shape and merely tipped it out onto a greaseproof covered wire cooling rack (to stop the cake marking or falling through the gaps). It’s quite a robust cake with all of the almonds in so it can take a bit of handling. The cake slid smoothly out of the mould and looked impressive before I even added a layer of icing to it.

A good layer of Orange blossom icing

A good layer of Orange Blossom Water sugar icing

I’ve never really been successful with making my own glaze icing and yet I continue to persevere. I decided to add a layer of icing to the cake to add a little more sweetness. I clearly got the measurements wrong (yet again when will I learn!) as the icing wouldn’t set despite being left over night!) so I ended up scraping it off and leaving the cake with the syrupy goodness from the icing seeping into every pore instead. This made one extremely moist cake. Similar to some of my other Arabic creations Baklava and Basboosa.

One orange blossom water syrup soaked Armenian Orange Cake

One orange blossom water syrup soaked Armenian Orange Cake

Icing sugar is probably not the best choice of decorative tool when dealing with a syrup soaked cake, however I wanted a quick white decoration to contrast with the golden sponge. Armed with a paper doily, icing sugar and my trusty tea strainer I placed the doily on the cake and dusted it liberally to ensure the cake got a good coating. I think its a brilliant (and cheap!) way to create an impressive decoration. I think I may be a little obsessed with this now as you can see with my Crack Pie stencilling

Armenian Orange and Almond Cake

Doily decorations all round – Armenian Orange and Almond Cake (ps. no one will notice the dent I put in the top of the cake when scrapping off the icing with a spoon will they…)

To continue the heart theme I sliced up some homemade candied orange peel into dinky heart shapes and placed one in the centre. As Mary Berry always says it’s good to decorate your cake with a little of what’s on the inside to give a hint of what it’s offering

Practice makes perfect - slicing candied peel into hearts

Practice makes perfect – slicing candied peel into hearts. No fingers were lost in this process

Armenian Orange cake is the most intensely orange cake I’ve ever tasted. Perfect if you like a fruity cake that’s not too sweet. The almonds give it a wonderful texture and the added sweetness from the icing lifts the slightly bitter tang of the orange peel.  An interesting cake with a healthy twist, it’s a wonderfully moist and light summery bake. The full oranges give the cake a whole other level of moisture and depth of flavour. Another cake that would be perfect with a strong cup of tea or an espresso. This is great cake for those who enjoy a good pound cake and who aren’t a great fan of buttercream icing. Although you could ice this in any which way you prefer if you’re a buttercream fan go for it. I heart all cake! Yum!

Armenian Orange and Almond Cake
A perfect piece of my heart - armenian orange and almond cake
Armenian Orange and Almond Cake

Armenian Orange and Almond Cake

Things that I used to make my Armenian Orange and Almond Cake

  • 2 oranges
  • 6 eggs
  • 230g sugar
  • 230g almonds
  • 1 tsp baking powder
  1. Boil the oranges for 2 hours
  2. Blend the soft oranges into a paste
  3. Whisk the eggs and sugar until frothy
  4. whisk in the almonds and baking powder
  5. Whisk in the orange paste until all is combined
  6. Bake for 30-45 minutes in a 9 inch tin at 200 degrees C or 400F

Icing

  • 150g icing sugar
  • 2 tbs orange blossom water
  • the zest of one orange
  • a little water to thin the icing if need

Mix it all together until smooth and thick. Pour over the cake.

*Or dust with icing sugar! The choice is all yours


That icing sugar sure disappears fast!


Buttercup Babycakes

Buttercup Babycakes

Buttercup Babycakes

It’s no secret I’m not the best sugar crafter or cake decorator. I’m still finding my feet when it comes to making pretty cakes. I’m more at home pouring loads of ganache over a cake and hoping for the best. So why on earth did I decide to attempt to cover a bundt cake with fondant icing you may wonder?! I’m always up for  a challenge and this really was a test of my cake decorating abilities.

A recent cake experiment - I won the Church Chocolate Cake Competition (for taste, not presentation!)

A recent cake experiment My Giant Chocolate Truffle Cake – I won the Church Chocolate Cake Competition (for taste, not presentation!)

I was invited to participate in Renshaws Baking Competition. The challenge? To bake and decorate a cake fit for the next heir to the throne, to welcome Baby Windsor into the world. My initial idea was to make a 3D crown, hence the bundt cake. however it seems my imagination is far more advanced than my sugarcrafting skills.

Lavender Bundt Baking

Lavender Bundt Baking

What flavour cake do you bake for the royals? Well, I know Kate enjoyed a few Lavender shortbreads during her pregnancy, so a Lavender Madeira Bundt Cake I baked. Hoping that she hasn’t since developed an aversion to lavender. Not that Kate’s ever going to actually eat this cake, but you know it’s the thought that counts.

image

Roll roll roll your fondant gently off the table

One of the reasons I don’t venture into sugarcraft very often is that there isn’t a lot of space in my kitchen. Attempting to roll my crown out meant there was a bit of droppage on the floor. I rolled the fondant as thin as I could manage in one rectangular piece.

image

Pizza cutter at the ready – crown creating

I don’t own any proper sugar crafting knives so wielding the pizza cutter I attempted to fashion some crown shapes. Cutting triangles out of the fondant.

Hoping the crown sets safely with a tin foil support

Hoping the sugar crown sets safely with a tin foil support

Once I had my basic crown shape I gently lifted it onto a cling film covered bundt tin. and held the pointy ends in place with a crumpled horseshoes of tin foil. Unfortunately the bundt tin then needed to have a cake baked into it, so it all went to hell. The crown ended up as a crumpled mess, so I made another. This crown snapped after it dried. Admitting defeat I returned to the drawing board.

jam up the bundt

jam up the bundt

To help spur on my creativity I decided to apply a layer of marzipan to the lavender bundt. Applying a liberal coating of apricot jam to make it all stick.

A layer of marzipan

A lovely layer of marzipan

Bundts are not usually iced in this way and I can now see why. Pouring a whole lot of chocolate over a bundt is a much easier option. This traditional style of icing is best suited to a more circular cake with flat edges, like with my wedding cake. Anyway who said I had to be traditional! Undeterred I threw a thin layer of marizpan over the bundt and poked a hole in the marzipan, coaxing it into the inner ring and under the moulded edges of the cake.

Marzipaned bundt

Marzipaned bundt

Surprisingly the marzipan worked exceedingly well. I filled in a few gaps with some extra bits of marzipan as no one will know about the messy joins. If you won’t tell I won’t either. AND only a small bit of the extra marzipan fell into my mouth whilst rolling this out, honest. (Did I mention that I have a marzipan obsession?? It is manna from the heavens!)

Smooth fondant finish

Smooth fondant finish

The most tricky bit is trying to get a thin layer of smooth white fondant icing to cover the bundt. The Renshaw white fondant is really lovely to work with, so soft and smooth, but I had to add a lot of icing sugar to stop it sticking to the worksurface so I could lift it all up in one go over the rolling pin. I didn’t have the courage to pop a hole in the middle of the white icing once I eventually got it on to the cake. I couldn’t have faced more rolling after it took me a good few goes to get it the right size to fit the cake. It took a bit of manoeuvring in my little kitchen to get it to work but once in place it worked a treat! Using the palm of my hand I smoothed the fondant and buffed it to a nice sheen so a hint of the moulding of the bundt can be seen through the icing.

Terrible crown attempt number 2.

Terrible crown attempt number 2.

In a bid to create a royal crown for my baby cake I cracked open a pack of yellow fondant. I clearly had to give up on my crown idea, as this looked more like a wonky chimney. A new approach was needed.

I give up on the crowns let's make flowers instead!

I give up on the crowns let’s make flowers instead!

And that approach is always flowers! I have a few sugar craft tools in my kitchen, most of which tend to be flowers or stars. The yellow sugar paste was really easy to handle. As it was so soft it didn’t really require any kneading to make it more pliable. It was good to go straight from the packet. As we don’t know if the baby is a girl or a boy (yet) I chose the gender neutral buttercup yellow.

whack a load of flowers all over the bundt

whack a load of flowers all over the bundt

I whacked a whole load of yellow buttercups randomly all over the bundt straight from the cutter. As the white fondant and the yellow sugar paste were still moist no edible glue was needed to hold the flowers in place. You could add some for extra security if you like, but the fondants bonded instantly and let me crack on with cutting as many flowers as possible.

image

Just when you’re think you’re done… keep going

Just when I started to think I was almost finished, I kept on cutting flowers and piling them up in the centre of the bundt to create a bouquet of buttercups fit for the Duchess.

Spray liberally with sparkle and stud each daisy with a pearl

Spray liberally with sparkle and stud each daisy with a pearl

I realised that my bundt was starting to resemble a 1970s swimming cap. I was going for a vintage look but no one wants to eat a swimming cap, especially not Kate Middleton and Wills. The flowers required a lift. Spray on silver lustre is always my go to when cakes need a little something extra. It’s my pièce de résistance. And yet it still wasn’t enough. Back to my cupboard and I discovered a pot of edible pink pearls. Terrific! I studded the still supple yellow fondant flowers with a pearl in the centre. This (in my opinion) makes all the difference.

image

Birds eye bundt view – Welcome to the World Baby Windsor

Pushing the pearls carefully into the centre of each flower added variance to the flowers, giving a more natural look and lifting the petals slightly from the cake. The added pressure also encouraged the bond between the fondants to help hold the flowers on to the cake.

image

I love a bit of lavender in my baking, you can probably tell from all of the other cakes I’ve made. Lavender keeps coming back. Infusing caster sugar with lavender is so easy to do and gives you a naturally wonderful flavour that enhances any cake, shortbread, meringue, Madeleine or cupcake that takes your fancy. It’s subtle floral scent perfumes the house and soothes the soul (and tummy). A nice hunk of lavender Madeira cake is best served with a strong cup of proper tea. The marzipan and fondant gives you an extra flavour dimension and sweetness. That sugar boost a new mammy needs. Welcome to the World Baby Windsor.

Baby Bundt Cake

Build me up Buttercup – Baby Bundt Cake

Things that I used to make this Baby Bundt Cake

  • 115g Self Raising Flour
  • 115g Plain Flour
  • 175g Margarine
  • 175g Lavender infused sugar
  • 3 eggs
  • splash of milk
  • 500g Renshaw white fondant icing
  • 500g Natural Marzipan
  • 40g yellow sugar paste
  1. Beat sugar and butter together until light and fluffy
  2. Beat eggs in, one at a time until fully incorporated
  3. Fold in the flours
  4. Fold in enough milk to get a good dropping consitency
  5. Pour into a bundt tin and smooth down, filling all of the gaps
  6. Bake for 50 minutes at 170 degrees C
  7. Cool
  8. Coat with apricot jam
  9. Apply a layer of marzipan
  10. Apply a layer of fondant icing
  11. Apply flowers, lustre and pearls!
  12. Present to your new parent friends.
Buttercup Bouquet

Buttercup Bouquet

Thank you to Renshaw for sending me this lovely box of icing and marzipan. I loved getting creative with the icing and it’s really easy to work with. I shall have to practice my cake decorating skills more often! Now who needs a celebration cake??

My box of Renshaw Icing Goodies

My box of Renshaw Icing Goodies

If you’d like to see the other entries in the Royal baby cake competiton head on over to www.renshawbaking.com


50. Authentic Danish Rye Bread – Rugbrød

Danish Rye Bread

Danish Rye Bread

My wonderful friends Josh and Mark shared their genuine Danish Rye Bread recipe with me months ago and I’ve been dying to try it! I was going to visit them in Manchester and thought it the perfect occasion to take them some freshly baked Rye bread too to say thank you for letting me stay!

A cross section of Danish Rye Bread

A cross section of Danish Rye Bread

The recipe arrived in 3 photos of hand written sheets so I knew it was going to be good and truly authentic. It requires rather a lot of flour as it is enough for 3 loaves. My brain couldn’t calculate the maths to scale this recipe down so 3 loaves it is!

The Rye Bread Sourdough Starter

The Rye Bread Sourdough Starter – porridgey

The recipe calls for a homemade sourdough base. I have attempted to make my own sourdough starter from scratch before following the Fabulous Baker Brothers method of capturing the yeast from the air in flour and water and letting it ferment. Perhaps my house is not particularly yeasty, I’m not sure but for whatever reason I couldn’t get it to bubble. Having made a successful Herman the German Sourdough starter and cake before I know that adding instant yeast is a sure fire success. Therefore, I admit it, I deviated from the rules immediately, before I even began baking pouring in a little cheating instant yeast to get the sourdough started.

Starting the Rye Bread in my massive cake tin

Starting the Rye Bread in my massive cake tin

I don’t own a bowl big enough to stir this vast amount of flour in so wielding my largest cake tin I set to work… and consequently ruined said cake tin, bending it out of shape with the cement like dough!

If you were making your own sourdough starter, you could keep some back and carry on feeding it so you can make many more beautiful loves in the future. I was making just enough for this recipe, but may attempt to make my own sourdough rye starter again.

There's a lot of flour in this Rye Bread

There’s a whole lot of flour, seeds and grains in this Rye Bread

Rye is quite the healthy flour, full of wholesome goodness, as opposed to refined white flour. This means that it has quite a distinct flavour and it is much heavier than white flour. It creates a rather dense loaf. Mixing rye flour with white flour lifts the texture and colour of the bread slightly. The addition of seeds, nuts and grains give it extra texture and nutritious value!  This bread is perfect for applying lashings of cream cheese and smoked salmon to. I love the traditional Smørrebrød, or Danish open sandwiches. Rye bread is an essential part of proper Danish sandwich making.

If you plan this in advance you will have plenty of time to allow the starter to ferment. I however did not. You should mix the flour and water together, stirring it into a smooth, thick paste and leave for at least 12 hours to let it bubble. I made my starter but needed it to be ready to go asap so I cheekily added 7g of instant yeast to make sure it rose fully.

Adding the flour and seeds to the sourdough start mix

Adding the flour and seeds to the sourdough start mix

Once your starter is ready you can save a cup back for future sourdough creations or, whack it all in to the mix like me. The beauty of rye bread is that it doesn’t require kneading! However you do need strong arms for the mixing. My weapon of choice was a wooden spoon to battle the heavy dough with. Combining the sourdough starter with the rest of the rye bread mixture, alternating between the dry ingredients and the water is hard work but you must keep on stirring until everything is combined, including the seeds and grains. Prepare yourself for a good 10 minutes of elbow grease.

How to fit all of this in one bowl... water, flour, seeds and sourdough starter

How to fit all of this in one bowl… water, flour, seeds and sourdough starter

Unfortunately there were a few ingredients that I didn’t have to hand so improvising to my hearts content, I chose sunflower and sesame seeds to add to the dough. I haven’t been able to find malt powder so I just left it out of the mix, but I bet you can get it in healthfood shops. Rye/barley/wheat grains don’t really feature in my cupboards (other than broth mix and I’m pretty sure dried barley and split lentil is not what we’re looking for here) but oats were an excellent emergency substitute!

Thick and porridgey just how the best Rye breads should be

Thick and porridgey just how the best Rye breads should be

Once the dough is the consistency of thick porridge (lumpy in a good way) it’s ready to pour/scoop into your greased and floured loaf tins. It is quite a stiff liquid so your have to encourage the dough as you pour it into the corners of the tins. Pour in enough dough fill two thirds of the tin, so there’s still space for the dough to expand without overflowing the tin. I had to resort to baking one loaf in a square cake tin (the same size as 2 normal loaf tins) and some mini pudding tins as I only have the one small (500g) loaf  tin!  Coat each loaf with a nice wash of oil and sprinkle a few oats/seeds on the top. Cover the loaves with greased cling film and leave to prove/mature for 8-12 hours. This time allows the sourdough to mature further and add a deeper tangy flavour to the bread.

Pour your rye bread dough into all of your loaf tins (and every other container you can find...)

Pour your rye bread dough into all of your loaf tins (and every other container you can find…)

When proved the dough will not double in size like other breads but it will increase in volume and should reach the top of your loaf tins. Prick the tops of the proven loaves all over with a fork, this will help keep your crust intact as it may fall off if left un perforated. It also prevents the loaves from rising and cracking in the oven, maintaining that distinctly symmetrical Danish Rye bread oblong shape.

The cling film covered and proving loaves

The cling film covered and proving loaves

Pre heat your oven to 220 degrees C. Bake the loaves at 220 degrees for 10 minutes. This initial blast of heat helps to force the bread to rise and the crust to develop. Lower the temperature to 175 degrees C and bake for a further 75  minutes.

Sometimes pegs come in handy to keep the cling film in place...

Sometimes pegs come in handy to keep the cling film in place…

If your loaves can be removed easily from the tins at this point do so. if not, leave for another 5-10minutes until they can be removed. Bake the bread for a further 5-10 minutes without the tin directly on the oven shelf to allow the crust to become extra crunchy.

The forked loaf ready for the oven

The forked loaf ready for the oven

Once they’ve cooled they’re ready to eat! You should be able to keep them at room temperature for 1-2 weeks or they freeze really well too.

Danish Rye Bread fresh from the oven

Danish Rye Bread fresh from the oven

I always know when I’ve baked something especially tasty as Super Hans will go out of his way to steal it from me. He was desperate for a bit of my Danish Rye Bread. I love the depth of the flavour in this bread. It radiates health and wellbeing. It’s also rather filling, so thin slices are a must. The sourdough tang cuts through the fantastic texture of the seeds and nuts. Now that I have the Kitchenaid I can dispense with the cake tin mixing method, so I will be purchasing more rye flour very soon and having another go. I would also love to try other dark breads. I can see me attempting many more in the future. Thank you Josh and Mark for sharing your fantastic recipe with me!

Extreme close up of the crunchy crust

Extreme close up of the crunchy crust

Things that I used to make Danish Rye Bread

Sourdough Starter

  • 300ml luke warm water
  • 250ml rye flour
  • 7g of instant yeast (if you’re in a hurry)

Mix together to a thick smooth paste and leave to ferment until bubbly (12-24 hours) or if you’re impatient add 7g of instant yeast to your starter…

Rye Dough

  • 1 litre of warm water
  • (if you can find it add 1 tablespoon of ground malt -I didn’t)
  • 200g sunflower seeds
  • 200g sesame seeds
  • 400g oats (or whole rye, barley/wheat grains)
  • 2 tablespoons salt
  • 1 tablespoon honey
  • 300g strong white flour
  • 900g rye flour
A slice of rye

A slice of rye

My pair of rye loaves

My pair of rye loaves

48. Oh Canada! Oh Nanaimo Bars!

Happy Birthday to Chris  Nanaimo Bar

Happy Birthday to Chris – your own personal Nanaimo Bar

This blog has been a looooong time coming. I wanted to recreate a special treat from our Canadian travels for Chris’s birthday (last October…). My Aunty Carol in Canada recommended the quintessentially Canadian Nanaimo bar to satisfy my Canadian cravings.

Hike up Mount Doug

Hike up Mount Doug

We spent a glorious week with my family on Vancouver island. Taking in all the sites, hiking up Mount Doug, whale watching, exploring the ski slopes and of course meeting a Mountie or two.

Mountie Meeting

Mountie Meeting

Ziplining through the forests in Whistler

Ziplining through the forests in Whistler

So many beautiful sights to take in

So many beautiful sights to take in

Nanaimo bars are as popular in Canada as Tim Horton’s coffee shop. I still dream of those bear claw doughnuts. Unfortunately in England we don’t seem to know what Graham Crackers are or sell them in any shops… and they are an essential ingredient in Nanaimo Bars.

Smash up your biscuits with whatever's handy in a sandwich bag

Smash up your biscuits with whatever’s handy in a sandwich bag

My educated guess is that it’s some sort of spiced caramelised rich tea biscuit. So I did what I do best with limited store cupboard. I improvised. Smashing up a load of rich tea biscuits and adding in a combination of ginger and cinnamon to the mix.

The beginnings of the biscuit base

The beginnings of the biscuit base – combine sugar, butter, egg, biscuit crumbs, nuts and coconut

The base required a tasty combination of biscuits, melted butter, sugar, egg, cocoa powder, almonds, and coconut. It’s really quick to mix it all together. A 20 second blast in the microwave is all the butter needs to be fully runny.

Stir it all together until fully combined

Stir it all together until fully combined

Stir it all together until fully combined and comes together into a stiff mixture.

Biscuit base ready to be baked

Biscuit base ready to be baked

Once combined press the mixture firmly and evenly into all of the corners of a flat lined and greased 9 inch baking tray. Bake the biscuit base in the oven for about 10 minutes at 180 degrees C.

Whipping up the custard filling

Heating up the cream, milk and vanilla to make the custard filling

The next decadent layer is a lovely custard cream. At this point in my baking repertoire I was still yet to attempt custard concocting. Daunted yet undeterred I proceeded to my cupboard to retrieve the custard powder the recipe requires. Disaster struck when I discovered the custard powder was over a year out of date! Not wanting to poison Chris on his birthday I decided I had gone too far and didn’t have time to make another cake so I would have to proceed and whip up my own custard instead.

Thickening up the custard

Whisking up the eggs, sugar and cornflour

I decided a full custard recipe would be far too much for a small Nanaimo bar recipe so I adapted a Mary Berry recipe to make up my own sweet filling. As with gelato or ice cream you start off heating the cream and milk with a vanilla pod to infuse the custard. Then you whisk the eggs until fluffy with the sugar. Taking the cream off the heat and pour over the eggs. Continue to whisk until it thickens. Then return the custard to the pan and whisk over a low heat until it thickens.

Keeping whisking til the custard thickens

Keeping whisking til the custard thickens

The Nanaimo bar is quite a firm cake so I knew I would have to adapt the rather runny custard to make this work. I added the butter, vanilla extract and a lot of powdered (icing) sugar to the custard. Continuing to whisk it over the low heat until it reached the right thick consistency. You may need to add more powdered sugar to make your custard set firmly. It will end up a much paler custard due to the white icing sugar.

The baked biscuit base - nanaimo bar recipe

The baked biscuit base – look at those nuts!

Take the biscuit base out of the oven and let it cool fully. Once the custard has cooled you can then happily pour the custard over the biscuit and let it set in the fridge whilst you whip up the chocolate topping.

The custard layer setting - nanaimo bar recipe

The custard layer setting

Using a bain marie, pop the chocolate in a bowl suspended over a bowl of boiling water to allow the chocolate to melt gently. Save the last third of the chocolate back to add to the melted chocolate to help reduce the temperature of the chocolate. This tempering of the chocolate stops it from blooming or sweating when it’s cooling. It helps to keep your fingers slightly less sticky.

Gloriously gooey melted chocolate

Gloriously gooey melted chocolate

Pour the glossy melted chocolate all over the custard layer and simply let it cool and set.

The chocolate layer

The chocolate layer

But… just before it’s fully set quickly score the chocolate with a sharp knife to mark out the bar squares. You’ll thank me later. Once the chocolate sets fully it’s really difficult to cut through the chocolate and get properly portioned slices, as the chocolate cracks. (I wish I’d known this when I made Millionaire’s Shortbread!)

The scored Nanaimo Bar

The scored Nanaimo Bar

Then once it’s fully set you can take it out of the tin, chop it up and tuck in! I served Chris his for a special birthday breakfast. In hindsight it might not be the best breakfast food, but you can eat whatever you like on your birthday. That’s the rules. It’s a wonderfully sweet treat.  The coconut, custard and chocolate are a brilliant combination. That’s 3 of my most favourite ingredients all wrapped up into one cake. And even better,  it doesn’t take an age to make. I can see why the Canadians love it so.

Nanaimo Bar recipe

Nanaimo Bar

Thank you so much for the wonderful memories and for showing us the sights Aunty Carol, Uncle Malcolm , Kelly and David!

At the top - Whistler

At the top – Whistler

Things I used to make Nanaimo Bars

  • 1 cup or 250g rich tea biscuits smashed to fine crumbs (or if you have access to graham crackers go for it!)
  • 1 tsp ginger
  • 1tsp cinnamon
  • 1/2 cup or 125g desicated coconut
  • 1/3 cup or 75 g of flaked almonds
  • 1/4 cup or 60g cocoa powder
  • 1/4 cup or 60g sugar
  • 1/3 cup or 75g  melted butter
  • 1 egg

Custard Cream Filling

Custard

  • 285ml milk
  • 25ml cream
  • 1 vanilla pod
  • 2 egg yolks
  • 15g sugar
  • 1 tsp cornflour

*Or alternatively use 2tbsp custard powder if you have it!

  • 1/4 cup or 60g butter
  • 1 tsp vanilla
  • 2 cups 500g icing sugar

*add 30ml milk if you’re not using home made custard

Chocolate Topping

  • 200g plain dark chocolate
  • 1 tbsp butter

5 Tiers of Fruit Wedding Cake – My biggest booziest cake ever

Five Tiers of Fruit Cake on our wedding day

Five Tiers of Fruit Cake on our wedding day

After Chris and I got engaged my first thoughts turned not to the arranging the wedding, or buying my dress, but to the wedding cake. I got my priorities right. My theory is sort out the cake first and everything else will fall in to place.  I actually bought the first wedding dress I tried on and my nephew who wasn’t quite 1 years old helped me choose it but that’s a completely different story. Let’s concentrate on the cake. We knew we wanted to get married as soon as possible, so the vast majority of the 6 months of our planning and preparation time I spent creating our wedding cake.

Fruit cake is very popular in my family as you can tell by my previous Caribbean Christmas Cakes and Jamaican Black Cake so I knew I needed to make something extra special, something a bit more challenging and flavour packed to feed about 120 of our family and friends. A few sleepless nights later of conjuring up flavour combinations in my head I had it planned. 5 tiers of fruit cake, each with it’s own booze and fruit combination.

12 inches worth of dried fruit soaking in their temporary storage box home

12 inches worth of dried fruit soaking in their temporary storage box home

I quickly realised that I needed much BIGGER kitchen equipment than I owned to create the largest 12″ tier. No bowl was big enough to house the enormous quantity of dried fruit to soak it in the flavoursome booze. A quick hunt round the house and I discovered a hard plastic storage box which I disinfected and decanted all the ingredients into. I like to soak my fruit for as long as possible, in a bit more booze than is recommended so then I don’t really need to feed the cooked cake on a regular basis. It matures nicely wrapped up in greaseproof paper and stays moist. I pour enough booze onto the fruit to give it a pungent glistening alcoholic coat, but not so much that it’s swimming in a pool of booze. If you stir it regularly you can make sure the fruit is absorbing the booze. There should be no liquid left after 2 weeks.

Soaking 3 tiers of boozy fruit - wedding cake fruit

Soaking 3 tiers of boozy fruit

Weighing out the fruit and measuring in the booze can be quite complicated as I found out, especially if you don’t mark on your pot which size cake the fruit is eventually intended for.  Note to self: You really won’t remember which fruit is which after 2 weeks of soaking in booze so don’t even pretend that you will. Your memory is good but it’s really not that good. Squashing an 8″ cake’s worth of fruit into a 6″ cake will not work and you won’t realise that this is the problem, even when you can’t fit it all into the cake tin and have to make extra cupcakes with the rest of the mixture. The cake will be extra moist and you will think it’s not cooked so you have to bake it for an extra 3 hours to convince yourself it’s definitely cooked. To compensate for the extra oven time you will then pour way too much booze on the hot cake when it comes out of the oven and drown it. You will never be happy with this cake so you will then have to start again. From scratch. (You will also have to make another 8″ cake as you decided to bake the two cakes simultaneously and made a right pigs ear of the whole thing. That was a really good Saturday well spent.)

one incinerated wedding cake - let's eat the middle with a spoon

One incinerated wedding cake – let’s eat the middle with a spoon

For my 5 tier wedding cake I ended up baking 8 actual cakes! Mainly due to my own stupidity and also because the oven broke. The 2 cakes which required an extra 3 hours of baking (when added onto their original 4 hours of baking is a lot of time in an oven!) made me realise that the oven wasn’t playing nicely. I invested in an oven thermometer to check the temperature throughout the wedding cake baking process and followed this precisely. Only to then incinerate one cake completely. It was a charcoal cake. Although once I chipped away the outer charcoal casing the centre of the cake was really rather nice. I was determined not to let the amaretto soaked cherries to go to waste. So I chopped up the inside of the cake and served it with ice cream. It was delicious!

The quick ice day late spare cake

The quick ice day late spare cake

The other ‘ruined’ cakes did not go to waste either. I decided to donate one of my reject cakes to the church bake sale and quickly iced it. However upon arrival we discovered we were a day late for the bake sale… Ah the brain fog of wedding preparations! So I shared it with friends instead when they came round for festive drinks. I must admit the extra booze and fruit in the cake made it tricky to cut but it was so tasty!! The final uniced extra boozy tier is still maturing nicely in the cupboard. I’m going to save that one for a special occasion. I’m sure it’s good to keep for at least a year or two.

I despaired slightly as I still had 3 cakes left to bake with a broken oven. Then I did a bit of googling and decided instead to dismantle the oven, clean it and put it back together.  Thankfully this seemed to do the trick! I also watched the other cakes like a hawk and turned them every hour to avoid any charring from the hot spots in the oven. The result? The final 3 tiers were the best cakes I’ve ever baked in my life. I’m sure that extra care and attention was the secret to their success. They were so level they didn’t need to be propped up when icing them to get an even top.

Creaming the butter and the eggs - wedding fruit cake

Creaming the butter, sugar and orange and lemon zests

The method for each sized cake is exactly the same and after baking 8 of them I was starting to know it off by heart. I think this Christmas I may make chocolate cakes! After soaking the fruit in booze for at least 24 hours (if not 2 weeks) you cream the butter, sugar and fruit zests together until light and fluffy.

Whisk in the eggs to the butter and sugar

Whisk in the eggs to the butter and sugar

Then to add the eggs, whisking them into the butter and sugar mix one at a time. I had to use the biggest bowl I own for this job as the eggs inflate like mad when whisked. The mixture can start to curdle or separate at this point, but it’s not the end of the world. You can whisk in a little flour to stop it separating but it’s still going to taste pretty amazing.

The whisked eggs are dangerously close to overflowing the bowl

The whisked eggs are dangerously close to overflowing the bowl

Then to prepare the dry ingredients. A separate bowl was definitely required to sift the mountain of flour and spices together. I love a spicy cake, so I’m always quite liberal with the cinnamon and nutmeg.

Mountains of flour and spices

Mountains of flour and spices

For the 12″ cake I didn’t have a bowl big enough to fit everything in so had to resort to stirring it all together in the plastic storage box! Who knew it was so difficult to stir things in a square box… I ended up with cake mix right up to my elbows and consequently my face and hair. But I did it!

Time to stir it all together! Wooden spoon at the ready

Time to stir it all together! Wooden spoon at the ready

You have to fold the wet and dry ingredients in a third at a time until it’s all incorporated. Then finally fold in the ground almonds, chopped nuts and treacle.

Almost fully combined just the treacle and almonds left to fold in

Almost fully combined just the treacle and almonds left to fold in

I hired the largest cake tins from my local cake shop. At 50p a day it was much cheaper than buying massive cake tins and I don’t have to worry about storing them in our already full to capacity flat. It’s really important to double line and grease the cake tins to help prevent the cake from burning as it needs to bake for a really long time at a low (ish) temperature (150 degrees Celsius).

I always tie an extra collar of greaseproof paper around the outside of the tin and use that to prop up a greaseproof paper lid to protect the top of the cake from burning too. As it doesn’t have any raising agent in it the fruit cake won’t really rise any higher than it sits in the tin uncooked. I wanted to try to get the most even finish that I could so I carefully layered the mixture into the tin, spreading and flattening it down with a spatula. No air pockets for me thanks and the smoothest top I’ve ever achieved.

An even spread - all of the 12" cake mixture in it's very large tin

An even spread – all of the 12″ cake mixture in it’s very large tin

The largest cake obviously takes the longest time to bake. In hindsight starting a massive cake at 6pm is probably not the best plan. It takes at least an hour to combine all of the ingredients together and prepare the tins. Then it needs 6 hours in the oven. This meant I was babysitting the cake until 3am. I accidentally fell asleep and awoke with a fright with the oven timer going off, in my own personal inferno with the oven and the heating on, whilst wearing fleecy pyjamas, a dressing gown and a furry blanket with the cat sat on top of me. I forgot to turn this cake whilst it was baking, due to me being asleep and all , so the cake had a nice diagonal shadow across it, but once it had an extra feeding of booze and it was iced no one noticed. And with a cake this big, using so many ingredients there was no way I was going to start again!

The biggest 12" fruit cake with a slight shadow... shhh no one will notice

The biggest 12″ fruit cake with a slight shadow… shhh no one will notice

The cake fruit and booze combinations I created were…

  • 4″ Cake – Amaretto Tier – Almond, Amaretto and cherry
  • 6″ Cake – Vanilla Tier – Vanilla Brandy, dates, peel and sultanas
  • 8″ Cake – Tropical Tier – Malibu, dried pineapple, coconut, papaya and mango
  • 10″ Cake – Traditional Tier – Brandy and mixed fruit
  • 12″ Cake – Orange Tier – Orange Brandy sultanas, cherries, peel
Putting things into slightly frazzled perspective. This cake was bigger than my head.

Putting things into slightly frazzled perspective. This cake was bigger than my head.

Each cake had a different baking time too although all were baked at 150 degrees

  • 4″ Cake – 2 and a half hours
  • 6″ Cake – 3 hours
  • 8″ Cake – 4 hours
  • 10″ Cake – 4 and 3 quarter hours
  • 12″ Cake – 6 hours
The 6 inch wedding cake. Quite the smooth level finish even if I do say so myself

The 6 inch wedding cake. Quite the smooth level finish even if I do say so myself

What I used to bake my wedding cake – Ingredients

4″ Cake – Almond, Amaretto and Cherries

  • 150g dried cherries
  • 100g sultanas
  • 40g candied peel
  • soaked in (at least) 2 tablespoons of amaretto
  • 100g butter
  • 100g brown sugar
  • zest of 1/4 of lemon
  • zest of 1/4 of orange
  • juice of 1/4 orange (add to the soaked fruit just before you combine the rest of the ingredients)
  • 2 eggs
  • 100g plain flour
  • 1 tsp cinnamon (or more…)
  • 1/2 tsp nutmeg
  • 1/2 tsp mixed spice
  • 1 tsp almond extract
  • 10g ground almonds
  • 10g flaked almonds
  • 1/2 tablespoon treacle

6″ Cake – Vanilla Brandy, dates, peel and sultanas

  • 70g glace cherries
  • 375g sultanas
  • 200g dried chopped dates
  • 45g candied mixed peel
  • soaked in (at least) 4 tablespoons of vanilla infused brandy (pop a vanilla pod in your bottle of brandy and leave a vanilla pod in with the fruit whilst soaking in brandy)
  • 175g butter
  • 175g brown sugar
  • zest of 3/4 of lemon
  • zest of 3/4 of orange
  • juice of 1/2 orange (add to the soaked fruit just before you combine the rest of the ingredients)
  • 3 eggs
  • 175g plain flour
  • 1 tsp cinnamon (or more…)
  • 1 tsp nutmeg
  • 1/2 tsp mixed spice
  • 1 tsp vanilla extract
  • 20g ground almonds
  • 20g flaked almonds
  • 1 tablespoon treacle

8″ Cake – Tropical Tier – Malibu, dried pineapple, coconut, papaya and mango

  • 125g glace cherries
  • 650g sultanas
  • 320g dried tropical fruits (pineapple, papaya and mango)
  • 100g candied mixed peel
  • soaked in (at least) 5 tablespoons of malibu (coconut flavour white rum)
  • 350g butter
  • 350g brown sugar
  • zest of 1 and half of lemons
  • zest of 1 and a half  oranges
  • juice of 3/4 orange (add to the soaked fruit just before you combine the rest of the ingredients)
  • 6 eggs
  • 350g plain flour
  • 2 tsp cinnamon (or more…)
  • 1 tsp nutmeg
  • 1/2 tsp mixed spice
  • 35g ground almonds
  • 35g desicated coconut
  • 1 and 1/2 tablespoons treacle

10″ Cake – Traditional Tier – Brandy and Mixed fruit

  • 180g glace cherries
  • 800g sultanas
  • 210g dried apricots
  • 250g dried chopped dates
  • 250g dried cherries
  • 110g candied mixed peel
  • soaked in (at least) 8 tablespoons of brandy
  • 450g butter
  • 450g brown sugar
  • zest of 2 of lemons
  • zest of 2 of oranges
  • juice of 1 orange (add to the soaked fruit just before you combine the rest of the ingredients)
  • 8 and half eggs
  • 450g plain flour
  • 3 tsp cinnamon (or more…)
  • 2 tsp nutmeg
  • 1/2 tsp mixed spice
  • 55g ground almonds
  • 55g flaked almonds
  • 2 tablespoons treacle

12″ Cake – Orange Brandy sultanas, cherries, peel

  • 250g glace cherries
  • 1460g sultanas
  • 400g dried apricots
  • 350g dried chopped dates
  • 250g dried cherries
  • 200g candied mixed peel
  • soaked in (at least) 10 tablespoons of orange brandy liqueur
  • 660g butter
  • 660g brown sugar
  • zest of 3 of lemons
  • zest of 3 of oranges
  • juice of 1 and 1/2 oranges (add to the soaked fruit just before you combine the rest of the ingredients)
  • 12 eggs
  • 660g plain flour
  • 4 tsp cinnamon (or more…)
  • 2 tsp nutmeg
  • 1/2 tsp mixed spice
  • 75g ground almonds
  • 75g flaked almonds
  • 3 tablespoons treacle
5 teetering tiers of fruit cake. Stacked and ready to mature

5 teetering tiers of fruit cake. Stacked and ready to mature

Once all 8 cakes were baked I had a job trying to find places to store them. A bit of strategic thinking and double wrapping in greaseproof paper and tin foil later 8 cakes were ready to mature for a month before being iced. I’ll tell you all about that adventure later on along with our house flooding 2 weeks before the wedding and making over 100 sugar flowers…

My bakers impression of the final 5 tier wedding cake

My bakers impression of the final 5 tier wedding cake

Love from the new Mrs Lauren Hoy x

Me

Me – more bridey than cakey

This is part 1 of the 4 stages of wedding cake baking! You can read more about my epic wedding cake adventures here…

Part 1 – My 5 tiers of fruit wedding cake – My biggest booziest cake yet 

Part 2 – How many sugar flowers does it take to make a wedding cake?

Part 3 – Where to start icing a 5 tier wedding cake?

Part 4 -The Final Frontier – Decorating & assembling my 5 Tier wedding cake

Coconut Crazy! Homemade Italian Coconut Gelato

How to make Homemade Italian Coconut Gelato complete with coconut curls

Homemade Italian Coconut Gelato complete with coconut curls

My favourite ice cream in the whole entire world has got to be Italian Coconut Gelato. Now that’s a bold statement I know, but having sampled real Italian Gelato and having lived very close to a Gelato shop in Newcastle I think I’ve tried quite a few flavours and this is without doubt top of my list every time. Yeah chocolate is always lovely but a bit too much of an obvious choice sometimes for my liking. I do love cherry gelato and pistachio is tremendous too but coconut is what is usually what I crave when looking for a cold fix.

dried coconut half

I’ll have half a dried coconut please

I seem to be developing an obsession with coconut, finding ways to incorporate it into all foods. Be that coconut milk, oil, dessicated and dried. In the creation of this gelato I discovered the wonderful ingredient of dried coconut halves which saved me the effort of breaking into a fresh coconut with a hammer and fork (my only suitable kitchen implements I think for such a job!)

Trevi Fountain adventuring in Rome with my Dad

Trevi Fountain adventuring in Rome with my Dad


I visited Rome just last year for the first time with my Dad. It was gorgeous. We spent a few days wandering round, bouncing from the Trevi Fountain to pasta cafes to St Paul’s basilica. Pausing to absorb the beauty and history of our surroundings and to take on more fuel in the form of pasta and gelato. I dragged my Dad to many cake shops and the beautiful and oldest gelataria in Rome, Giolitti. Not that I heard him complain once 🙂

What a view from the top! Colosseum, Rome

What a view from the top! Colosseum, Rome

The main difference between ice cream and gelato is the taste and texture. Gelato freezes at a higher temperature than ice cream. This gives a much more intense flavour than you get from eating ice cream which is colder and numbs your tastes buds slightly. The warmer the temperature the more you can taste! Gelato is also made with less fat, so good news it’s better for you than ice cream! (Depending on how much you eat of it of course). Gelato is also much softer and smoother in texture than traditional ice cream. All the better for eating!

Heating the milk and cream to infuse flavour into the gelato base

Heating the milk and cream to infuse flavour into the gelato base

The initial stage of heating the milk/cream gives you the perfect opportunity to infuse flavours. You can choose to infuse whatever flavour you fancy into your gelato. Some flavours will require a longer infusion time than others. A vanilla pod may take about 20 minutes over a low heat to impart it’s flavour fully, but something like coffee extract, tea bags, cocoa powder or other flavour extracts will give instant flavour and need little infusion time (maybe about 5 minutes).

You can infuse your base with your favourite flavours, such as vanilla, coffee, tea, lavender, rose, cinnamon, cherry, pistachio and much much more! If you’re going to choose a different flavour it would be wise to choose something with a low liquid content as adding water to the mix may cause ice crystals to form. Adding alcohol in small amounts should be ok, but remember alcohol doesn’t really freeze.

Another flavour option can be created by using a different variety of milk. Even better news for people with food allergies or intolerances! I used coconut milk here but you could just as easily use cows, goats, soy, almond or hazelnut. Each will give you a slightly different flavour and possibly texture. Some milks can become grainy when heated, so it may be wise to try heating up a small amount first to make sure it can stand the heat. before you commit to cooking an entire batch. Or have a fine sieve to hand!

Add your choice of flavour to your milk then heat the cream/milk until it starts to bubble. I added 80g of desiccated coconut to the milk and cream here to infuse even more coconut goodness.

Keep stirring it so a skin doesn’t form on the top.  Allow it to cool slightly. Cream and milk have slightly different boiling points so keep a close eye on the pan, you don’t want it to boil over, or get a thick skin on your coconut cream!

Beat together the eggs and sugar for about 5 minutes - gelato recipe

Beat together the eggs and sugar for about 5 minutes

Beat together the sugar and eggs until smooth and fluffy. They will become a mellow yellow colour after about 5 minutes of beating with an electric whisk/mixer.

The discarded dessicated coconut - nothing will go to waste in my house! - gelato recipe

The discarded desiccated coconut – nothing will go to waste in my house!

Once the cream/milk has cooled slightly pass it through a fine sieve to remove your flavouring if needed. Squeeze all of you milk/cream out of the coconut so you don’t miss a drop of your infused cream. I kept my creamy coconut mixture to use later on.

Gelato recipe - Sieve your hot cream mixture if you need to remove additional flavourings like vanilla pods or dessicated coconut!

Sieve your hot cream mixture if you need to remove additional flavourings like vanilla pods or dessicated coconut!

As the next stage is to make a smooth custard you can’t add any swirls of fruit/flavours at this point. Your custard needs to be smooth and pure so it can thicken fully. Hang on to any additional flavourings that you would like to add for later on.  You can then swirl them in just before the final freeze. After about 5 minutes of beating, the sugar and eggs will inflate slightly and take on a pale yellow colour.

The beaten eggs and sugar - the custard base - Gelato Recipe

The beaten eggs and sugar – the custard base

Whilst continuing to beat the fluffy eggs and sugar slowly pour the hot coconut cream into the eggs. Add the hot cream gradually to avoid scrambling the eggs! Adding very hot cream at this stage will give you lumpy egg custard, I don’t think anyone would enjoy lumpy gelato although it may be an interesting texture on the palette!

Pour the hot cream into the eggs gradually whilst continuing to beat the eggs - gelato recipe

Pour the hot cream into the eggs gradually whilst continuing to beat the eggs

Once you’ve poured all of the cream into the eggs, keep beating the mixture until it’s fully combined. When it’s ready the  custard will start to thicken as the hot cream gently cooks the eggs. The custard will be smooth, fluffy and a very pale yellow in colour due to all those beautiful egg yolks! (Note my leftover egg whites in the jug. I’m saving them for another recipe later on…)

Fluffy coconut custard - how to make gelato

Fluffy coconut custard

Then all that’s left to do is thicken the custard a bit more. You can do this in a bain marie (in a bowl suspended over a pan of hot water) to avoid burning the custard and gently thicken the mixture. Or if you’re in a hurry, whack it all in a pan and heat the custard over a low heat and stir like mad so nothing burns/sticks to the bottom. The key is to keep stirring to distribute the heat evenly and allow the custard to cook thoroughly.

Thickening up the coconut custard in a bain marie

Not letting the precious coconut custard out of my sight as I thicken it in my home made bain marie

Once the custard is thick enough to coat the back of a spoon it’s good to go! The custard needs to cool before you can freeze it and unfortunately this can take up to 6 hours…. Not great when you need a gelato fix right this second! A quick cheat is to carefully place your hot pan of custard into a bowl (or in my case a sink) of cold water to rapidly cool the custard. Keep stirring it every now and then to stop a skin from forming. You can chill it further in the fridge before cracking out the ice cream maker.

Coconut Custard coating the back of a spoon - thick enough to cool!

Coconut Custard coating the back of a spoon – thick enough to cool!

After all this patience the end result is not far off! I recently bought myself an attachment for my Kitchenaid mixer. The ice cream maker! This was my very first experiment and venture into ice cream making. You will need to follow the instructions for your own ice cream maker as they’re all a bit different, but for the Kitchenaid, I had to freeze the special ice cream bowl in the freezer for 15 hours (it now lives there permanently for all ice cream making emergencies) . Once I had fitted the blade to the Kitchenaid mechanism it’s good to go. One important thing to note is that you should pour the custard in whilst the machine is running as the custard may freeze solid instantly and could break your Kitchenaid if you’re unlucky.

Freeze me up - KitchenAid Ice Cream attachment in action - coconut gelato

Freeze me up – KitchenAid Ice Cream attachment in action

It takes about 20  minutes in the Kitchenaid to freeze the gelato to a ‘soft set’ . I couldn’t resist a sneaky taste of it at this stage and it tasted pretty amazing. It will be quite sweet at this stage as when it’s set further in the freezer the sweetness is reduced.

Letting the KitchenAid do all the hard work freezing my coconut gelato

Letting the KitchenAid do all the hard work freezing my coconut gelato – time for a cup of tea methinks

So with 20 minutes on your hands you’ve got plenty time to have a cup of tea and start the washing up. Once the gelato has reached the ‘soft set stage’ where it starts looking like slightly melted/soft ice cream you can stir in any additional flavours. I added 2 tablespoons of the left over desiccated coconut for good measure. You can see some of it lurking on the top of the blades!

Soft set coconut gelato ready for the freezer

Soft set coconut gelato ready for the freezer

You could probably eat it at the soft set stage if you like your gelato extra soft, or scoop it into a freezer container, smooth it down and leave it in the freezer to set fully for about 5 hours. As Gelato contains less fat it freezes much harder than ice cream, so you may need to take it out of the freezer to soften before serving. You could pop it in the fridge for 15 minutes if it’s a bit difficult to get it into a bowl.

Shaving a coconut to create coconut curls

Shaving a dried coconut to create coconut curls

Taking my trusty vegetable peeler I shaved the dried coconut halves into thin slivers to create some pretty coconut curls. I quite like the dark brown edges of the coconut rind against the white coconut flesh. It’s makes a tasty decoration too! Pop a couple of curls on the top of your gelato for a quick and sophisticated looking decoration.

Coconut Gelato complete with coconut curls

Coconut Gelato complete with coconut curls

Sharing Coconut Gelato with friends - I didn't eat it all myself. I promise!

Sharing Coconut Gelato with friends – I didn’t eat it all myself. I promise!

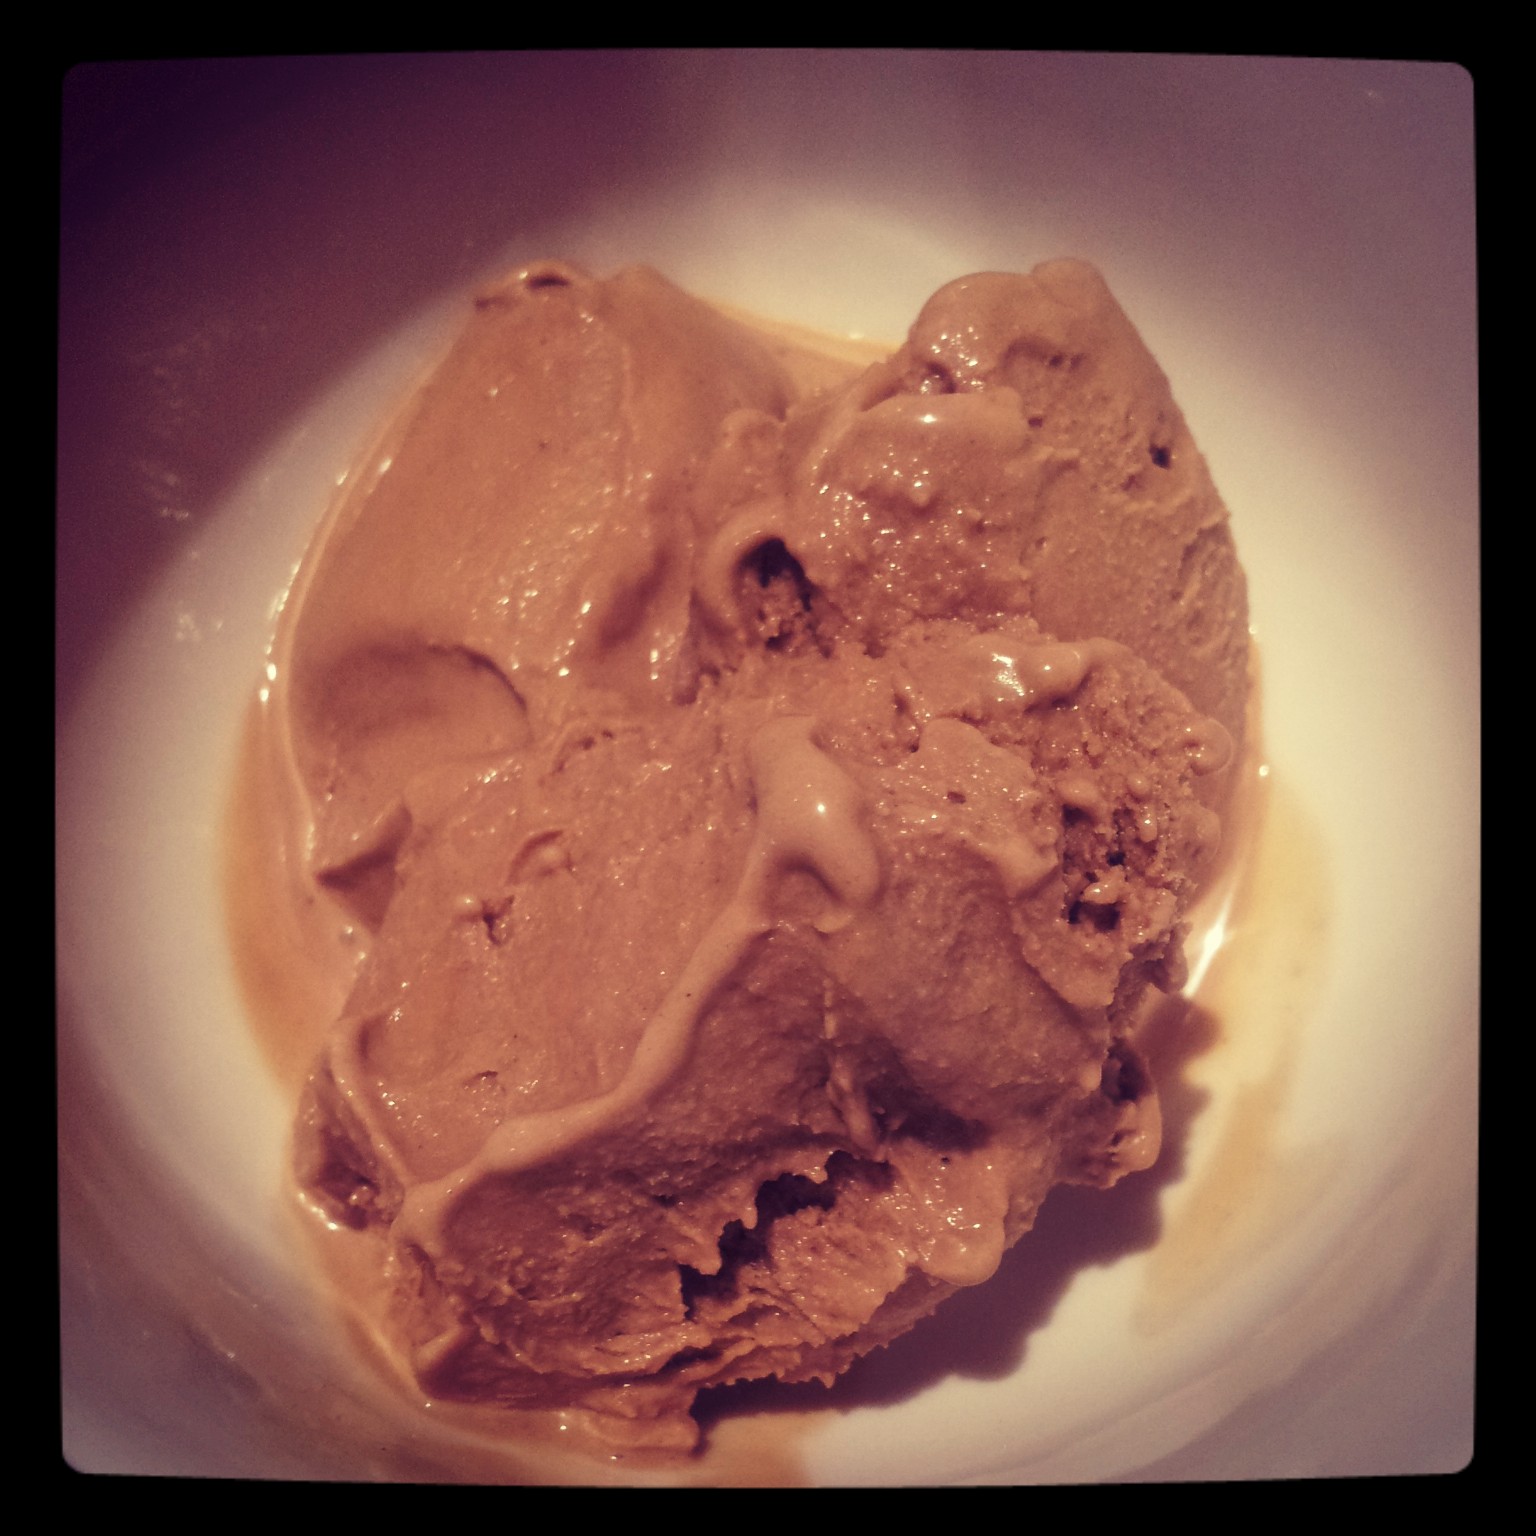
I didn’t eat it all myself. I promise! My friends came round for tea and we all quickly cleared our bowls of gelato which marks it as a clear success! It was smooth, creamy and extremely coconutty. Just my kind of gelato! I liked it so much that when I was washing up after my friends left I decided to start making some more custard, but this time I experimented with Italian Espresso Gelato instead.

Coconut Gelato - it didn't last long

Coconut Gelato – it didn’t last long

Home made Coconut Gelato  - extreme close up

Coconut Gelato – extreme close up

What I used to make  Italian Coconut Gelato (Gelato di Crema)

Coconut Custard

  • 1 x 400ml can of  coconut milk (which is equal to 1 and 3/4 cups)
  • 109ml of double cream (1/2  cup)
  • 55ml  semi skimmed milk (1/4 cup)
  • (you can use your own combination of cream/milk here to total  545 ml or 2 and 1/2 cups of liquid)
  • 5 egg yolks
  • 110g (or 1/2 cup) granulated sugar (I used vanilla infused sugar)
  • 80g (or 1 cup) desiccated coconut (add your flavour to infuse at this stage)
  • Keep 2 tbs of the desiccated coconut back to add to the soft set gelato before putting it into the freezer.

Coconut Gelato Method Summary

  1. Add flavouring and heat cream and milk until boiling
  2. Beat eggs and sugar together until fluffy
  3. Cool cream slightly
  4. Pour hot cream into eggs and sugar while continuing to beat the mixture
  5. Thicken the custard in a bain marie/pan until it coats the back of a spoon
  6. Cool the custard until chilled throughly
  7. Freeze the custard using ice cream maker for about 20 minutes until soft set
  8. Set the ice cream in the freezer for about 5 hours

Many thanks to Thomson Al Fresco who supplied the ingredients for me to make this Italian Gelato creation! If this recipe has whetted your appetite for all things Italian you might enjoy camping in the beautiful Lake Garda, Lazio, Tuscany, Adriatic Coast or the Venetian Riviera. I’m already dreaming of my next Italian adventure.

If you want to make another Italian classic you could try making your own Espresso Gelato, using the same method but a slightly different recipe.

Espresso Gelato 

  • 3 tbs coffee essence
  • 273 ml (1 and 1/2 cups) milk
  • 218 ml (1 cup) double cream
  • 1 tsp cocoa powder
  • 5 egg yolks
  • 110g (or 1/2 cup) granulated sugar (I used vanilla infused sugar)
How to make Homemade Espresso Gelato recipe

Homemade Espresso Gelato

100 Boozy Birthday Cupcakes and Counting

We have been busy bees recently. I put some of our wedding present vouchers to very good use and invested in a beautiful Candy Apple Kitchenaid Mixer. I have christened her Joni and she has already proven her weight in gold.

Introducing Joni my candy apple buttercream dream making machine Kitchenaid mixer

Introducing Joni my candy apple buttercream dream making machine

My 30th birthday was approaching fast and wanting to mark the occasion my friend Jill (who’s birthday just so happens to be the day before mine!) and I decided to have a little soiree at our local pub. Cupcakes seemed to be a good option for a gathering, so we didn’t have to worry about plates, knives and such like. It also meant that we could go a bit mad with the flavour combinations too.

What a lucky birthday girl I am with 2 surprise birthday cakes!

On my actual birthday! What a lucky birthday girl I am with 2 surprise birthday cakes from my mam and my sister. We’re not going to go hungry. EVER.

The week before our birthdays, Jill and I spent a merry evening baking everything in sight. Modifying Hummingbird Bakery recipes to our hearts content. It’s amazing what can be achieved in 3 hours by two 29 year old girls, armed with a Kitchenaid and a bottle of prosecco. We got very creative indeed.

How many cupcakes can 2 girls make in less than 3 hours whilst drinking a bottle of fizz??

How many cupcakes can 2 girls make in less than 3 hours whilst drinking a bottle of fizz?? There’s still more in the oven…

We baked well over 100 cakes and still made it to the pub afterwards to meet our husbands. I must admit we sampled rather a few along the way so not all of the cakes made it into our freezers to await their icing. It’s hard to resist when you’ve got cupcakes hot out of the oven dancing in front of your eyes.

The beginnings of Pina Colada Bundt cakes from a genuinely German Gugelhupf tin!

The beginnings of Pina Colada Bundt cakes from a genuinely German Gugelhupf tin! Soaking in white rum syrup

The following week we defrosted our cupcakes and spent an entire day icing the lot, with lashings of buttercream, glitter and ganache. The results were very well received by our friends and the bar staff! The Jasmine green tea cupcakes were a surprise success after I accidentally  emptied the entire bottle of Jasmine Extract into the cupcake batter… They are the most fragrant cupcakes I’ve ever created. Perhaps an acquired taste for some and definitely an excellent air freshener accessory.

Amaretto and Coconut Snowball cupcakes

Amaretto and Coconut Snowball cupcakes – my personal favourite. I shall be rolling many more cakes in coconut in the future

Our 30th birthday party cupcake table

Our 30th birthday party cupcake table! (From left to right; coconut mini bundt cakes, amaretto snowballs cakes, pina colada bundts, jasmine green tea, double chocolate, more jasmine green tea, amaretto sours, and peppermint cream cupcakes,)

Amaretto Sour Swirl Cupcakes

Amaretto Sour Swirl Cupcakes

Pina Colada Gugelhupf cakes

Pina Colada Bundt (Gugelhupf) cakes

Extremely fragrant Green Tea and Jasmine Vintage Rose Swirl Cupcakes (With obligatory birthday glitter and lustre powder)

Extremely fragrant Green Tea and Jasmine Vintage Rose Swirl Cupcakes (With obligatory birthday glitter and lustre powder)

Double chocolate Cupcakes complete with golden lustre, glossy ganache and white chocolate hearts

Double chocolate Cupcakes complete with golden lustre, glossy ganache and white chocolate hearts

Chocolate and Peppermint Cream Cupcakes

Chocolate and Peppermint Cream Cupcakes

Happy birthday to us! What a wonderful start to the new decade!

The Creative Cupcake Modification Method

I’m not entirely sure if this is the scientific way to create your own recipes but it seems to work for me. My basic understanding of creative baking is to find a recipe that works for you then add and subtract from it. Experiment to the extreme! My general guidelines are

  1. Don’t alter the specified oven temperature (unless you have to because you’re using a fan/non fan oven) cupcakes bake at around 170-180 degrees Celsius and should take about 20 minutes depending on the size of your cases
  2. Maintain the combination of wet to dry ingredients
  3. Use whatever is in your cupboards
  4. Feel free to double the quantities if you need to bake lots but be prepared to bake them in stages
  5. Naked cupcakes freeze really well and can keep for a month. Freeze them as soon as they’re cooled in freezer bags/Tupperware and this holds all of the moisture in sponge. Leaving you with a wonderfully moist cupcake when you choose to ice it later on.
  6. You normally need more buttercream than you think so again feel free to make a double batch!
  7. The more you beat buttercream the better it is.
  8. Feel free to experiment with shapes if you have a Madeleine tin, Gugelhupf or mini bunt tin they work really well too
  9. A squiggle of melted chocolate works wonders if you can’t be bothed to whip up buttercream to top your cakes and a sprinkle of coconut and glitter hides a multitude of sins

The Basic Cupcake Recipe

Makes 12-16 cupcakes (using cupcake not muffin sized cases)

For the sponge:
Rub together (using an electric whisk if you have one) the sugar, butter, flour salt and baking powder. When it all looks quite sandy beat in the wet ingredients including your choice of flavouring!

Then pour the smooth liquid batter into prepared cupcake cases in a muffin tin.
Bake for 20-25 minutes in the centre of the oven at 170 degrees celsius until golden brown and springs back when pressed. To be extra certain they’re cooked insert a cocktail stick and if it comes out clean it’s definitely done.

The Basic Cupcake Sponge Ingredients

  • 120g  (4½oz) plain flour
  • 140g (5oz/) caster sugar
  • 1½ tsp baking powder
  • A pinch of salt
  • 40g (1½oz) unsalted butter, at room temperature
  • 120ml (4½floz) milk
  • 1/4 tsp vanilla extract
  • 1 egg

Cupcake Roulette!
Choose from an array of flavour combinations such as

Green Tea

  • 3 Jasmine Green Tea bags steeped in 3tbsp just-boiled water (reduce the amount of milk by 3
  • Replace 30 ml of milk with jasmine extract

Vanilla

  • 1 vanilla pod
  • Replace caster sugar with vanilla flavoured sugar (if you have pre-prepared some but if not don’t worry!)
  • 1 tsp vanilla extract

Amaretto

  • Replace 40ml of milk with amaretto
  • You can also add almond extract for extra oomph

Amaretto Sour

  • Replace 40ml of milk with amaretto
  • Add 1 tsp lemon extract
  • Add zest of one lemon

Coconut

  • Replace 25g of flour with desiccated coconut
  • Use coconut milk instead of normal milk

Chocolate

  • Replace 20g of flour with cocoa powder

Lavender

  • Steep the milk in 1 tbs of dried lavender flowers overnight
  • Infuse the sugar with 2tbs of dried lavender flowers for a week
  • Sieve the lavender petals out of the sugar and milk before use
  • Blitz 1 tsp of lavender into the sugar before use

Rose

  • same as lavender but using dried rose petals
  • Replace 1 tbs of milk with rose water

Piña Colada

  • Replace 40ml of milk with Malibu
  • Replace 25 g of flour with desiccated coconut
  • Use coconut milk instead of milk
  • (soak cupcakes in rum syrup whilst still warm)

Chocolate Brandy

  • Replace 40ml of milk with brandy
  • Replace 20g flour with cocoa powder

Orange

  • Use orange extract instead of vanilla
  • Add orange zest

The possibilities are endless! Create your own flavour combinations!!

You could choose your own favourite liquor, (Gin?)  cordial (sasparilla, blackcurrant), extract (Orange Blossom, violet), and just follow this idea. I’m very tempted to create some Brandy Alexander cocktail cupcakes very soon…

Then to choose your topping to enhance your flavour combination even further…


The Basic Buttercream Recipe
Depending on your style of icing you may want to double the quantities of buttercream. Piping swirls and roses uses a lot more icing than creating a palette knife swirl.

  • 25 ml milk
  • 250g icing sugar
  • 80g unsalted butter, softened

Icing Flavour Options

Vanilla

  • 1 tsp vanilla extract

Amaretto Sour

  • Replace 25 ml milk with amaretto
  • 1 tsp lemon extract
  • Zest of 1 lemon

Coconut

  • use coconut milk

Peppermint

  • Use 1 tsp peppermint extract

The General Buttercream Guidelines

You can see here the rules are simple. Add whatever flavour extracts you like. Substitute milk for liquid or boozy flavourings.  Zests are good to add as they are dry so won’t effect the consistency of the buttercream. If your icing is looking a bit sloppy beat in some more icing sugar and return it to the fridge to set a bit if it’s too runny.

Use a piping bag and star shaped nozzle to pipe swirls,  Mr Whippy peaks, stars or roses onto your cupcakes. Or use a palette knife to smooth a swirl of buttercream onto your cakes.

Syrup

If you would like extra moist cakes you can add a syrup to the sponge whilst it’s still warm.

Tropical White Rum Syrup

  • 200ml white rum
  • 60g sugar

Warm the sugar and rum in a pan over a low heat. Simmer it until it’s reduced by half in volume. Once cooled pour over your cakes. Allow it to soak in before icing your cakes. Feel free to use other flavours too! Lemon juice, rose water, cordial etc make a really good syrup!

Colourings

Using a cocktail stick add a couple of drops of your food colour gel of choice and beat until its fully incorporated. You can always add more if needed.

If you want to swirl 2 colours together, split your buttercream in half. Colour each half whatever you fancy. Pipe one colour buttercream down one side of a piping bag and then pipe the different colour down the other side of the bag. You will then get a lovely swirl of colours on you cupcakes when piping the two colours simultaneously from the same bag!

Chocolate Ganache

  1. Heat up 300ml of double cream to just about boiling
  2. Take it off the heat
  3. Smash up equal amount of dark plain chocolate 300g
  4. Stir the chocolate into the hot cream until completely smooth
  5. Spoon a generous blob onto cupcakes and let gravity do the work to create a smooth level shiny ganache top

You could use white chocolate if you add more white chocolate to the mix as it contains less cocoa solids so it won’t set until there’s more chocolate than cream in the mixture.

  • 150ml double cream
  • 250ml white chocolate

Decoration
Arm yourself with a selection of…

  1. Sprinkles
  2. Glitter
  3. Desiccated coconut
  4. Chocolate shavings
  5. Hand made chocolate swirls (melt chocolate squiggle it onto some grease proof paper allow it to cool and hey presto fancy looking chocolate bits)
  6. Lustre powders
  7. Popping candy
  8. Pearls
  9. Cupcake wrappers (if you have some)

And go wild!

Cupcake Combinations That Work Well

  • Chocolate sponge and peppermint buttercream
  • Jasmine green tea sponge and vanilla buttercream
  • Chocolate sponge and chocolate ganache
  • Amaretto sour sponge and amaretto sour buttercream
  • Piña colada sponge and coconut buttercream
  • Amaretto sponge and coconut buttercream

45. Rosca De Reyes – Spanish Three Kings Cake

Rosca de Reyes - 3 Kings Cake

Rosca de Reyes – 3 Kings Cake

I’m so excited! I’ve been invited to join an online bake off with 4 amazing bloggers, including the wonderful Yasmin Lambert from the Great  British Bake Off! We’re all baking the Spanish festive bake, Rosca de reyes and the baker with the most votes will win £500 worth of holiday holiday vouchers! (which would come in very handy for our honeymoon which are still yet to arrange following our wedding in less than 3 weeks…) I’m so happy to also be able to offer you the chance to win  £50 of vouchers to spend on the very.co.uk Christmas Shop, perfect for finding those last minute Christmas gifts! My first ever competition on aroundtheworldin80bakes! 

If you would like to enter this competition all you need to do is vote for my Rosca de Reyes (aroundtheworldin80bakes) on the Cosmos Holidays website by leaving a comment at the bottom of the article and a 5 star rating. This would be very gratefully appreciated! You can see the full Rosca de Reyes in all it’s glory over on the Cosmos holiday website. The closing date is Wednesday 19th December. Then please let me know that you have voted by leaving me a comment on (any or all!)

This means I can then contact you if you are the lucky winner. I will choose one winner at random from all of those who vote for me. You could tweet something like “I’ve voted for @laurenprince #roscadereyes  to win£50very.co.uk vouchers http://aroundtheworldin80bakes.com #bakeoff #competition Vote to enter”

Now for the bake itself! I hope you like it!

Rosca de reyes  (Kings’ Cake) is a traditional Spanish  cake with an amazing story. It’s eaten on 6th January, the day that the 3 Kings (or wise men) reached the stable to visit Jesus.  This is also known as the religious holiday the Epiphany, a day where Christians celebrate the Son of God taking on human form as baby Jesus. In some countries this is the day that children open their presents rather than Christmas Day so this day definitely needs a special cake to celebrate!  A little figurine or a bean is usually hidden inside the cake to represent baby Jesus fleeing from King Herod who was trying to kill Jesus. Whoever finds the baby bean/figurine is blessed  as ‘King’ or ‘Queen’ of the banquet and should take the figurine to church with them on February 2nd. In Mexican cultures this person also has to throw the Epiphany banquet party for their families and friends the following year!

I’ve never eaten a Rosca de reyes despite all of our family holidays in Spain as a child. We always visited Spain in the Summer holidays where we contented ourselves eating ice cream and custard filled donuts whilst basking in the sun on the beaches instead. Some of our best family holidays were in Spain, so this recipe intrigued me. I’ve never attempted to hide things inside my cakes before and was unable to find a figurine in my house small enough, or that wouldn’t poison us all so I decided to make one out of sugar paste instead and hope that it doesn’t melt in the oven!

My marzipan interpretation of the baby Jesus...

My marzipan interpretation of the baby Jesus…

Looking for a suitable recipe I discovered there are quite a few variables. The Rosca de reyes is usually a ring shape or it could also be an oval (depending on how many people you’re baking for!). The festive dried fruits usually include wonderful reds, greens and oranges so you could use cherries, apricots, figs, cranberries, or mixed candied peel. The choices are endless.

This is essentially an enriched dough, shaped into a bejewelled festive wreath. It’s a bit of a cake/bread/pastry hybrid and stuffed with beautiful dried fruits.

Whizz up the flour and yeast

Whizz up the flour and yeast

If you’re using instant dried yeast you can throw it straight into your flour and mix it evenly through the flour. Using my Russian Doll measuring cups makes life a bit easier than weighing things out on the scales.

As it’s almost Christmas (we’re celebrating on 15th December this year as our wedding is just around the corner…) I wanted to make light work of this recipe. I struggle to knead dough for a long time, I’m simply not tall enough to put enough weight into it! So I whacked it all into my food processor to ease the process. If you don’t have a food processor you can mix it together by hand instead.

Grind up a star anise

Grind up a star anise

I whizzed the yeast and the flour together first to make sure the yeast is evenly distributed throughout the flour. Then while the food processor was running I added the dry ingredients first, the sugar, salt, cinnamon and ground star anise.  The spices really enhance the colour of the dough giving it a wonderful brown hue.

Rub in the butter

Rub in the butter

Once this is combined I popped the butter in and rubbed/blended it into the flour.

Rub in the butter until it looks sandy

Rub in the butter until it looks sandy

Followed quickly by the  beaten eggs, vanilla pod seeds and water. In the future I probably wouldn’t add any water as this made an extremely wet and sticky dough which meant my food processor went into over drive and actually caught fire! The poor food processor didn’t make it but the dough was thoroughly kneaded!


Beat in the eggs

Beat in the eggs


The food processor may screech a bit in protest but it can (usually!) knead the dough (using the dough hook) for a good 3 minutes before it starts to rock out of control and dance off the work top.

I had to add a little more flour in order to knead the dough by hand as it was more of a paste at this stage.

It was rather a sticky dough...


Once it becomes a firm dough it’s ready for a final knead on the work surface for 5 minutes or so until it bounces back when pressed lightly with a finger.

I had to bring out the cavalry to sort out this sticky mess - dough scraper!


Then to rest the dough for 2 hours in a greased and covered bowl in a warm place until it’s doubled in size. Or if like me you like to do things in stages feel free to let it rise slowly over night in the fridge and shape it at your leisure the next day.

A nice firm brown dough


When the dough has risen, punch it down and knead it thoroughly before starting to shape it into a ring or wreath. This really reminds me of my Swedish Tea Ring attempt. Roll it into a rectangle  about 30cm by 20cm. I oiled the board to stop the dough from sticking rather than dusting it with flour.

Roll it out to an even rectangle about 5mm thick

Roll it out to an even rectangle about 5mm thick

Spread the melted butter all over and give a generous coating to the outside edge of the dough.

Spread a generous coating of melted butter all over


I found I had an extra bit of dough which I trimmed off to make my rectangle extra straight. I used this to make another plaited version of Rosca De Reyes later on.

My second plaited Rosca de Reyes


Line the dough with an even covering of candied fruits, cinnamon and sugar.

Coat with sugar and spice and all things nice


Take your figurine/bean (or in my case a hand crafted marzipan baby Jesus) and hide him amongst the fruit.

Hide your figurine inside the fruit


Then roll it up into one long sausage, from the longest edge to the longest edge.

Roll roll roll your dough


Once you have you sausage shape you can add a smattering of melted butter to one end and coax the 2 edges together to form a ring. Feel free to pop a small greased pudding dish in the centre of the ring to ensure the ring has a hole in the middle as the dough rises.

The final sausage shape


A final egg wash and decoration with your chosen candied fruits, I used glace cherries and mixed peel, and it’s ready for the final proving.

Using lazy egg wash in a can (!) and dotting with cherries


Cover your ring with greased cling film to prevent it sticking and leave it for an hour to double in size on a baking tray greased and lined with greaseproof paper.

Bejewelled and ready to prove itself


After 40 minutes in the oven at 170 degrees C the Rosca De Reyes will have taken on a golden tinge and be firm to the touch. You can check it’s cooked through by tapping the bottom, of the ring, it should sound hollow.

Straight from the oven


Once it’s cooled completely I carried on decorating my Three Kings Cake. I’ve been saving my gold lustre spray for a special occasion and this seemed to be the perfect time to use it! I thought the gold would add a regal touch to the ring and additional symbolism as one of the 3 Kings brought gold as a present for baby Jesus. So I’m presenting a very gold Rosca de Reyes to you!

Then it seemed a bit too gold… so I added a sprinkling of marzipan stars with a dab of brandy on the back of each star to hold it in place. The original plan was to add just the one star, as the 3 Kings followed the star to Bethlehem to find baby Jesus in the stable, however I got a bit carried away with my cutters and made an entire starry night of marzipan instead. Resulting in a very decadent Rosca De Reyes!

A very decadent Rosca de Reyes - 3 King's Cake


With my left over dough I created a plaited Rosca De Reyes and smeared cinnamon, butter and sugar in between the plaits and dotted a few more glace cherries on the top. I hid one whole cherry underneath and tucked it into the dough.

A golden plaited Rosca de Reyes


Once it was baked I also gave it a liberal coating of edible gold lustre.

This bake feels so festive and is a wonderful cake to share with friends and family. It’s a bit like hiding a silver sixpence inside your Christmas pudding, waiting in anticipation to see who finds the baby Jesus inside their piece of bread. I loved this bake and think it may become a regular festive creation in my house. The egg wash gives the outside a fantastic bite to it. I love warming spices and this definitely packs a punch, with the cinnamon and star anise spices in the dough, carried through to the spicy sugary fruit inside. It is also rather reminiscent of a sticky Chelsea bun but even more festive and sparkly!

Cinnamon swirls - a slice of Rosca de Reyes


Marzipan is not traditionally found inside Rosca de reyes, but I adore it and try to fit it into everything that I possibly can. The addition of marzipan made the rosca de reyes slightly stollen-esque and what’s not to love about stollen? (It’s another of my favourite festive bakes – as if I don’t have enough already?!)  I try not to waste any ingredients  and wanted to put my left over marzipan to good use from icing my Wedding and Christmas cakes. You can adapt this recipe to suit your own favourite ingredients and play around with the shape too. Have fun and hope you enjoy it as much as me!


Things I used to make Rosca De Reyes:

Bake for approximately 45 minutes at 350 degrees F or 170 degrees C

  • 1/3 cup warm water (only add as much as you need)
  • 1 packet of yeast (7g dried instant yeast)
  • 4 cups flour
  • 1 cup sugar
  • 4 large eggs, beaten
  • 3/4 cup butter, room temperature
  • 1/4 teaspoon salt
  • 1 1/2 teaspoons cinnamon
  • 1/2 teaspoon ground star anise
  • 4 teaspoons vanilla extract

Filling

  • 2 tablespoons unsalted butter, melted
  • 1/2 cup sugar
  • 2 teaspoon cinnamon/mixed spice
  • A marzipan baby Jesus (or you can use a small figurine or toy or a bean)
  • Dried/candied fruit (about 2 cups of assorted fruit cut into small pieces  such as sultanas, orange/lemon peel, mango or cherries)

Decoration

  • Large dried fruits (so they don’t burn in the oven) such as glace cherries
  • Beaten egg (to wash over the whole ring)
  • Edible gold lustre spray (or glitter) if you wish!
  • Marzipan and star cutters

44. A Healthy Christmas Pudding? – a very English recipe

image

Can this be real? Is there such a thing as a healthy Christmas Pudding when you soak your fruit in booze and add copious amounts of sugar? Well according to the Great British Bake Off (series 2 cookbook) it is. So what’s the difference you may wonder? It’s breadcrumbs, would you believe and no suet!!

image

Obviously I can never leave a tried and tested recipe alone so I accidentally modified it… I decided to make it nut free, adding the equivalent amount of dried fruit in place of the nuts to soak in the booze. Then promptly forgot about my decision and added the nuts as well. This will surely be an extra fruity pudding!

I have only attempted one Christmas Pudding, an original Bero recipe, full of suet and other wonderful stuff. However it didn’t cook all the way through despite it’s initial 3 hours of steaming and the additional steaming on Christmas Day itself.

I got a bit carried away when purchasing fruit for my enormous wedding cake   (which actually turned out to be a good thing – it’s a LONG story- but in a nutshell I ruined 3 cakes in the process of baking my 5 tiers so had to bake 8 fruit cakes in the end!) Even with the additional 3 cakes bakes I still had enough dried fruit to bake 2 Christmas Puddings! Hurrah! (I also have plans for my rather sad 3 wedding cake tiers, they will not go to waste!)

image

As with all good festive fruit recipes I started with soaking the fruit in Booze, Brandy to be exact, along with some lemon juice. The recipe only requires a soak over night but I decided to soak it in a tupperware pot in the fridge for a few days instead. Surprisingly the most effort in this entire pudding is the weighing of ingredients and bread crumbing. (Totally discounting the watching of the pot bubble for 3 hours of course…)

image

The breadcrumbs required a little preparation so a quick blast in the hello kitty toaster and a whizz with the blender makes some lovely breadcrumbs and decorates the kitchen beautifully in bread dust.

Whilst the bread is toasting you have time to whisk together the butter, honey and sugar until light and fluffy. Then to whisk in each egg individually. The more you whisk the lighter the pudding, so whisk away!

wpid-2012-11-25-18.16.09.jpg

Whisked up and fluffy butter, sugar, honey and eggs with a smattering of grated apple

Then to stir in the grated apple, spices, (nuts) and brandy soaked fruit.

Stirring in the spices, nuts and grated apple

Stirring in the spices, nuts and grated apple

With the grand finale stirring in the toasted breadcrumbs along with the dried fruit.

image

This forms quite a pale and loose mixture Once it’s all mixed together well it’s ready to be spooned gently into your pre prepared greased pudding bowls.

image

This recipe is enough to make two Christmas puddings. I used a 1lb bowl and a 3/4 1 lb. bowl.

image

Fill the pudding basins until at least 3/4 full and make sure the pudding is level by pushing the mixture level with a spatula and tapping the bowl gently on the worksurface to release any air bubbles.

image

Then for the exciting bit! I’ve read so much about wrapping puddings in greaseproof paper with a pleat (a double fold about an inch wide) in it to allow room to expand as the pudding steams, but never before have I actually had a go at it!

image

Both puddings needed a lid made out of a layer of greaseproof paper and tinfoil (both with wonderful pleats) before being trussed up like a turkey in lashings of my trusty cotton string.

image

There is definitely a knack to this technique. My theory is always to tie stuff as tight as possible, it needs to be water tight, (you don’t want to drown your pudding when you submerge it in your pan of boiling water) and when in doubt add more string and tin foil. I added a full coat of tin foil, wrapping the pudding basin from the bottom to ensure the water couldn’t seep into the pudding. It seemed to do the trick. I added an additional length of string, tying it to the string around the edge if the puddings to create a handy handle for lifting out in and our of the pot too.

image

Dinner plate face down in the pan

I had planned to economise and steam both puddings together however I failed to measure the pan…. So 2 separate pans were required to steam the little beauties.

image

Pudding basin balanced on top of the plate inside the pan

I popped a dinner plate (face down) into my largest pan and a saucer into my smaller pan to balance the puddings on. I boiled the kettle and carefully poured the boiling water into each pan until it reached 2/3 of the way up the side of the pudding basin. Then to pop on the pot lid (an essential bit of the steaming process to keep the heat and moisture in) and let the puddings steam gently in the simmering water. It’s a good idea to allow some of the steam to escape by creating a vent (I tilted my pan lid and as my other pan lid was broken many moons ago I used even more tin foil with a hole in the top to create a lid) This takes about 3 hours on a low heat. I had to keep my eye on the pans and top up the water a couple of times as a pan should never be left to boil dry (this can cause the pan to explode!). So please be careful! My pans and plates made a few worrying noise over the next few hours, clattering about so perhaps a smaller plate would be a better idea to avoid the rattling!)

image

Double Bubble – 2 pans steaming 2 puddings simultaneously

After 3 hours remove the puddings from the pans and allow to cool. Take off their tin foil and greaseproof paper and wrap them with a fresh coat. This will help to create a seal and prevent any mould from forming on your lovely puddings. I placed a clean saucer on the top of mine to weigh down the paper and create a good seal.

image

Freshly steamed and cooled pudding. Ready for a tin foil coat and a sleep in the fridge

These puddings will keep for up to a month in the fridge or up to 3 months in the freezer, but once defrosted they will need to be eaten within a week. If you were making a traditional pudding with suet they can be kept for about a year to mature so you can make them well in advance! I’ve just read that freezing your pudding helps to speed up the maturation process. So this could be a good option if you haven’t had a chance to prepare it in advance. My puddings are currently having a snooze in the fridge until 15th December as we’re celebrating Christmas a little early in the Prince household! I may even give them both a little drink of brandy to help keep them warm for the next 3 weeks. 🙂

The puddings looked a little paler than I expected after their 3 hours in their steam bath, I think this is due to the breadcrumbs and lack of flour. But I could tell that they were done as one pudding had shrunk back slightly from the side of the basin.  Unfortunately I can’t tell you how they taste yet, as I need to steam them for 3 more hours on Christmas Day (or 15th  December in my case – some of us have a wedding to prepare for and a 5 tier cake to finish decorating!) I will pop back to let you know how they turn out

Things I used to make Healthy Christmas Puddings 

  • 70g dried apple
  • 330g sultanas
  • 200g mixed peel
  • (total 700g of dried fruit – any combination could be used! I added more fruit to replace the nuts if you wanted to make a nut free version just omit the nuts below)
  • Zest of one grapefruit ( I had ran out of oranges so replaced this with the only citrus fruit I had to hand…)
  • 5 dessert spoons of Vanilla Brandy (to soak the fruit in)
  • Juice of 1 lemon (to soak the fruit in)
  • 50g sliced blanched almonds (I accidentally added the nuts which I had added more fruit to compensate for -you could reduce the amount of fruit you use by 100g if you would like to include the nuts?!)
  • 50g ground almonds
  • 75g brown sugar
  • 75g unsalted butter
  • 75g runny honey
  • 2 eggs
  • 1 medium apple grated (with  the skin on)
  • 125g toasted white breadcrumbs
  • 1/2 teaspoon all spice
  • 1/2 teaspoon cinnamon
  • 1/2 teaspoon ginger

(I heavily adapted this recipe to suit what I had in my cupboards. The original included pine nuts and fresh figs, so feel free to play around with the ingredients, your favourite fruit and nuts and what you can afford to include!)

  • 2 pudding basins (1lb each)
  • tin foil
  • greasproof paper
  • 2 saucepans and 2 saucers
  • Steam for 3 hours on a low heat
  • Refrigerate for up to one month or freeze for up to 3 months
  • On the day you wish to eat your pudding steam for 2 hours on a low heat before serving

image