A Christening Cake with a history. 3 years on our final tier of wedding cake transformed.

Christening cake. Two tiered iced fruit cake with duck egg blue polka dots and bunting

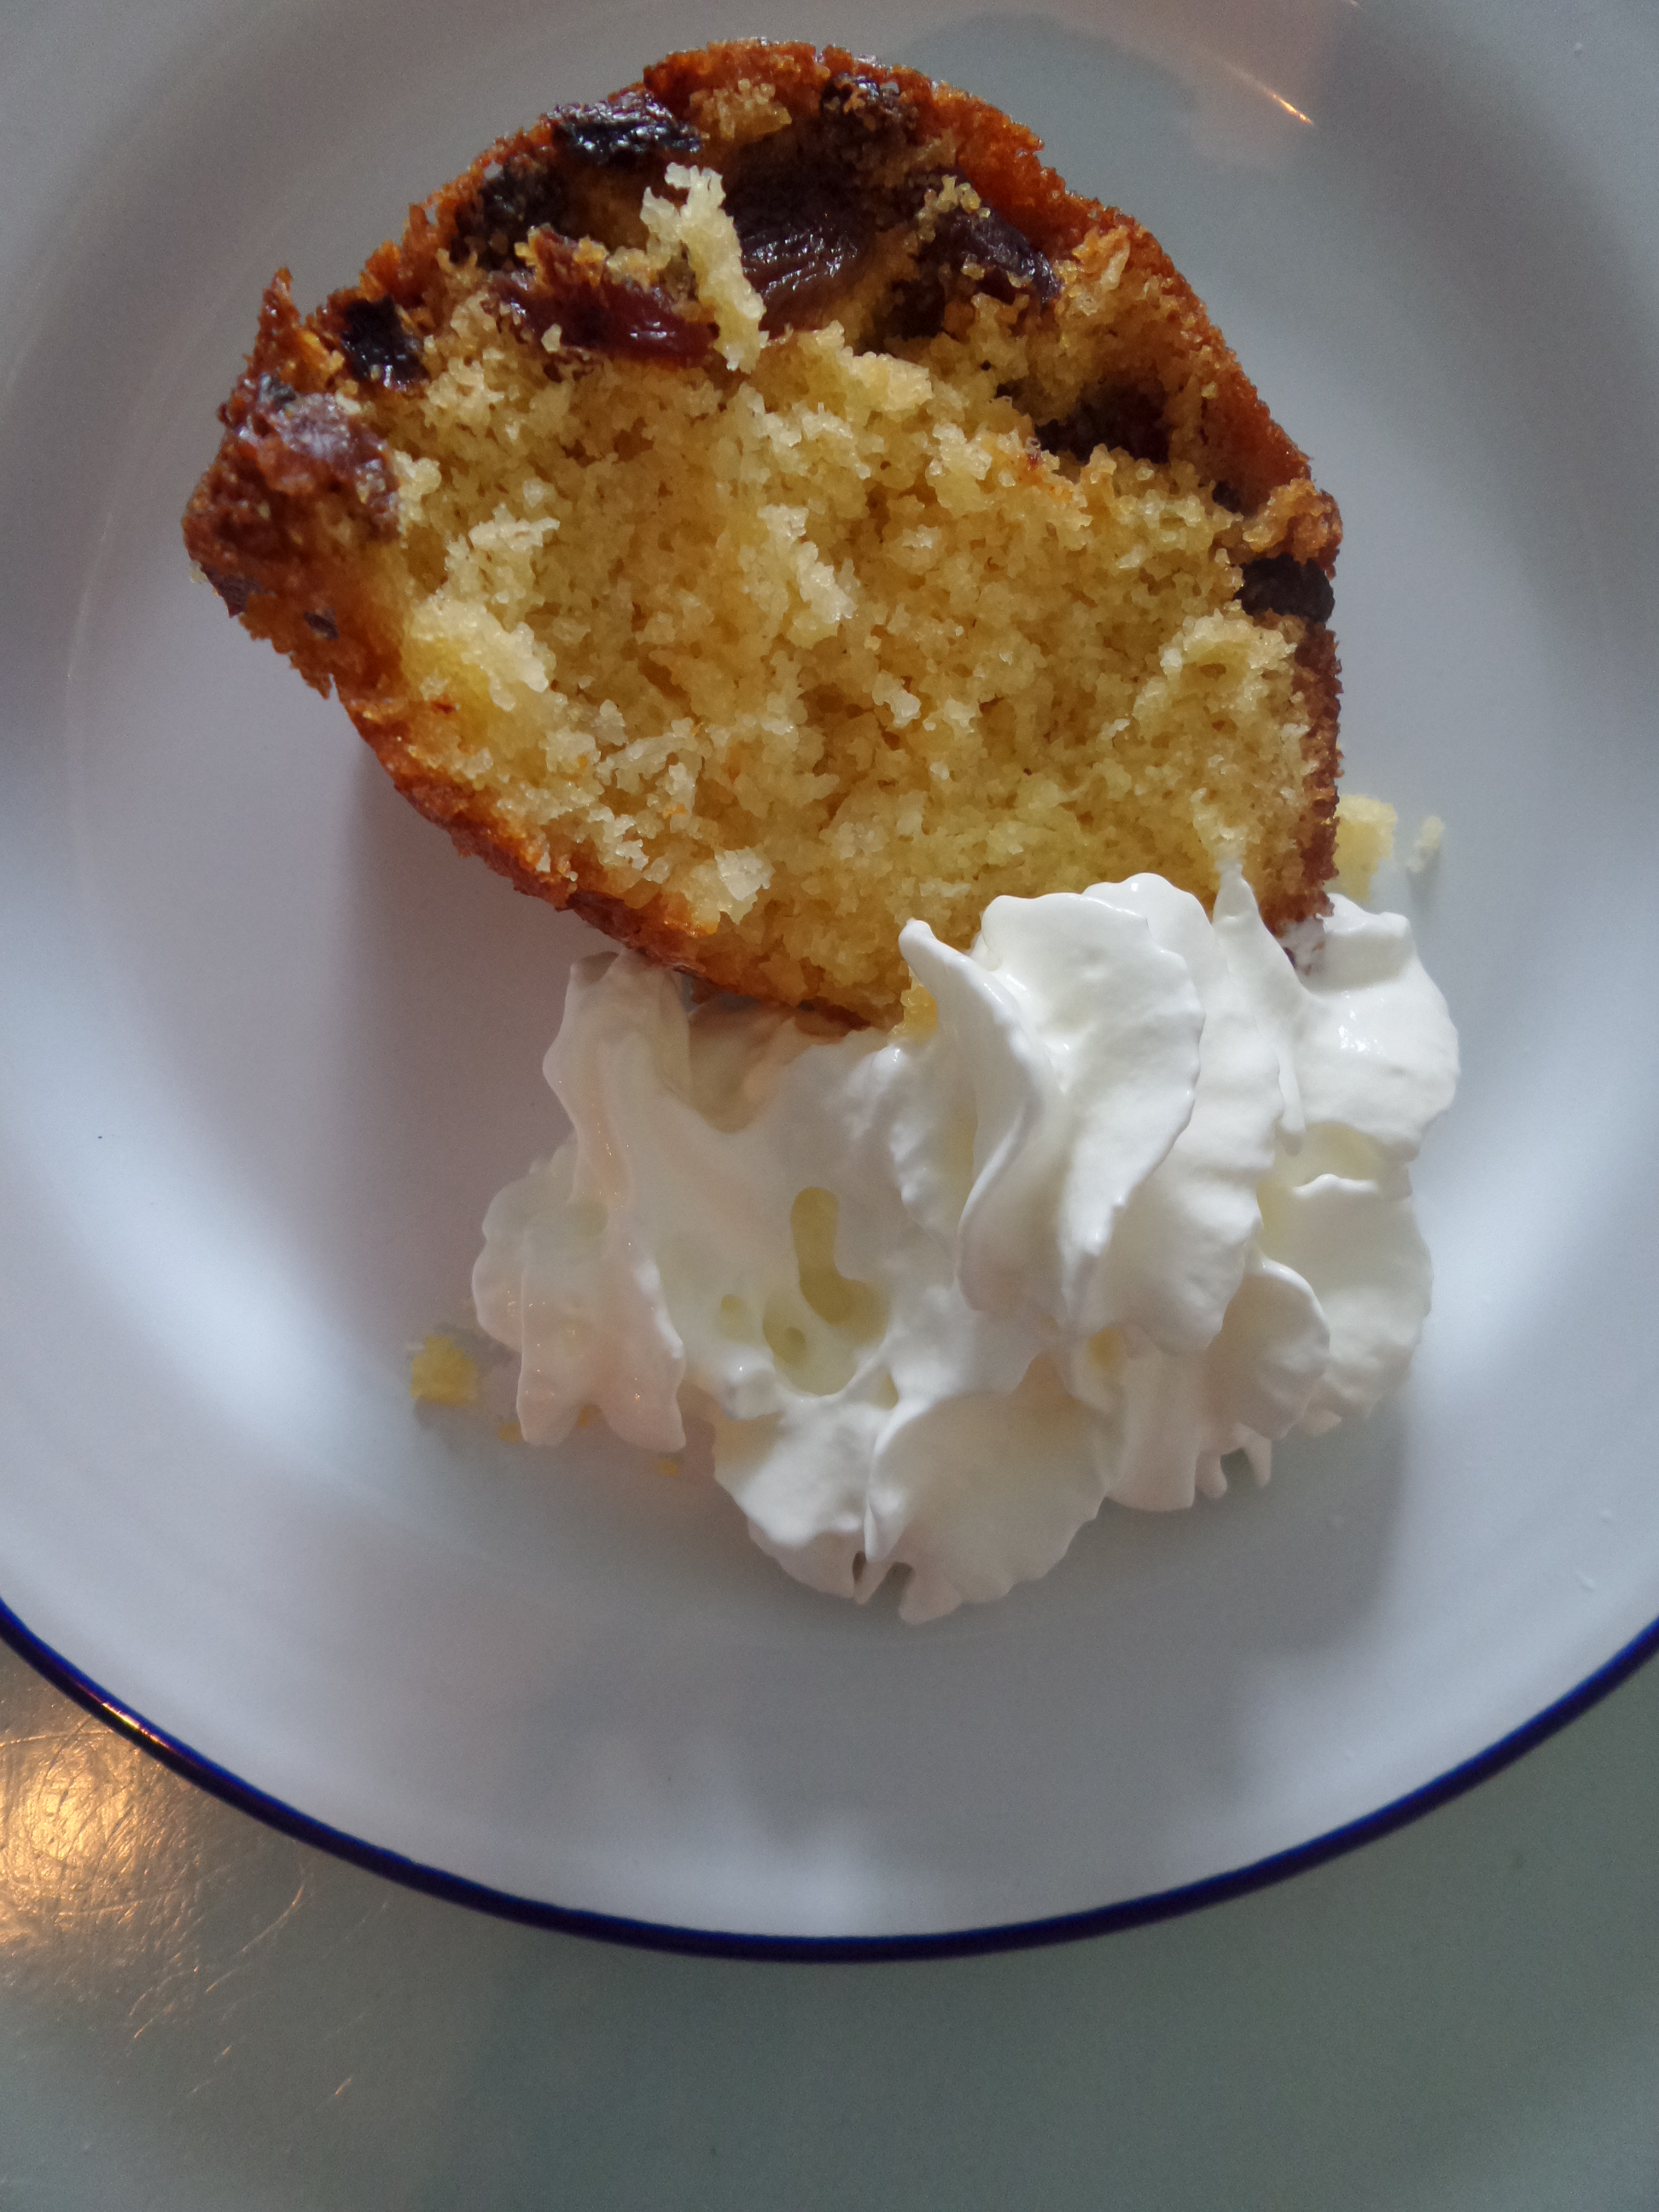
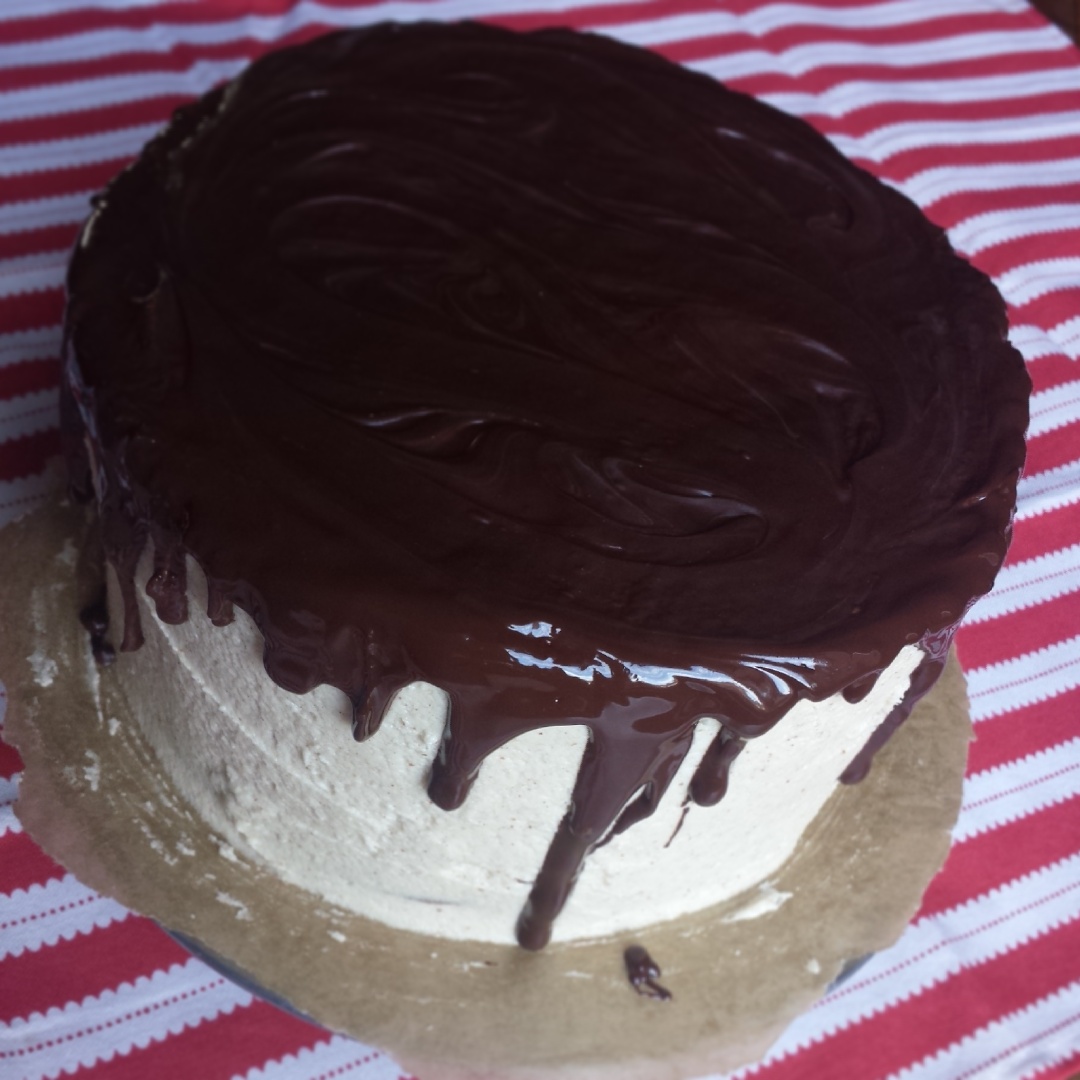
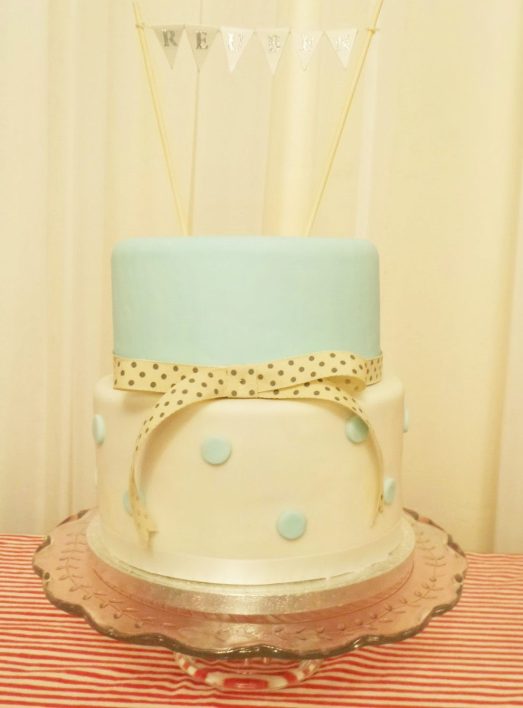
Christening cake with a history. In a previous life it was a tier in our wedding cake. 3 years on it’s had a make over and tasted great!

As you may recall I got a bit carried away when baking our 5 tier fruit cake for our wedding almost 3 years ago. I ended up baking 8 cakes in total (!) We managed to eat most of the cakes but had one 7 inch round cake left.  So I carefully wrapped the cake in greaseproof paper and tin foil and popped it in a biscuit tin and put it in the back of the  cupboard and forgot about it. It managed to survive our house move and kitchen renovations too!

image of 3 year old fruit cake preserved in brandy ready for transforming into christening cakle

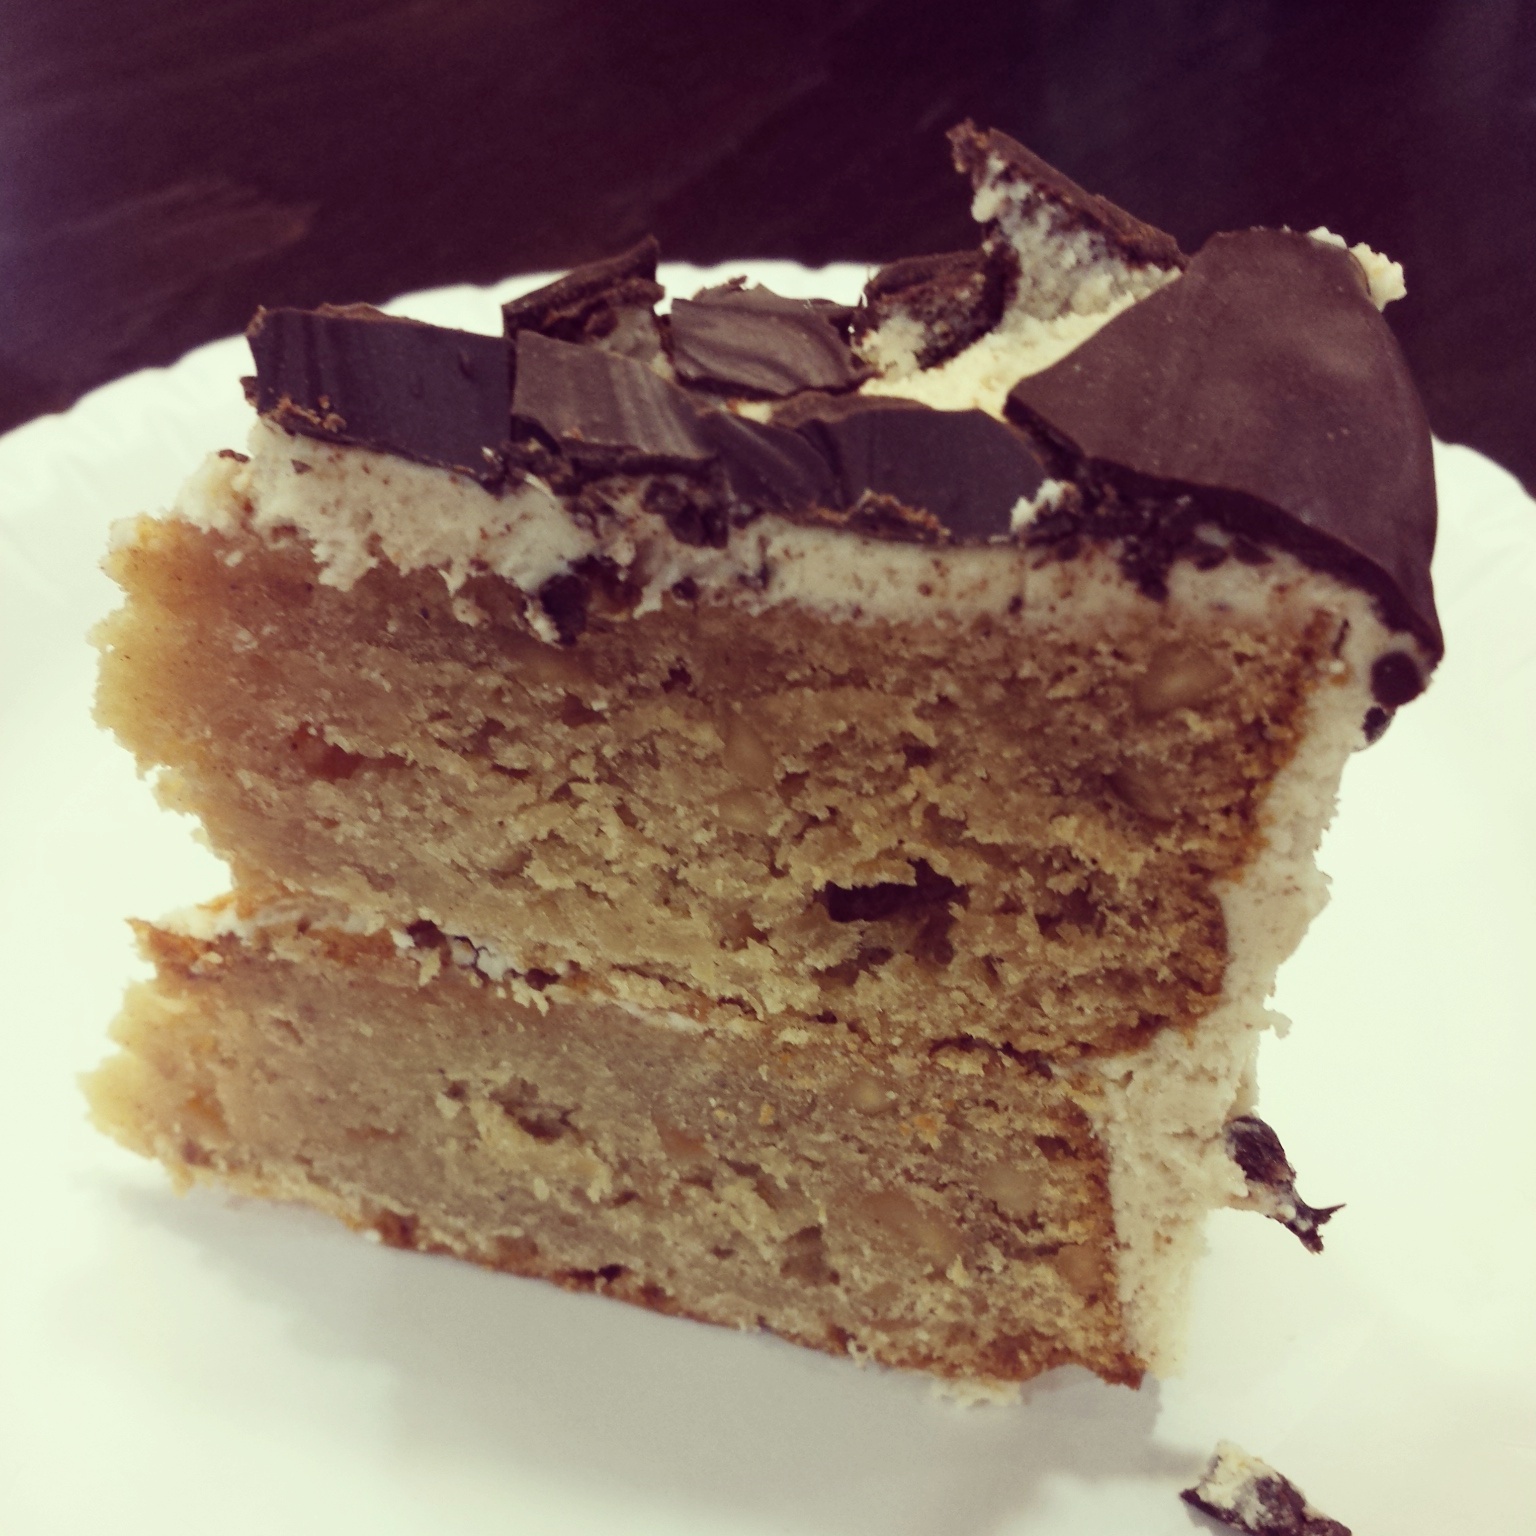
The original 3 year old wedding cake, full of booze and deeper in flavour and colour.

It’s a well known English tradition that you save the top tier of your wedding cake for the christening of your first child. Fruit cake keeps extremely well, provided you give it a good drink of booze every now and then. It also needs to be kept in a dry cool environment.  It’s important to store it in a tin,  not a plastic container, as the cake will sweat in plastic. And sweat means mould which you really don’t want! A layer of greaseproof paper and tin foil helps to stop the cake from drying out and keep the booze, which preserves the cake, in.
Every time I moved the cake (about once a year) I had a quick peek in the foil and topped it up with the orange brandy liqueur that I used in our original wedding cake. Drizzling just enough booze over the top of the cake to make it slightly damp (about 2-3 tbs). After 2 years I replaced the paper and foil.

Cutting the cake!

The actual wedding cake in it’s moment of glory.  (Any excuse to include another photo of it…)

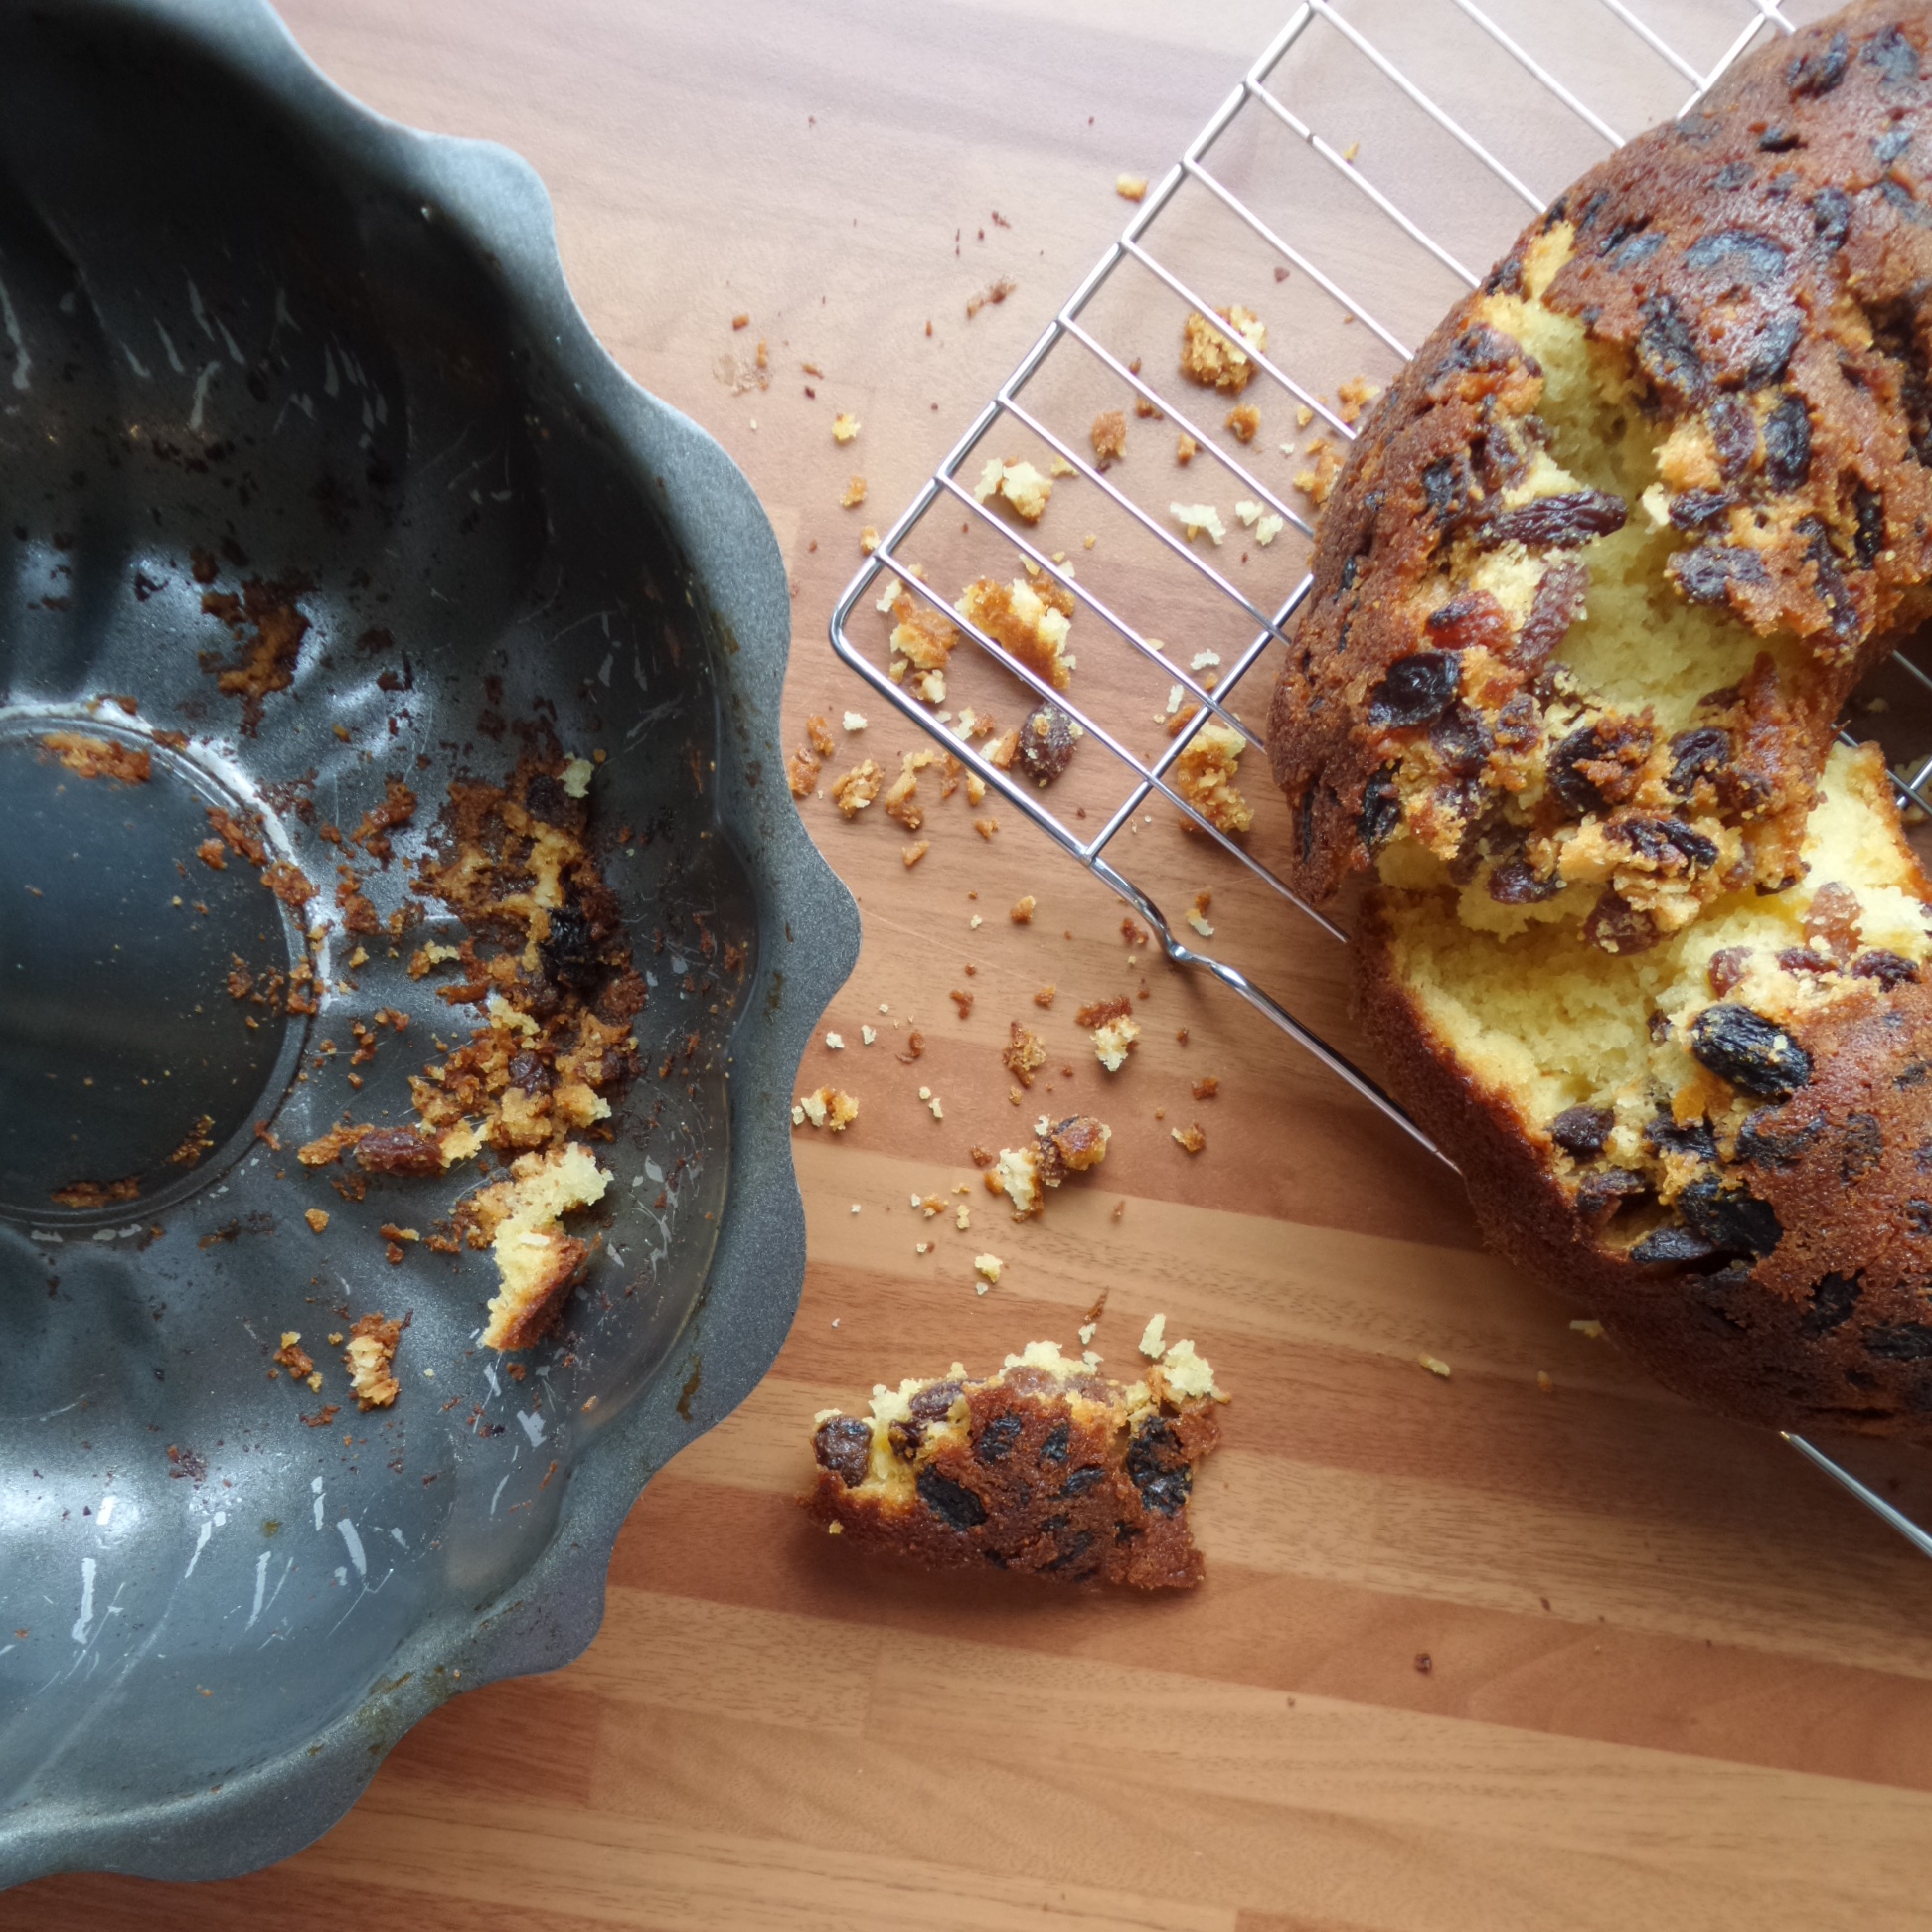
I was a bit nervous about feeding a 3 year old fruit cake to my family but on close inspection the cake looked absolutely perfect just much darker than when I first baked it from absorbing all that delicious brandy.

I had such high ambitions and a million ideas on how to decorate the cake but with very limited time and a 5 month old baby who needs feeding every hour or so my ability to make fondant hot air balloons and elephants totally escaped me. And to be honest sugar craft has never been my strong point!

IMG_20151010_153818.jpg

I gave up sugar crafting and instead ate a lump of marzipan with a cup of tea.

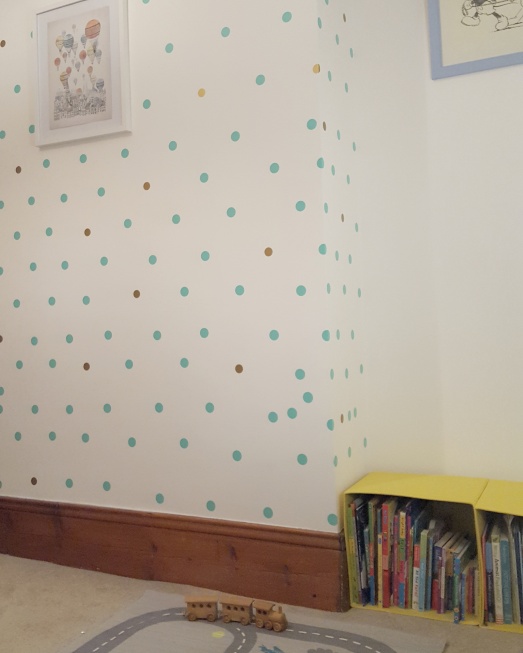
As a compromise I opted for the smoothest finish I could manage of white fondant with duck egg blue polka dot design (much simpler and quicker!) And a year later I realise I’ve clearly got an unhealthy obsession with duck egg blue polka dots as I’ve just decorated the little one’s room in them too!

Image of duck egg blue and gold polka dots on bedroom wall

Polka dots galore

And don’t tell anyone but I cheated and bought a polystyrene 6 inch round to decorate for the top tier to give extra height and interest! As I was baking loads of chocolate cupcakes, flapjacks and brownies for my non fruit cake loving nieces and nephews I didn’t want to bake another round cake to ice as sponge cake can’t be iced a month in advance!

Our traditional English christening cake. 3 year old wedding fruit cake

Our traditional English christening cake. 3 year old wedding fruit cake

I iced the fruit and fake cakes a month in advance to give it a chance to dry and set. Making the cakes more durable and easy to transport. I iced them directly onto half inch thick drum cake boards for extra height with a layer of marzipan and fondant.

To hide any rough edges I pinned white ribbon into the drum boards around the edge of the cake. And found some beautiful grey polka dot ribbon that my friend gave me which worked perfectly to make a decorative bow on the top tier. As the cakes were on their drum boards I used dress making pins rubbed with brandy to pin the ribbon directly into the board without fear of the pins rusting.

Once the cakes were iced, buffed and smoothed (method here) I dabbed the small fondant polka dots (cut out with the round end of a fine piping nozzle) with a spot of brandy to help it adhere to the fondant.

I stored the cakes in cardboard cake boxes to protect them and help them dry and then all I had to do was make the bunting cake topper using some glitter sticker letters and paint my cardboard letters. So you definitely know our little one’s name!

I was so impressed with the cake. It actually tastes better than I remember. The orange brandy really popped and had intensified throughout the cake which was moist and rich. Fruit cake definitely gets better as it ages. The more mature the better. I’m so pleased I saved the cake. Not only did it save me from having to bake one whilst clutching a small baby but I managed to slice it into half inch fingers and feed our 50 family members and keep a couple of pieces for me to enjoy and savour later on!

Traditional, tasty and time saving. What’s not to love?

Liked this post? You can read about our epic wedding cake adventure here…

Part 1 – My 5 tiers of fruit wedding cake – My biggest booziest cake yet 

Part 2 – How many sugar flowers does it take to make a wedding cake?

Part 3 – Where to start icing a 5 tier wedding cake?

Part 4 -The Final Frontier – Decorating & assembling my 5 Tier wedding cake

69. Ukrainian Sweet Chestnut Babka

Sweet Chestnut Babka recipe

Sweet Chestnut Babka

Seinfeld introduced the idea of the Babka to me. It’s an enriched sweet dough usually flavoured with chocolate popular in Eastern Europe. The episode focuses on Jerry and Elaine’s desperation to get their hands on the last Babka in the bakery. I’ve wanted to find out what all the fuss was about for ages. It was definitely worth the wait.

Sweet Chestnut Babka recipe

Sweet Chestnut Babka

I love how beautiful the Babka looks in all it’s braided glory. Dark brown sweet chestnut stripes peeking through the sweet dough, glistening in their honey glaze. I also love how complicated and impressive it looks too! I’ve plaited bread before, before but this was my first attempt at a braid and it’s not as difficult as you’d think.

Traditionally Babka, which means Grandmother in Polish, is a comforting bread flavoured with chocolate and baked at Easter time. As I like to do things differently (and I had ran out of chocolate) I found a tin of chestnut paste in the cupboard and thought I would put it to good use.

Babka swirls

Babka swirls

It’s absolutely delicious with it’s soft light texture and not too sweet, although you can add more sugar if you wish. I added cocoa powder to my chestnut paste along with poppy seeds to give a nod to the traditional chocolate and nut versions. The cocoa added depth to the chesnut paste and poppy seeds feature heavily in many European bakes and give a lovely crunch.

Having never baked with chestnut before, I was so happy with the result. I bought the tin on an impulse and it’s lay at the back of the cupboard forgotten until now. It’s an unusal flavour, rich nutty and rather savoury. Do check your can to see if it’s sweetened or natural. If unsweetened you’ll need to add sugar to you get your preferred level of sweetness. You could add chocolate chips, or use chocolate spread or nutella (or anything you fancy!) if you prefer.

How I made my Sweet Chestnut Babka

  1. Mix ingredients together til fully incorporated
  2. Knead for 10 mins until the dough is smooth and springs back when pinched
  3. Place in bowl, cover with cling film and leave to prove for 1-2 hours till doubled in size.
  4. Knock back the dough.
  5. Knead lightly on oiled work surface and roll out to a rectangle approx 5mm thick.  30 cm by 20cm.
  6. Spread even layer of chestnut paste over the dough and sprinkle lightly with Poppy seeds and light brown sugar.
  7. Roll dough up from long edge to long edge to form a sausage of dough with a spiral of chestnut running through the centre
  8. Cut the dough sausage with a sharp lightly oiled knife lengthways all the way along the sausage. Cut all the way through the dough to spilt it down the middle and expose the filling.
  9. Seal the strips together at one end
  10. Twist the two halves together,  folding one half of the dough over the other keeping the stripes of filling in the outside
  11. Seal the other two ends together to form a braided ring. You can trim the ends of the Babka with sharp knife to seal the twists together before joining the ends to form a ring
  12. Lift carefully onto a greased and lined baking sheet.
  13. Cover with greased cling film and prove for 1-2 hours till doubled in size
  14. Bake for 25 minutes at 200 degrees Celsius.
  15. Brush all over with honey syrup whilst still hot
  16. Cool and eat!

Things I used to make my Sweet Chestnut Babka

Dough

  • 350g strong white flour (you could use all white strong flour if your prefer)
  • 115g strong wholemeal flour
  • 25g butter
  • 1 tablespoon sugar
  • 1 tsp salt
  • 1 1/4 tsp instant yeast
  • 300ml milk
  • 1/2 tsp vanilla extract
  • splash of water and vegetable oil if needed to bring the dough together into smooth ball

Sweet Chestnut Paste

  • 300g chestnut puree (unsweetened)
  • 30g cocoa powder
  • 50 g light brown sugar
  • splash of milk to mix the paste together until smooth and spreadable (not too runny or thick)
  • *1 tbs sugar to sprinkle over paste
  • * 2 tsp Poppy seeds to sprinkle over paste

Honey Syrup

  • 2 tbs runny honey
  • 30ml water
    boil gently for 1- 2 minute to thicken syrup

67. Peruvian Corn Cake

The imperfect yet delicious Peruvian Corn Cake

The imperfect yet delicious Peruvian Corn Cake

So not all cakes are perfect. Despite the rather rustic appearance this Peruvian Corn cake it is extremely delicious. It’s traditionally eaten in coffee shops with enormous amounts of whipped cream and adorned with cherries. As I was transporting this to Cake Club at The Cookhouse I had to make do with squirty cream in a can…

Squirty cream in a can masks all manner of sins

Squirty cream in a can masks all manner of sins

You’d think by now, 67 bakes in to my around the world in 80 bakes challenge I’d be getting pretty good at this baking malarkey. Alas I still have the odd disaster and ruin a cake or two.

Is it because I can’t resist tampering with the recipe?  Is it because I’m slap dash in the kitchen?  Or is it because the sultanas all sank to the bottom welding the cake to the tin meaning I had to hack at it with a sharp knife to prise the last half from it’s bundty prison?

Perhaps I was a bit too roough with the Peruvian Corn Cake?

Perhaps I was a bit too roough with the Peruvian Corn Cake?

I guess it’s a combination of all 3 to be honest. Nevertheless I took it to cake club to share with my friends and enjoyed an enormous slice of it smothered in whipped cream. Which hides a multitude of sins and disguises the broken bits.

Shhh no one will notice it's a cake of two halves

Shhh no one will notice it’s a cake of two halves

The Peruvian Corn Cake is infused with Star Anise and stuffed full with coconut and plump sultanas.  It’s a perfect crumbly cake to accompany a strong cup of coffee.

The stars of the show - Star Anise seeds and Pink Himalyan Salt ready for grinding

The stars of the show – Star Anise seeds and Pink Himalyan Salt ready for grinding

Cornmeal gives the cake a wonderful golden yellow hue and an interesting texture.  Light yet crumbly to the touch with bursts of sweet moisture from the sultanas.

I’m a big lover of fruit cake and bundt cake and coconut and spice so this is an absolute winner for me. I bet if you soaked the sultanas in a little rum beforehand it would be sublime.

If you’re not a dried fruit fan feel free to leave the sultanas out (and you might have more joy getting the cake out of its tin!)

Beat the butter and sugar together until light and fluffy

Beat the butter and sugar together until light and fluffy

Being lazy I whacked everything into my kitchenaid knowing full well that if you want to distribute your dried fruit evenly you should roll it in a little flour first and fold it into the batter. Alas I was hasty and missed this step so I had sunken sultanas.  Although the cake batter is very fluid so I doubt it would suspend sultanas throughout the cake. Gravity is inevitable.

The beaten batter

The beaten batter

I adapted this recipe from a wonderful book which could have literally been made for me. Cakes from Around the World.

wpid-img_20140901_182046.jpg

Things that I used to make my Peruvian Corn Cake

  • 200g caster sugar
  • 30g butter or margarine (butter would be better if you have it)

Step 1: Beat together the sugar and butter until fluffy

  •  3 eggs

Step 2: Then beat in the eggs one at a time adding a little of the flour if it starts to spilt.

  • 240g Fine milled corn meal (not to be mistaken for corn flour which is white not yellow). If you only have coarse corn meal blitz it in the blender to make it fine milled.
  • 20g (2tablespoons) Baking powder
  • 40g plain flour
  • Ground star anise (I used 6 seeds from whole star anise or you could use 1/2tsp of ground star anise powder)
  • 40g desiccated coconut

Step 3: Measure all of the flours and spices together. Beat in a third of the dry ingredients followed by a third of the oil.  Repeat until all of the flours and oil is incorporated into the batter. Don’t forget to scrape the sides of the bowl down too!

  • 80ml olive oil (it’s supposed to be corn oil which I didn’t have but sunflower oil would also be a good substitute)

Step 4: Roll the sultanas in a little flour and fold them gently into the batter. (or of you can’t be bothered to dirty another spoon beat them in gently with your mixer there’s so much baking prefer in this cake it’s bound to rise so you probably don’t need to treat it too delicately worrying about keeping the air in the batter. )

  • 220g sultanas (golden if possible but they’re more expensive so I just used normal ones)

Step 5: Pour your cake batter into a thoroughly greased bundt tin.  You could add a little flour too for good measure.

Step 6: Bake in the centre of the preheated oven for 45 minutes at 190 degrees Celsius (fan).

Step 7: Allow to cool before attempting to coax it from the tin. Slice and smear with whipped cream. Eat enormous wedges with strong coffee!


2 Egg Lemon Almond and Elderflower Cake

Lemon, Almond and Elderflower Drizzle Cake recipe

Lemon, Almond and Elderflower Drizzle Cake

What do you do with your last 2 eggs? Boil them? Fry them or cake them?

I was frantically looking for a quick summery cake to bake but I only had 2 eggs left. Every recipe I turned to called for 3 so I decided to create my own cake with what I had to hand and share it with you.

Lemon, Almond and Elderflower Drizzle Cake recipe

Going, going, gone! Summery surprise birthday drizzle cake

You may also notice the new addition to our kitchen… My brand new double oven! I’m absolutely over joyed with it. This is only it’s second cake and I’m struggling to adjust to its efficency. I can actually put a cake in and trust it to do as it’s told! An uncharred cake has been a rare sight in our house for quite some time!

The new addition to my kitchen. Super Hans loves it too

The new addition to my kitchen. Super Hans loves it too

Things I used to make my 2 Egg Lemon, Almond and Elderflower Cake

  • 115g margarine
  • 175g sugar
  • Grated zest of 1 lemon
  • 1tsp lemon oil extract (optional)

Beat together until light and fluffy then add

  • 2 eggs

Beat until even fluffier and it increases in volume (add a little of the flour if it starts to split). Then add.

  • 1 tsp baking powder
  • 175g self raising flour

Beat/fold in. Then add

  • 5 tbs almond milk (or any milk you prefer)
  • 50g of mixed candied peel (you could substitute this for other dried fruit or fresh berries)

Beat/fold in until smooth and the batter reaches a fluffy thick dropping consistency.

Pour the batter into a greased 6 inch round cake tin. (Or a tin of your choice – adjust your baking times accordingly – smaller tin reduce would produce a thicker cake so it may take longer or a larger cake tin wil produce a thinner cake and should take slightly less time to bake). I poured one inch of batter into my tin and had enough left to make 4 small muffins. level and smooth the top with a spatula and sprinkle the top with flaked almonds.

Bake 180 degrees c for 40 minutes I baked the additional muffins for only 14 minutes.

Whilst the cake bakes make the syrup. Allow the cake to cool slightly in the tin before removing it from the tin to cool further.

Things I used to make my Elderflower and Lemon Syrup

  • juice of 2 lemons
  • grated zest of 1 lemon
  • 30- 40 ml elderflower cordial
  • 50g caster sugar
  1. Stir gently til the sugar dissolves.
  2. Bring to the boil then without stirring…
  3. Simmer until the liquid reduces by at least a third.
  4. As it thickens the syrup takes on the yellow hue from the zest.
  5. Allow the syrup to cool slightly before drizzling it all over the cake.
  6. Whilst the drizzle is still sticky sprinkle on a few more flaked almonds for contrast against the now toasted top.

And enjoy!

64. Curly Churros

Curly Churros

Curly Churros

Considering how many small fires I’ve started in my kitchen recently I surprised myself by not inflicting any further injuries whilst venturing into deep fat frying for the first time. Churros have been on my got-to-bake list forever.

Going all in at San Churros, Sydney. Churros, Dark chocolate dipping sauce, ice cream, milk chocolate dipping sauce AND a giant chocolate milkshake, just for good measure. (I ate the lot!)

Going all in at San Churros, Sydney. (left to right) Churros, dark chocolate dipping sauce, vanilla ice cream, milk chocolate dipping sauce AND a giant chocolate milkshake, just for good measure. (I ate the lot!)

I first tried Churros in Sydney in the bohemian district of Glebe. San Churros is a late night chocolate cafe offering half a metre long cinnamon sprinkled churros, thick hot chocolate and ice cream. AMAZING. Newcastle needs one of these.

Dippy churros

Dippy churros

Churros are traditionally Spanish but also very popular in Mexico usually dipped in liquid chocolate for good measure. You could also add some chilli to your chocolate (or chocolate to your churros – substitute some flour for cocoa powder) if you want an extra kick.

Glossy chocolatey churros

Glossy chocolatey churros

The process for making churros batter is very similar to profiteroles. Heat the water, butter and sugar in a pan until the butter melts.

churros recipe Heat the water butter and sugar in a pan

Heat the water butter and sugar in a pan

Take the pan off the heat and using a wooden spoon beat in the flour and salt until it comes together into a thick lump.

churros recipe Beat in the dry ingredients

Beat in the dry ingredients – best not use a whisk opt for a wooden spoon…

Then beat in the eggs one by one until it’s a smooth and shiny batter.

churros recipe Beat in the eggs

Beat in the eggs – wooden spoon is a much better option

This is quite a precise process so it’s worth setting up your workstation to make it as stress free as possible.

  • Keep a damp tea towel to hand to wipe your hands when you’re covered in batter.
  • Line a plate with kitchen paper and keep it close to add more layers when needed to drain the churros on.
  • Fill a shallow and wide dish with cinnamon sand to roll your churros in whilst they’re still hot.
Roll the churros in cinnamon sugar whilst hot

Roll the churros in cinnamon sugar whilst hot

To prepare the chocolate dipping sauce, heat the water and milk in a pan until approaching boiling and point. Take it off the heat add half of the chocolate. Stir until melted. Then stir in the remaining chocolate until smooth and shiny. Pour your chocolate soup into a pot ready for dipping.

churros Chocolate dipping sauce

Chocolate dipping sauce

Heat the vegetable oil in a deep pot about 400ml in a 8 inch round stock pot will give you about 2 inches of oil to fry the churros in. Make sure the oil is hot enough before piping your churros in. Just pop a blog of batter in and if it sizzles you’re good to go. You will need a slotted spoon to turn the churros with and to scoop them out when they’re cooked.

Use a slotted spoon to scoop the churros out of the boiling hot oil

Use a slotted spoon to scoop the churros out of the boiling hot oil

Although the batter is thick it should be free flowing. Scoop it into a piping bag with a star shaped tip. Don’t overfill the bag as it becomes really unwieldly (gushing batter from both ends). You need as much control as possible when piping into boiling hot oil as you really don’t want to get splashed.

Scoop the batter into a piping bag. Stand your bag up in a tall cup - churros recipe

Scoop the batter into a piping bag. Stand your bag up in a tall cup

I’ve watched street food vendors preparing churros and they have special batter dispensers that cut off the flow and deposit long sticks of churros into a deep vat of molten oil. Great method but probably not something that you’ve got in your kitchen at home. TV Chefs have also demonstrated perfectly straight churros. Nigella piped hers into boiling oil using scissors to cut the flow from the bag. She made short churros. Jamie Oliver made a firm dough and rolled his churros and then fried them. My batter was very liquid and difficult to control so I mostly ended up with it all over my hands and in my hair but I did manage to get some of it into the pot.

Multi tasking with an upturned piping bag to stop the batter spilling all over the place and flipping the sizzling churros with the other hand

Multi tasking with an upturned piping bag to stop the batter spilling all over the place and flipping the sizzling churros with the other hand

My lack of precision and being covered in batter meant I piped rather curly churros into the pan which instantly puffed up into curious shapes. The batter has a mind of its own and using a shallow round pot does have some limitations. Despite their irregular appearance they’re pretty damn tasty.

Some weird looking churros curling into the pan

Some weird looking churros curling into the pan

They sizzle instantly as soon as they reach the oil (watch out for sizzly splashes) and take minutes to cook, about 2 minutes each side turning a golden brown.

A good cinnamon sand coating is required churros recipe

A good cinnamon sand coating is required

With your kitchen roll at the ready you can pop your churros straight from the pan onto the paper to blot any excess oil before transferring them to the cinnamon sand (caster sugar and ground cassia/cinnamon) for a good sugary coating.

Mountains of Curly Cinnamon Churros

Mountains of Curly Cinnamon Churros

Keep piping churros into the boiling oil, flipping them, scooping them out, blotting them off, rolling in sugar until you’ve exhausted all of your batter. This makes an enormous amount of churros, so you may need to friends to help… Be careful not to leave the oil on the heat for too long, for example if you’re messing around taking photos. Without any churros to absorb some of the heat the oil will continue to sore in temperature and scorch the next churros you pipe into the pan. Also make sure you scrape out any scraps from the oil before piping the next churros in to avoid burnt bits attaching themselves to your fresh batch of churros.

Dippy churros

Dippy churros

Eat immediately! The longer they sit, the more oil they absorb so they lose a little of their crispiness. You’ ll not be disappointed by these churros. I shared these still warm and cinnamon scented to my friends at a picnic and with my family. Every single one disappeared. They’re light and fluffy on the inside and just crispy enough on the outside, (with the added texture from the sugar) to be oh so moreish.

Glossy chocolatey churros

Glossy chocolatey churros

I quite like the contrast of the dark chocolate against the sweet churros, but my 3 year old nephew winced at the bitterness despite the addition of some milk to my chocolate soup. You could use a lighter chocolate or milk chocolate if you prefer more sweetness in your life.

Things I used to make my Curly Churros

Churros Batter

  • 470g/ml water
  • 45g butter
  • 45g caster sugar

Melt in pan then remove from heat

  • 440g plain flour (or if you want to make chocolate churros substitute 420g of flour and 20g cocoa powder)
  • 2g salt

Beat in with a wooden spoon

  • 2 eggs

Beat in with a wooden spoon

Pour the smooth batter into a piping bag with a star shaped tip

  • 400ml vegetable oil

Heat oil until sizzling hot. Pipe in Churros. Cook them for 2 minutes (ish) on each side. Remove from oil and to drain on kitchen paper

Cinnamon Sand Ingredients

  • 150g caster sugar
  • 2-3 tsp ground cassia (or cinnamon powder)

Roll warm churros in cinnamon sand

Chocolate Soup Ingredients

  • 60ml water
  • 20ml milk

Heat liquid til just before boiling, remove from heat and add half the chocolate. Stir til melted

  • 100g good quality chocolate
  • optional sprinkle of chilli powder for extra kick

Add the remaining chocolate and stir until melted.

Dip your warm churros in your chocolate soup and enjoy!

63. Ugandan Groundnut Cake (Peanut Cake)

Ugandan Groundnut Cake recipe

Ugandan Groundnut Cake

Smothered in a thick dripping coat of dark chocolate this is one hell of peanut cake. (The recipe didn’t call for chocolate but I figured it was the logical combination.) Not one for the faint hearted or those watching their calorific intake. It’s fudgey and delicious.

Groundnuts are hard to come by so I’ve substituted them for peanuts, which is apparently what most people do as peanuts are easier to grow too. It’s probably the sweetest cake I’ve ever made. And I LOVE it.

Ugandan Groundnut Cake

Ugandan Groundnut Cake

This recipe is a large one and I found it was enough to make 2 6inch round cakes and 1lb loaf too! So I hope you’re hungry. (Or you could use larger round cake tins if you have them maybe 8 or 9 inches – adjust/reduce your cooking time accordingly.)

I never usually bother toasting nuts, but I thought I would pull out all the stops to make this cake as authentic as possible. Toasting the peanuts helps to release the oils, creating a moister (if that’s a word) cake with a deeper peanutty flavour. Spread skinless (blanched) peanuts evenly on a baking tray and toast them in the oven for about 10 minutes at 200 degrees c. Keep an eye on them in case they burn. Once cooled chop them roughly with a big knife.

Mellow yellow stage of egg beating - fluffy, frothy and runny - groundnut cake recipe, peanut cake

Mellow yellow stage of egg beating – fluffy, frothy and runny

Whilst the peanuts are gently toasting, beat the eggs until lights and fluffy. They will reach a mellow yellow stage after about 4  minutes of beating with an electric mixer.

groundnut cake peanut recipe Gentle brown batter all fluffy and light full of sugar, honey and oil

Gentle brown batter all fluffy and light full of sugar, honey and oil

Then beat in the sugars, (brown and caster) along with the honey and vanilla extract. Once the sugars are fully combined, beat in the vegetable oil. The mixture will take on a gentle brown hue and increase in volume.

Fold (or beat) in the dry flour, salt, cassia and baking powder groundnut cake recipe

Fold (or beat) in the dry flour, salt, cassia and baking powder

The batter will become light and fluffy. Then to beat/fold in your dry ingredients. (I’m lazy and continued to beat in the ingredients using my mixer, but if you want to have a lighter cake you could fold it in with a metal spoon). I use ground cassia as I love it’s sweet cinnamonny notes. (Feel free to stick with cinnamon if you have it). Fold in a third of the dry ingredients followed by a third of the milk. Repeat until it’s all combined.

Fold in the toasted peanut - ugandan groundnut cake recipes

Fold in the toasted peanuts

Then fold in the cooled chopped peanuts into the thick glossy cappuccino coloured batter and it’s ready to bake! Pour the batter into your greased and lined baking tins. I used 2 x 6 inch round cake tins and a 1lb loaf tin. You could bake it in 2 larger cake tins, 8 or 9 inch rounds would require less time in the oven. My cakes took between 40 and 55 minutes. If you’re using a bigger tin your cake might take around 30 -40 minutes. The trick is to keep checking, once it’s safe to open the oven without causing your cake to deflate. I checked mine at 30 minutes and although the top of the cakes were firm to the touch the skewer didn’t come out clean when I tried it.

Golden brown groundnut cakes

Golden brown groundnut cakes (the flat bottoms)

Once the cakes are firm to the touch and when you insert a skewer and it comes out clean. (They should be looking slightly caramelised on the top and take on a darker brown hue.) Then you know they’re done. Cool them on a rack covered in grease proof paper to stop the rack branding them with stripes. This cake freezes well uniced (wrap them in greaseproof paper first). I baked mine in advance so I could assemble and ice it for Cake Club later in the week and still have fresh moist sponge.

Peanut buttercream is a revelation. I could eat the entire bowl with a spoon. But resisted long enough to get a smoothish coat on the cakes. In hindsight I had enough to be a bit more generous (particularly in the middle of the two cakes) but regrets don’t suit anyone so be as frugal or free with your icing as you like.

Peanut Buttercream is my new favourite frosting

Peanut Buttercream is my new favourite frosting

Beat your room temperature butter and smooth peanut butter together until they’re fluffy and light. I used a health food store peanut butter which promises to be natural and unprocessed. This did mean it was more oily than other peanut butters and more grainy. Give your peanut butter a good stir before measuring it out so it’s not too oily or dry. Then beat in your icing sugar and salt until it’s a smooth peanuty cream. The recipe called for honey but frankly this cake has enough sugar in it so I skipped it. Adding only a splash of milk to loosen it up and give a smoother finish.

how to ice a cake with buttercream

Smoothing the buttercream with a palette knife all round the cake

I slapped on a layer on peanut butter for food measure before adding a layer of buttercream to sandwich the cakes together. Then using a palette knife apply a thin ‘crumb coating’ of buttercream around the sides and top of the cake to fill any gaps and encase the crumbs so they don’t peek through your final finish. Chill the cake uncovered for an hour in the fridge to allow the buttercream to set before applying a thicker coat all over. Cover the bowl of remaining buttercream with cling film to stop it drying out in between uses. Smooth the final layer with a palette knife as much as possible. Then return to the fridge.

Pour a generous coat of melted choclate all over your cake and coax it down the sides with a teaspoon... droooooool

Pour a generous coat of melted choclate all over your cake and coax it down the sides with a teaspoon… droooooool


While the cake sets melt 50g dark chocolate in the microwave 30 seconds bursts until it’s almost all melted. Stir inbetween between. Stir in the remaining 20g of chocolate and stir until melted to temper the chocolate and achieve a glossy finish.

peanut cake - chocolate icing

Drool

Use a teaspoon to coax the chocolate down over the sides of the cake and to swirl the chocolate over the top of the cake. Leave it to set at room temperature to retain the glossy finish. I took inspiration from Pinterest for this decoration (I lose hours looking at pretty cakes but I like this style, it reminds me of a chocolatey dripping paint tin). Refrigerating the cake will dull the sheen of the chocolate but you may want to store it in the fridge if you want to keep it for awhile or try to transport it! Firm buttercream frosting travels well and keeps the moisture in the cake too.

The Ugandan Peanut Cake in all it's glory

The Ugandan Peanut Cake in all it’s glory – check out the chunks of peanuts speckled throughout the cake

Serve it with a flourish and a sharp knife! This is one tall cake with chunks of peanuts to chop through too. And it is gorgeous, jam packed with peanuts and flavour. A friend likened it to ‘a cake version of the nougat in a snickers bar’ and that sums it up perfectly. It’s moist with a subtle hint of cassia permeating the sponge. I managed to keep a slice in the fridge for 3 days and it was just as delicious, not a dry slice in sight. I love this cake and will be making it again for sure!

Clandestine Cake Club pushing the boundaries of cakeClandestine Cake Club pushing the boundaries of cake

Clandestine Cake Club pushing the boundaries of cake

My Ugandan Groundnut Cake was very well received at our Clandestine Cake Club meeting at Waterstones. This week we were pushing the boundaries of cake. It was amazing. We had savoury cakes, Tiffin Cakes, extraordinary ombre 8 layer cakes and a magnificent ice cream cake (unfortunately that one was out of shot in the fridge).


Things I used to make my Ugandan Groundnut Cake

  • 200g of blanched peanuts – toast for 10 mins in medium hot oven and chop up roughly. (Save these for the end)
  • 6 eggs – Beat til fluffy. Then beat in…
  • 170g caster sugar
  • 170g light brown sugar
  • 270g runny honey
  • 2 tsp vanilla extract
  • 170g (3/4 cup) vegetable oil

Beat sugar and eggs til light and fluffy. Then beat in a third of the the dry ingredients, followed by a third of the milk

Dry Ingredients

  • 1 and a half tsp baking powder
  • 1 tsp salt
  • 2 tsp ground cassia
  • 650g plain flour

Wet Ingredients

  • 270ml milk (I use semi skimmed)

Once all the wet and dry ingredients are fully incorporated, fold in the toasted peanuts.

Bake in 2 x 6 inch round cake tins (greased and lined) and a a 1lb loaf tin at 170 degrees c for 35 – 50 minutes. Depending on your oven you may need to check if your cakes are cooked sooner. I took the loaf cake out first after 40 minutes and the last 2 round cakes needed a little longer.

Peanut Buttercream

  •  200g butter
  • 50g peanut butter (I used smooth wholefood peanut butter but you can use your favourite brand) – beat the butters together until soft and smooth before beating in the other ingredients.
  • 1/2 tsp salt
  • 400g icing sugar – beat in the sugar until it’s smooth and no longer grainy
  • a splash of milk to loosen it up if it starts to dry out

Chocolate Coating

  • 70g of dark chocolate melted – I used 70% cocoa chocolate but use whatever you have to hand.
ugandan groundnut cake

Yum

If you like nutty cakes you may also enjoy my Iranian Pistachio Cake too!


The Best Banana Bread I’ve ever made

image

My Bestest Banana Bread

I’m going to let you into a secret. I’ve been experimenting in the kitchen, trying new combinations of flours and flavours to make some tasty, healthy (ish) cakes using up food that would otherwise go to waste. And what did I conjure up? My bestest banana bread recipe, with coconut, pistachio and rye. Additional bonuses include an extra cake! This recipe is enough for 2 cakes, so you can freeze one for later or give it to a friend who needs a nutritious energy boost. It’s also low in sugar and gluten. (You could choose gluten free flour if you prefer.)

Bonus Banana Bread

Bonus Banana Bread

When my bananas are on the turn and almost ready for the bin I throw them in the freezer in their blacken skins to save for a later date.  (Yes you can freeze bananas. Feel free to peel them first and pop them in a tupperware container first if you want to use them from frozen for smoothies or milkshakes, then you don’t even need to add ice cream for a chilled drink).

Once I have 3 black bananas stockpiled I whip up my Banana Bread. Leave your bananas to defrost for an hour or so before you peel them to make your banana bread, as if they’re too cold it will make your butter solidify and could give you denser cake and an uneven bake.

This is really quick to make. Basically beat the butter and sugar together until fluffy. Followed by your bananas, vanilla and eggs, then the combination of flours and baking powder. Finally beat in a handful of sultanas and chopped walnuts. This takes about 15 minutes with an electric mixer.

I use two 6 inch round tins to bake this recipe, or you could bake one large banana bread loaf if you prefer. Liberally sprinkle the cakes with chopped nuts (whatever you have to hand is fine). I use pistachios which gives you gorgeous green flecks singing out in between the flaked almonds and hazelnuts.

As the cake bakes the batter rises up and supports the nuts, holding them in place for the final cake. It’s also the perfect way to disguise any uneven finishes on your cake, if like me you have an unpredictably hot oven.

My initial experiments involved using 100% coconut flour, but this ended in disaster. I think coconut flour needs to be balanced against other nuttier flours (I like using rye flour but spelt or wholemeal would work well too) to absorb some of the natural oils and sugars and avoid the quick to burn, blackened mess that I made.

In less than an hour (50 minutes at 150 degrees c to be precise) you will produce two beautifully moist banana cakes, that are perfect accompanied by a large mug of strong tea, perhaps after a bracing stroll by the coast. I’m drooling just thinking of that sweet sponge and nutty crunch of a cake. Wonder how many bananas I have lurking in my freezer today…

Perfect Cake spot: A blustry day by Alnwick Castle

Perfect Cake spot: A blustery day by Alnwick Castle

 Things I used to make my Bestest Banana Bread

  • 125g margarine (or butter)
  • 250g caster sugar
  • 3 over ripe bananas
  • 2 eggs
  • 1 tsp vanilla paste
  • 100g coconut flour (or finely ground dessicated coconut if you can’t find the flour)
  • 90g Rye Flour (or spelt or wholemeal) -NB: Spelt and Rye flours are not gluten free but may be more suitable to those who have a wheat intolerance. Use a wholemeal gluten free flour if you want to avoid gluten in this recipe.
  • 60g plain flour (feel free to use gluten free flour)
  • 3 1/2 tsp baking powder
  • 1tsp ground cassia (or cinnamon or mace)
  • Handful of chopped sultanas
  • Handful of chopped walnuts
  • * Topping: (2 handful of chopped/flaked nuts: almonds, pistachio, walnuts, hazelnuts
  1. Beat together sugar and butter until fluffy
  2. Beat in bananas
  3. Beat in eggs one by one
  4. Beat in vanilla paste
  5. Beat in coconut, plain, rye flours and baking powder and spice
  6. Beat in sultanas and walnuts
  7. Pour into 2 greased 6 inch round tins (or one large loaf tin)
  8. Cover the top of each cake entirely with a layer of chopped nuts
  9. Bake for 50  mins at 150 degrees c (or until a skewer comes out clean)

My other banana based recipes are Fanny and Otto’s Fijian Banana Cake

60. Japanese Matcha Green Tea Mochi – Gluten Free

Mochi are like no other cake I’ve ever tasted. At first I thought I didn’t like them, with their chewy jelly exterior and smooth paste interior, that’s just not as sweet as I’m used to in my sugar spiked desserts. However once you get past your preconceptions of what a cake should taste and feel like, you’re going to love Mochi. I can guarantee it.

Matcha Mochi

Matcha Mochi

The first time I experimented with Mochi was on a food adventure around Hong Kong. (Although they are a traditional Japanese sweet treat.) My friend Bobo and her Mam took us on a whistle stop tour of the real Hong Kong. Rolling from Dumpling Soup and Dim Sum, to Duck and Eel banquets. Sampling Chinese Milk Tea, Egg Tarts and Pineapple Cakes and everything in between. Including impressive dry ice tapioca desserts presented with a flourish of icy smoke clouds. This was my kind of trip! Although I must admit I didn’t manage to eat noodles for breakfast. A regret I still carry with me today. Unfortunately I’m much more of a tea and toast kinda gal!

But Mochi were something else. Deceptively bland on the outside in their floury cloak.  When you tentatively choose your mochi you immediately realise how soft and squidgey they really are . Take a bite and there’s a perfect balance of sweet bean paste to rice gel dough. I always thought that Mochi would be difficult to make at home, when in fact they are possibly one of the quickest bakes I’ve ever made! The assembly is the trickiest bit and even then it’s a bit like playing with Play Doh so it’s actually quite fun!

My Mochi Mountain at Confidential Canapé Collective

My Mochi Mountain at Confidential Canapé Collective

You can apparently buy red bean paste (also called Anko) pre made (if you can find it!). I couldn’t find any so made my own, and as per usual, made it up as I went along! I chose dried Aduki beans from my local health food shop. These beans are also know as Azuki or Adzuki beans. They are much smaller than kidney beans and apparently rather good for you. They’re classed as a ‘superfood’ which is a bonus. (Just in case you’re interested they are high in soluble fibre, and rich in other nutrients such as B vitamins, potassium, magnesium, zinc, iron, copper and manganese.)

Tender Aduki Beans after 2 hours simmering

Tender Aduki Beans after 2 hours simmering

You do need to plan this one in advance if using dried aduki beans. You must soak them overnight in cold water. Change the water the next day, then bring them to the boil and simmer them for 2 hours. Once they are tender they’re ready to make into a paste. I didn’t realise that you’re supposed to remove the skins by passing them through a sieve, so I ended up with rather more textured paste than some Japanese confectionery would use… This is called Tsuban (red bean paste). If you sieve your beans you’ll end up with smooth Koshian paste. Once you’ve mastered Anko making, you can use it to fill lots of other Japanese desserts such as Dorayaki (Japanese Red Bean Pancake) or Red Bean Ice Cream (I’m adding these to my list right now!).

The Aduki Sweet Red Bean paste

Anko – Aduki Sweet Red Bean paste

Once your beans are tender, drain the water and stir in the sugar. Then add a splash of water (half a cup) and allow to simmer . As the water evaporates the paste thickens. When you can draw a line along the bottom of the pan with a spoon the paste is ready. Allow it to cool and blend with a hand blender to a smooth paste. If you make too much you can freeze it for future use.

The very runny rice flour sugar and water batter ready for microwaving

The very runny rice flour sugar and water batter ready for microwaving

Technically this is a non-bake bake. You only need to microwave the glutinous rice flour, sugar and water for 3 minutes 30 seconds to produce a wonderfully gelatinous dough! It’s amazing how many Mochi you can eek out of the small amount of flour, water and sugar.

The very hot and thick gel dough. You can see my fingermarks where I tried to remove the piping hot dough out of the bowl with my bare hands. Be careful!

The very hot and thick gel dough. You can see my fingermarks where I tried to remove the piping hot dough out of the bowl with my bare hands. Be careful!

Sift one cup of glutionous rice flour (I used my left over Pandan flavoured flour from my Pandan Chiffon Cake. It’s got to be glutinous rice flour as this is the sticky kind. It’s still gluten free despite it glutinous qualities.), followed by 1/4 cup of sugar, 2 tsp of matcha green tea powder, and 1 cup of cold water into a microwave safe bowl. Whisk gently until you have a very smooth thin batter. You could choose other flavourings or colours such as jasmine, taro or coconut. Add your preferred flavouring before cooking!

Cover the bowl with cling film and microwave on high for 3 mins 30 secs. The dough will thicken and inflate. Check it and then microwave for a further 30 seconds if it needed to be a bit firmer.  Et voila you have a extremely green jelly dough ready to shape!

The bright green dough scooped safely out of the bowl with a knife

The bright green dough scooped safely out of the bowl with a knife

IT WILL BE VERY HOT when you take it out of the microwave! Most recipes tell you to shape it whilst it’s hot. I can assure you it’s much easier to work with when cool and less likely to sizzle your hands, so be careful.

Lots of rice flour everywhere to stop the dough from sticky to everything

Lots of rice flour everywhere to stop the dough from sticky to everything

Dust your worksurface with rice flour (other recipes say to use potato starch or cornflour, but as I had rice flour to hand I used that and it was fine.) You’re going to want to dust your hands too as the jelly dough sticks to everything! Mine was a vivid green so it looked like I’d been slimed. I’m still finding green goo in my kitchen… Take a small amount of dough (about 1cm x 5cm) and flatten it out using your finger tips on the worksurface. Press it into a round shape about 3mm thick.

Fold in the edges to seal in the red bean paste

Fold in the edges to seal in the red bean paste

Dollop a nice large marble sized pea of red bean paste in the centre of your dough and fold the dough over the paste to seal it in. Turn the Mochi over and roll it in a cupped hand or on the work surface to encourage the sealed edge to stick together and create a smooth round finish. Roll it in a little more rice flour and pop it into a mini cupcake cake case. Roll and repeat until you’ve used all of your paste and dough!

Shape shape shape your mochi

Shape shape shape your mochi

You could choose other pastes or ice cream to flavour your mochi with. Next time I’m going to try matcha ice cream centres!

The finished Mochi sitting pretty

The finished Mochi sitting pretty

I had to make a second batch of dough as I’d been a bit too enthusiastic with my portion sizes first time round. My Mochi were more dough than paste which isn’t as tasty to eat.

The first batch - I had rolled some too thin so the red bean paste is lurking periliiously close to the surface of some mochi

The first batch – I had rolled some too thin so the red bean paste is lurking periliously close to the surface of some mochi

It could be the complex combination of it’s jelly like texture or the smooth savoury yet sweet paste filling that make Mochi so memorable. Or perhaps it’s the unusually satisfying bite that they possess. Once you’ve tried them I’m sure you’re going to want to try them and experiment with more flavour combinations. They’re small so you probably want to eat at least 2 in a sitting!

A mouthful of mochi! Yum yum yum!

A mouthful of mochi! Yum yum yum!

This dough recipe was enough to make 16 small mochi. I had enough paste left to make another batch so made a second batch of dough. Good news Mochi are gluten free and low in sugar so they’re relatively health conscious snack or dessert too. It’s best to store Mochi in an air tight container. They will keep for a couple of days if you don’t eat them all straight away!

My Mochi Mountain at Confidential Canapé Collective

You can see the Matcha Mochi are a bit darker in colour and more rounded in shape 🙂 My Mochi Mountain at Confidential Canapé Collective

I made my Mochi to share with friends at out Confidential Canapé Collective which we hosted at my new house. I really enjoyed making and eating these little sweet treats. I definitely prefer my Mochi with matcha in the dough. It gives a richer yet subtle flavour whilst tinting the dough naturally with a dark green hue. I was surprised by how many disappeared that night and some friends even took a couple home for later. Therefore I can confidently declare my Matcha Mochi a success! I can’t wait to attempt Matcha ice cream next!

Things that I used to make my Mochi

Matcha Green Tea Mochi Dough Recipe

Really quick to prepare! Makes enough dough for approx 16 small mochi

  • 1 cup of glutinous (sticky) rice flour – I used pandan flavoured flour but you could use plain and add other flavours
  • 1 cup of water
  • 1/4 cup of caster sugar
  • 2 tsp matcha green tea powder

Mochi Filling Red Bean Paste (Anko) Recipe

Takes a bit of preparation: Soak over night and boil for 2 hours

Makes enough to fill approx. 30 mochi

  • 100g dried Aduki beans
  • cold water
  • 50g sugar

Red Bean Paste Instructions

  1. Soak the dried beans in cold water over night
  2. Drain the water.
  3. Cover the beans in cold water and bring to the boil. Simmer for 2 hours til tender.
  4. Drain the water. Stir in sugar. Add half cup of water. Simmer til very soft and water is evaporated.
  5. Blend with hand blender to a smooth paste.

Mochi Instructions

  1. Whisk the ingredients together into a thin batter
  2. Cover with cling film and microwave for 3 minutes 30 seconds and then a further 30 seconds if needed to firm the dough up further
  3. Allow to cool before scooping the dough onto a rice floured surface (use more flour as needed to prevent sticking)
  4. Take small pieces (1x5cm) of the dough and shape into rounds
  5. Place a marble sized dollop of your chosen filling in the centre of the dough
  6. Fold the edges over the filling. Press the edges to seal
  7. Turn the mochi over and roll in a cupped hand to seal the edges further.
  8. Dust with rice flour and place into paper case
  9. Leave to set at room temperature for an hour
  10. Eat!

59. Pandan Chiffon Cake – South East Asia & Gluten Free

Huge and Fluffy Pandan Cake

Huge and Fluffy Pandan Cake

Searching for a suitably exotic and challenging recipe I remembered a wonderful recipe I was given by a fellow cake clubber. Her family recipe for Pandan Cake.  Not to be confused with Panda cake. Although a Panda Pandan Cake would be immense.

The Great Reveal! (Probably not the best photo that I could have got of the delicate Pandan Chiffon Cake but it shows how brightly coloured it is on the inside!)

The Great Reveal! (Probably not the best photo that I could have got of the delicate Pandan Chiffon Cake but it shows how brightly coloured it is on the inside!)

Pandan is a traditional flavouring used in South East Asia. (You might find Pandan Cake in Indonesia, Malaysia and Singapore.) It comes from the leaves of the Pandan plant. It is also used to help flavour dishes such as jasmine sticky rice.  If you can get a hold of some Pandan leaves you can make your own extract by boiling the leaves in a small amount of water. Pandan cake is usually green because of the chlorophyll from the leaves  but as the leaves aren’t readily available everywhere most Pandan essences contain some bright food colouring to help recreate the glorious green sponge at home.

Gloriously Green Pandan Essence and Pandan infused Glutinous Rice flour

Gloriously Green Pandan Essence and Pandan infused Glutinous Rice flour

In search for Pandan paste I found Pandan essence and Pandanus Glutinous Rice flour which contained the elusive Pandan extract.  As rice flour behaves in a slightly different way to normal plain flour I had to modify my recipe to accommodate the changes. You don’t have to use the green flour if you can’t find it. You can use self raising or plain. But if you prefer gluten free go for rice flour.  Glutinous rice flour (despite it’s name) is gluten free. The glutinous bit means the rice belongs to the sticky rice family.

The Pandan Chiffon Cake in amongst the stunning array of Clandestine Cakes

The Pandan Chiffon Cake in amongst the stunning array of Clandestine Cakes

Now upon extra research I realised that this is a chiffon cake. Those Great British Bake off fans will remember this as one of the technical challenges that was a bit tricky to bake! And considering my oven’s unpredictability this may not be the best choice to bake for our first Clandestine Cake Club gathering of 2014. But I do like a challenge!

Whisk 8 eggs yolks with the sugar

Whisk 8 eggs yolks with the sugar

This has a lot of eggs in it so you will need 2 big bowls but doesn’t take as long to make as you might think. (Only if you stop to take photos along the way does this take a long time! ). Whisk 8 egg yolks with 100g of sugar until light and fluffy

Whisk in the coconut milk and oil

Whisk in the coconut milk and oil

Whisk in the coconut milk along with the pandan essence/paste/extract.  If you’re worried it’s not going to be green enough add a dot of green food colouring gel.  It will soon become a frothy fluid batter with a green tinge to it.

Adding the Pandan Essence

Adding the fluorescent Pandan Essence

Sift in the flour ( whatever type you prefer) along with the baking powder and bicarbonate of soda.  If using self raising flour you will not need as much raising agent.  Whisk a third of the flour into the batter followed by a third of the oil. Repeat until it’s all combined.

Whisking in the glutinous rice flour - How bright is the batter!

Whisking in the glutinous rice flour – How bright is the batter!

Whisk the egg whites until frothy. Then gradually add 100g of sugar and continue to whisk on high until stiff peaks form.

Whisk the egg whites (adding the sugar gradually) until stiff peaks are formed

Whisk the egg whites (adding the sugar gradually) until stiff peaks are formed

Fold a dollop of egg whites into the green batter to loosen the mix and then carefully fold the egg whites in to preserve the air in the mix and help the cake rise evenly.

Carefully fold in the egg whites

Carefully fold in the egg whites – Love how green the batter is!

As uncomfortable as this seems (it screams against all baking experience)  pour the mix into a NON GREASED tube pan (looks like a flat topped Bundt tin). Apparently chiffon cakes need to cool upside down and grip the sides of the tin so they slowly slide out of the tin as they cool. If removed straight away the cake will concertina up and end up as a dense pancake.  Greasing the tin would make the cake slip out too quickly so try not to grease it

Chiffon batter ready to bake in it's un greased tube pan

Chiffon batter ready to bake in it’s un greased tube pan

Now with all that wonderful air in the cake the sponge springs up magnificently in the oven almost escaping the tin. With the hole in the middle the cake will cook quicker and more evenly which can only be a bonus in my oven.

The enormous Pandan Chiffon Cake!

The enormous Pandan Chiffon Cake!

You will need to keep an eye on the cake to make sure it doesn’t burn.  Bake it for 50 mins at 160 degrees c ( fan) but if it is cooked through sooner take it out (or leave it longer if it needs it.) I made the mistake of sticking cocktail sticks into the cake too often to check that it was cooked. This meant I deflated the cake slighty. Also pausing to mess around taking photos of the cake meant that I didn’t invert the cake tin quick enough and to my horror saw the cake sag down inside the tin. You can see on the cooled cake that it has a little ridge around the bottom of the cake (a bit like a muffin top over spilling someone’s jeans). Note to self: check it’s cooked and tip the tin upside down immediately when taking it out of the oven!

Despite it's saggy ridge the Pandan Chiffon Cake was amazing!

Despite it’s slightly saggy ridge the Pandan Chiffon Cake was amazing!

Once the cake cooled completely I found that it didn’t slide out of the tin as easily as I had hoped, as the cake was clinging on a little too tightly to the tin. I coaxed it gently out of the tin using a sharp knife and running it around the edge of the tin, allowing gravity to do the rest of the job. This meant that the cake didn’t have a shiny finish to it, but  I think this is how it’s supposed to look.

The Magnificent Pandan Chiffon Cake

The Magnificent Pandan Chiffon Cake

What a magnificent cake the Pandan Chiffon Cake is! It is extremely light and soft to the touch, more like a tasty pillow than a cake. I’ve never eaten a cake that actually melted in my mouth before until now. It’s moist and airy and keeps for at least 3 days after baking it. (That’s as long as I managed to save my final piece until.) It’s worth slicing the cake with the sharpest knife that you have to preserve it’s shape as much as possible as it is very delicate. (I may have been a tad heavy handed when slicing it up as I squished it slightly.)

A slightly squashed slice of Pandan Chiffon Cake

A slightly squashed slice of Pandan Chiffon Cake

Pandan is an unusual flavour. It perfumes the air whilst managing to taste both sweet and savoury at the same time. It’s similar to Green Tea (Matcha) cakes but like nothing else that I’ve ever tasted before. I will surely be baking this again. It really doesn’t take as long as you might think, perhaps 30 minutes to prepare and as it doesn’t need any dressing up, you don’t need to spend time decorating the cake. Icing would be overkill. It’s a deceptive cake. It looks rather plain and boring from the outside, but that first slice releases the pandan perfume and the glorious green chiffon . It’s a much more complex and interesting cake than you might initially think. If you’re going to attempt an exotic cake I can’t recommend the Pandan Chiffon Cake enough!

An empty plate speaks for itself!

An empty plate speaks for itself! – The Pandan Chiffon Cake disappeared very quickly

Things I used to make my Pandan Chiffon Cake

Batter

  • 8 egg yolks
  • 100g sugar
  • 140ml coconut milk
  • 1/4 cup olive oil
  • 170g pandan flavoured glutinous rice flour (you can use plain rice flour if you prefer)
  • 3 tsp pandan essence (1tsp paste)
  • 3 1/2 tsp baking powder
  • 2 tsp bicarbonate of soda
  • (Green food colouring if you wish)

Egg whites

  • 8 egg whites
  • 100g sugar
  • 1/2 tsp cream of tartar

Method

  1. Whisk the eggs yolks with the sugar until light and fluffy
  2. Whisk in the coconut milk, pandan essence (and a splash of green food colouring if you would like it extra bright)
  3. Sift the bicarbonate of soda and baking powder and flour together
  4. Whisk in a third of the flour mixture followed by a third of the oil until it’s all incorporated
  5. In a separate bowl beat the egg whites until frothy, then gradually add the sugar and cream of tartar
  6. Beat until the eggs whites are they reach stiff peaks
  7. Fold the egg whites into the batter gently
  8. Pour into a non greased tube pan
  9. Bake at 160 degrees c fan for 50 minutes
  10. When fully cooked invert the tin immediately over a cooling rack and allow the cake to slide gently out of the tin as it cools
  11. Slice with a very sharp knife and store in an airtight container

Cooker Chaos and the Fiery Beast in my Kitchen

An Armenian Gluten Free Orange Cake with Orange Blossom icing and candied peel

An Armenian Gluten Free Orange Cake with Orange Blossom icing and candied peel

January has been a busy month filled with baking and frustration with the new-to-me-yet-old-to-our-house oven which has no temperature or oven settings remaining on it. Leaving the delicate science of oven temperature in the lap of the gods or in my case the sizzle of the grill.

This month I have successfully

  • set fire to my oven gloves and a pan lid!
  • grilled a puff pastry pie
  • charred a cake that took me 4 hours to make
  • threw 5 inedible cakes away – even Super Hans turned his nose up at them and he has been know to eat raw sourdough starter when it’s been dropped on the floor
  • and sobbed silently at the oven window glued to my newly purchased thermometer checking the temperature hasn’t yet reached ‘towering inferno stage’ and frazzled my Madelines.
Grilled pie anyone?

Grilled pie anyone?

I must admit I considered throwing the fiery beast in the bin, but the bin isn’t quite big enough… so back to patiently burning my cakes and starting over, and over, I went.

I guess this oven is a bit like baking with an Aga? (Having never used an Aga I may be making this up) I put my limited Aga knowledge to good use and attempted to control the heat by placing extra baking tins in the oven, to protect my precious cakes from the uncovered elements in the oven and ward off the extra hot spots. Adding tin foil hats to my cakes wherever possible to guard against the scorch. If you have any suggestions on how to bake in a small, yet very hot, electric fan oven please send them my way!

Undeterred I continued and eventually managed to bake some edible and rather lovely cakes, although I had to admit defeat on some of the more delicate bakes. It seems I shall be baking only robust cakes and breads that can withstand the heat until I can get to grips with the animal in my kitchen.

This month I’ve taken the opportunity to recreate some of my most favourite around the world in 80 bakes with a slightly new twist. Mainly that I have crammed as many international elements and Middle Eastern flavours that I could possibly think of into one cake. And the result? My 4 layer Iranian Pistachio Cake with cardamom; home made lemon curdTurkish Delight and Rose Italian Meringue. Which means I finally conquered the ever elusive Turkish Delight using a very good Rachel Allan recipe. I even treated myself to 2 new cake tins that are the same size! Unheard of in my house, so now I can actually make cakes that sandwich together. Hurrah! I predict there will be many more layered cakes in my future.

Cramming many international elements into one cake: A 4 layer Iranian Pistachio Cake, with homemade lemon curd, Turkish Delight and Rose Italian Meringue

Cramming many international elements into one cake: A 4 layer Iranian Pistachio Cake, with homemade lemon curd, Turkish Delight and Rose Italian Meringue

I also re imagined my Armenian Gluten Free Orange and Almond Cake into a bundt cake with ribbons of orange blossom icing and home made candied peel. Much less syrupy than my last attempt with thick piped glace icing which gave a great sweet contrast to the slightly bitter orange and almond cake.

An Armenian Gluten Free Orange Cake with Orange Blossom icing and candied peel

An Armenian Gluten Free Orange Cake with Orange Blossom icing and candied peel

Thanks for reading and I hope January is treating you well. I’m looking forward to hopefully baking not burning some new and exciting international recipes very soon.