Where to start when icing a 5 Tier Wedding Cake?

Me and my pride an joy - The 5 Tier iced wedding cake with ribbon in Kate's wonderful kitchen

Me and my pride and joy – The 5 Tier iced wedding cake with ribbon in Kate’s wonderful kitchen

If you’ve ever visited my tiny flat you will quickly realise that there is very little room to turn around never mind ice, stack and store 5 tiers of fruit cake. Thankfully I have a wonderful friend called Cake Poppins who kindly offered to spend the day with me in her amazing kitchen complete with all of her expertise and wonderful non stick cake decorating equipment. I cannot thank Kate enough for her help and guidance. If you haven’t checked out Kate’s blog I thoroughly recommend it !

Cath Kidston Jamaican Black Cake

Cath Kidston Jamaican Black Cake –  one of my previous attempts at cake icing

Never before have I attempted any sort of technical cake assemblage that requires dowling. I have attempted rather slap dash icing of cakes with layers of marzipan and fondant icing. My results have been passable, but on my wedding cake passable would not suffice. It needed to be perfect. No pressure there then.

One of the 5 Tiers of Fruit Cake

One of the 5 Tiers of Fruit Cake

Before the cakes could even go near any icing a great deal of planning and shopping was required. I packed up a car full of cake and sugar based goods and headed round to Kate’s. The fumes eminating from the cakes made for a very happy journey.

To start with you need to purchase drum style cake boards (the ones that are half an inch thick to add extra height to the cakes). Each board needs to be exactly the same size as the cake. I purchased a 4, 6, 8 10, and 12 inch round boards. The 4 inch was pretty difficult to find but you can definitely buy them online.

I have absolutely no idea how much marzipan and fondant icing we went through and so engrossed was I in mastering the kneading, rolling and enveloping the cakes in icing I forgot to take any photos along the way. (sorry!) My guess is that about 6 packets of marzipan disappeared in the process, which would be around 6 x 500g = 3 kg of marzipan. As a rough guess the same amount of fondant ivory icing was used to cover the 5 cakes.

A slosh of vodka was required (not for me) but to sterilise the cake boards.

3 jars of apricot jam were used to coat the cakes and the boards prior to the application of the marzipan. This helps to stick the marzipan to the cake and the cake to the board.

There was a lot of tea, cake and rolling going on that Sunday afternoon. Gaps in the cake need to be filled with marzipan, a bit like smoothing putty into cracks in a wall before you paint it. You can even add a sausage of marzipan around the edge of the cake to fit it neatly to the board, if there’s a gap. I learnt so many brillliant tips.

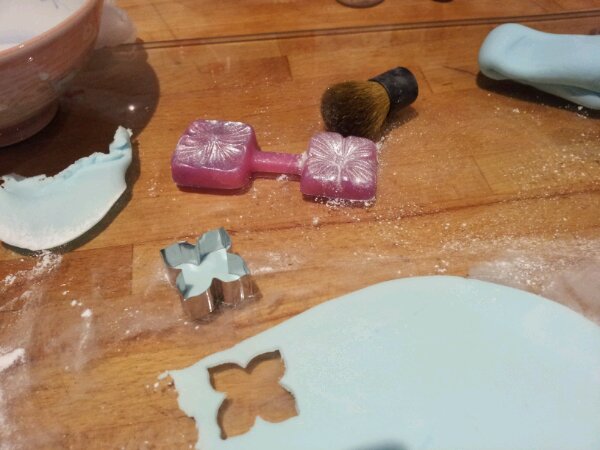
Kate introduced me to cake spacers. A truly wonderful invention. They consist of 2 equally thick pieces of wood (rather ruler shaped) which you place on either side of your marzipan or fondant. You then place the rolling pin onto the rulers and roll away from you (preferably on a non stick board). Turning the fondant at regular intervals so it doesn’t stick. This means you get evenly flattened fondant, giving a smooth and much less holey finish than I often achieve. You have to press with all your weight rolling from your hands all the way up to your elbows evenly. If like me your a rolling novice you then get equally spaced bruises up your arms too. Kate’s an absolute pro!

Once the marzipan layer is on the cake, it’s best to get the layer of fondant on whilst it’s still tacky so it all sticks together. The less you touch the final fondant layer the better finish you get. Only touch the fondant covered cake with the backs of your hands to avoid leaving any fingers prints please. Smoothing the edges down with a plastic cake smoother, pushing the excess fondant down and squeezing it out in to the bottom of the skirt of the cake. Which can then be trimmed away with a lovely sharp palette knife, being careful not to cut into the cake (!)

Once all 5 cakes have a double coat of icing you carefully wrap a thin ribbon around the bottom of each cake. Double sided sticky tape is useful to stick the ribbon together. This gives a really professional looking image. I chose ivory ribbon to blend into the fondant and give a really sleek finish.

The Iced Wedding Cake

The Iced Wedding Cake – you can see the ribbon edging neating up each cake tier

Icing the 5 cakes took around about 5 hours. Then Kate showed me how to make sure the cakes are level, how to cut the dowels to size, where to insert dowels (plastic rods) to hold the weight of the cake above and how to stack the 5 tiers together.

Using a spirit level, a hack saw, a dowling guide template and a marker pen we forced the plastic dowels strategically into all 4 iced cakes, all in the right places so you can’t see any plastic dowels on the finished cake! The top tier didn’t need any dowels to as there was no other cake to support above it.

One Tier - complete with a full round of dowls - how to ice a wedding cake

One Boxed Tier – complete with a full round of dowls – ignore the flowers these were added later on…

The final result was very impressive! Seeing all 5 tiers stacked up in their smooth white finish was worth all of the effort! Then all we had to do was carefully take it apart again, box the cake and manouvere it all back into my car. Then the task of finding a suitable storaged place in my tiny flat to rest the cakes whilst the fondant set.

Almost there but not quite yet...

Almost there but not quite yet…

There was still a month to spare before the wedding and I still had to glue all of the hydrangea flowers to the cake, box it back up again, transport it to Jesmond Dene House AND stack the entire cake, glueing each tier together. And then to eat it! So close and yet still so far to go…

This is part 3 of the 4 stages of wedding cake baking! You can read more about my epic wedding cake adventures here…

Part 1 – My 5 tiers of fruit wedding cake – My biggest booziest cake yet 

Part 2 – How many sugar flowers does it take to make a wedding cake?

Part 3 – Where to start icing a 5 tier wedding cake?

Part 4 -The Final Frontier – Decorating & assembling my 5 Tier wedding cake

How many Hydrangea Sugar Flowers does it take to make a Wedding Cake?

SEAN_ELLIOTT_PHOTOGRAPHY-703

After you’ve spent an inordinate amount of time baking 8 enormous boozy fruit cakes, how do you decide which wedding cake design to go for? Do you opt for a classic look, a fashionable design or something to match your colour scheme?? For those that know me, you will know that there has never been a colour scheme in my life. I don’t manage to match things very well. In fact if things clash that’s probably for the better. (

I couldn’t bring myself to decide on just one colour for my bouquet, as I love so many colours so I went for a bit of everything. It was only a last minute decision to leave out the bright pink roses from the bouquet. I decided it may be a little bit too much.  You can even see the blue hydragena flowers peeking out between the hyacinths. It was touch and go as to whether these flowers would bloom with it being a December wedding. It was clearly meant to be!

My wedding flowers

My wedding flowers – a little bit of everything

Part of me longed for a classic cake that I would love forever and part of me me wished for an entire room of different types of cake from around the world. Unfortunately there is not enough space in my freezer to create such an awesome display unless I baked them all the day before the wedding which in reality, was never going to happen.

Petite Italian Lavender Meringues

Petite Italian Lavender Meringues

As a compromise I baked as many extras as I could possibly manage. Opting for petite Lavender Meringues

Mini Brownie Bundts and Madeleines

Table Treats – Mini Brownie Bundts and Madeleines

and mini bundt brownies and madeleines to adorn the tables with.

I found so many gorgeous cake designs flicking through endless pages of Pintrest and magazines but many were way out of my skills set. One favourite was an impossibly beautiful white damask lace design on a pale green fondant  I made many many trips to my local cake decorating shop and experimented with different technniques,  I was never going to be able to use a stencil. (I practiced with a little one I had in the house and I always managed to smudge it or it oozed out of the sides.)  I was then going to make millions of sugar roses, but I made about 4. It took me ALL night and I felt angry. It was way too fiddly and my roses always turn out ridiculously enormous and ‘rustic’ looking.

Green Damask Lace Cake – The Cake Parlour

Another of my favourite designs was a tiered cake with a cascade of hydragena blossoms. Little did I know that both of these cakes were designed by the same woman the amazing Zoe Clark. (I have since purchased her books as I love her designs!)

I continued in an experimental vein ordering lots of plastic sugar tools online and waited a month for them to arrive. I attempted to make fondant pearls by hand but didn’t think about how they needed to dry so ended up with one lump of sugar pearl. That would never do.

One lump of pearl for me please

Just the one lump of pearl for me please

Back to the drawing board and my two favourite designs. My Mam invested in a hydrangea cutter and mould for me (thank you Mam) rather than watch me struggle with trying to do everything for myself.

Zoe Clark’s design used pink blossoms which is lovely but I’m not much of a pink girl. Instead I experimented with a few different colours including, lilac, baby blue, teal and finally decided upon ‘hydrangena blue’. I coloured some florists paste with food colouring and added a little more to get the right colour. I also left some to dry for a couple of weeks to see how the colour developed as it can fade as it dries out fully. I had found my winner. I made 3 slightly different shades of hydrangea blue paste to give the flowers more of a natural look and variety in the final cascade.

Using a tooth pick add a dot of your chosen food colour gel to the florists sugar paste and knead it until it's the colour you need.I chose hydrangea blue. Beware adding too much colour in one go, once it's in you can't take it out! You may need to colour your paste in advance to allow it to dry a little so it's not too sticky!

Using a tooth pick add a dot of your chosen food colour gel to the florists sugar paste and knead it until it’s the colour you need. I chose hydrangea blue. Beware adding too much colour in one go, once it’s in you can’t take it out! You may need to colour your paste in advance to allow it to dry a little so it’s not too sticky!

When adding food colouring gel to sugar paste it always makes the paste sticky. I find it much easier to handle if I colour it a few days before I need to use it.

Roll out the colourful florist's paste on a lightly dusted surface - making sugar flowers hydrangea

Roll out the colourful florist’s paste on a lightly dusted surface

You can add a little icing powder to the worksurface when you’re rolling it out but not too much as it will dry the paste out and it will crack. Florists paste isn’t cheap but it has a special ingredient (albumen) which allows you to work it into much thinner and more delicate shapes than normal sugar paste. It also dries really hard quite quickly so it keeps it’s shape. I tried to make my own (I know this was not my best idea!) I thought it would be cheaper to buy powdered albumen and knead it into sugar paste. In reality this was an extra faff on that I didn’t have the time for. It was much easier to just buy pre made florists paste and mix my own colour. If you’re feeling extravagant you could even buy yours in the shade you really want.

strategically press your cutter into the paste and carefully lift it away from the paste - sugar flowers hydrangea

Strategically press your cutter into the paste and carefully lift it away from the paste

My hydrangea cutter and mould instructions informed me that I needed vegetable fat to smear on the silicon mould to prevent the paste from sticking to the mould. It was late, I was all ready to cut out some flowers so I wasn’t going to make it to any shops. Improvising I took some pearl lustre powder and popped it in a shallow bowl.

Pearl Lustre Powder makes a great alternative to vegetable fat and icing sugar

Pearl Lustre Powder makes a great alternative to vegetable fat and icing sugar

Using a brand new clean blusher brush I coated the mould liberally with a combination of edible pearl and baby blue lustre powders.

Dust like your life depends on it

Dust like your life depends on it

Et voila. I have satisfactorily released flowers with a touch a sparkle and glamour that I was going to have to paint on afterwards. Success and time saved!

Using a clean blusher brush first the mould with lustre powder to stop it sticking. You can use trex but I discovered this saved me a job later on!

Using a clean blusher brush first the mould with lustre powder to stop it sticking. You can use trex but I discovered this saved me a job later on!

The little mould that I loved to hate. The first 50 flowers were a breeze but your fingers do start to ache after so much cutting, folding and pressing! The trick is to fold the mould over carefully so you don’t dislodge the flower inside. Or if the paste is too thick it oozes out of the sides of the mould when pressed…

image

There is a lot of patience and gentleness required in this process…

The pressed Hydrangea Blossom

The pressed Hydrangea Blossom – look at that beautiful detail

If you’ve lustred up the mould enough it should pop out quite easily but you might need to coax it out if it’s a bit stubborn. (Spot the cocktail sticks in the background). Flipping over the mould allows gravity to do the work for you and release the lovely detailed blossom into your palm.

Gently coax the flower out of the mould by peeling the mould away from the flower or let gravity do it's job

Gently coax the flower out of the mould by peeling the mould away from the flower or let gravity do it’s job

The final result! I also added a little baby blue edible lustre powder to the mix to ad depth and variation to the blossoms. I was glittering for a week after this!

Hey presto! You have a sugar flower all sparkly and full of lustre which helps bring it to life

Hey presto! You have a sugar flower all sparkly and full of lustre which helps bring it to life

I found a good way to make the flowers look more realistic was to gently roll themeach one in my cupped hand before leaving them to dry. This gives more shape to the petals, so they don’t appear too flat and fake. Then repeat times a million… This is probably an extreme exaggeration but I lost count of how many flowers I actually pressed. I used about 2 and half 500g packs of florists paste to create maybe around 150 hydrangea blossoms. Not all of them ended up on the cake however as I dropped some on the floor… Some snapped after they dried. They are quite delicate little flowers! And some flowers just weren’t that pretty (sorry flowers but some had to be prised apart and suffered the consequences) so they didn’t make the cut.

Gently roll the flower in your hand to encourage the edges to bend in slightly and create a bit of variety

Gently roll the flower in your hand to encourage the edges to bend in slightly and create a bit of variety

The flowers need to be held in shape whilst they dry. You can splash out on a special sugar paste foam mat if you like, or you can wrap an egg box in cling film and pile them all up like me. Crinkled up tin foil works really well too. It may also be a good idea to add layers of cling film to stop the flowers sticking together. I know I’m biased but don’t they look pretty all sparkly and delicate??

Line an egg box with cling film and pop all your pretty flowers in to hold their shape whilst they dry. Repeat repeat repeat...

Line an egg box with cling film and pop all your pretty flowers in to hold their shape whilst they dry. Repeat repeat repeat…

It takes about a day for the flowers to dry out. I made mine in stages so I could spend an hour or two at a time pressing hydragenas until I thought I had enough. Then  all that’s left to do is ice the 5 tiers of fruit cake and assemble it all.

The Final Result! The Wedding Cake

The Final Result! The Wedding Cake

This is part 2 of the 4 stages of wedding cake baking! You can read more about my epic wedding cake adventures here…

Part 1 – My 5 tiers of fruit wedding cake – My biggest booziest cake yet 

Part 2 – How many sugar flowers does it take to make a wedding cake?

Part 3 – Where to start icing a 5 tier wedding cake?

Part 4 -The Final Frontier – Decorating & assembling my 5 Tier wedding cake

46. Say hello to my Brazilian Roll ~ Rocambole Cake

image

Brazil is yet another country on my still to visit list. However I do have a lovely Brazilian friend who was an exchange student at my sixth form. We became firm friends over A Level Media Studies and parties. Thinking of you Gabriella when baking my Brazilian Roll or as you may call it in Brazil a Rocambole.

image

This bake reminds me of Mary Berry’s Chocolate Roulade (one of my very first around the world in 80 bakes more technical challenges). Both are very similar to the wonderful Swiss Roll however the distinguishing factor of the Rocambole and the Roulade is that they use whisked egg whites to fluff up the sponge. This means it’s a fragile cake but very light. Where as the Swiss Roll is more like a sponge cake, less delicate and probably (in my opinion) a bit easier to bake and to handle.

Traditionally the filling in a Rocambole is a Doce de Leite. This is a Brazilian favourite. It’s a creamy milky toffee sauce made from slowly reduced condensed milk. (It’s quite similar to the Italian toffee sauce dolce de leche). It’s reduced down over a low heat until caramelised to produce a thick fudgey gooey paste. As the filing takes quite some time to prepare it’s best to start with this! You need to be really careful with this as if the pan is left to boil dry the can could explode and really hurt yourself (and your kitchen).

how to make doce de leit Simmer an unopened can of condensed in a pan of water for at least 2 and a half hours

Simmer an unopened can of condensed in a pan of water for at least 2 and a half hours

Take one unopened can of condensed milk (Most cans in the UK randomly contain a very precise amount of condensed milk of 395ml. Who knows why? But the process is the same regardless of the size of your tin). Place your unopened can of condensed milk in a pan of boiling water and simmer it for 2 and a half hours. Keep an eye on the pan and keep topping up the water so the water level remains.always around 2 thirds of the way up the can. Allow the can to cool for about 30 minutes before opening it.

Evaporated milk isn’t the same and unfortunately won’t work as a substitute, as evaporated milk doesn’t have as much sugar in it. Never to be defeated I have managed to make doce de leite with evaporated milk. If you’re up for an experiment and evaporated milk is all you’ve got, you could get away with adding sugar to evaporated milk and dissolving it slowly over a low heat to create your own toffee sauce. (I have free styled this recipe before and it gave a rather more liquid toffee sauce so it can be done! Just add enough sugar until you reach your desired level of toffee colour and taste.)

how to make doce de leite

The grand reveal! My doce de leite looks suspiciously like condensed milk. No hint of toffee here. Back in the pan you go

Unfortunately I failed to let the water bubble (being a little too cautious – very unlike me!) so when I opened my can it still looked like condensed milk, just a bit thicker. However undeterred I threw it all into the pan and heated it on the stove to make my doce de leite directly in the pan. It does require a bit more attention and elbow grease however…

The slightly reduce condensed milk straight from the can, the bottom revealed some thicker doce de leit

The slightly reduce condensed milk straight from the can, the bottom of the can revealed  the beginnings of some thicker doce de leit. It’s a bit lumpy so needs a good whisk

I’m a little impatient and wanted it to thicken up quickly so kept increasing the heat and whisking by hand until it bubbled, then removed the pan from the heat to allow the residual heat to continue to cook the condensed milk. You need strong arms to keep whisking continuously as the milk thickens! (My arms weren’t feeling the strongest after a full day of Yoga handstands the day before but I still managed)

Whisking the condensed milk over a low heat to make doce de leit

Whisking the condensed milk over a low heat to make doce de leite

My impatience led my doce de leite to become extremely thick and it pulled the head off my hand whisk! However a little cold milk reduced the heat of the sugar to calm the doce de leite down. It allowed me to get the sauce back to a slightly more spreadable state. To stop the cooking process I placed the hot pan into a sink of cold water. In my ‘wisdom’ I then dipped my finger into the doce de leite to test if it was cool enough to spread! It was most definitely NOT cool enough and welded to my finger. I managed to pull the molten lava doce de leite off my finger and ran it under the cold tap. Did you know a piece of frozen melon makes a wonderful cold compress to take the heat out of a burn? Clutching my melon I managed awkwardly to continue to whisk the sauce still undefeated by my blistering finger. I ended up clutching on to more frozen fruit whilst spreading the doce de leit and rolling up the cake.

After a good 5 minutes of whisking and heating it turns a golden brown colour and becomes quite thick! Add a bit of milk to loosen the mixture if it needs it.

After a good 5 minutes of whisking and heating it turns a golden brown colour and becomes quite thick! Add a bit of milk to loosen the mixture if it needs it.

The cake itself takes hardly any time at all to prepare. The whisking is the most time consuming part of the Rocambole. Like a Roulade you have to whisk the ALL of the egg whites (there’s 5 eggs in this cake! That’s a lot of egg!) on a high speed setting. (If you have an electric whisk, if not prepare your arms for a bit of a work out!) until stiff and shiny. This takes about 5 to 7 minutes. The egg whites will double in size. I love this bit!

Whisking the egg whites to make Rocambole

Whisking the egg whites to make Rocambole

One slight difference between the Rocambole to a Roulade is that the egg yolks are then also whisked into the egg whites. (With a Roulade you whisk the yolks with the sugar and chocolate then fold it into the egg whites.) The Rocambole is a bit quicker banging it all together and whisking to your hearts content. You don’t want to knock any of the air out of the egg whites, so it’s best to beat the yolks lightly first so they are runny. You can then pour the egg yolks in as you whisk.

Adding egg yolks to whisked egg whites - rocambole

Whisking in the egg yolks to the egg whites – lovely creamy yellow colour and very fluffy!

Then to whisk in the sugar. The traditional Brazilian Rocambole recipe doesn’t include any flavourings or spices, it is a plain egg sponge. (A bit like my Chinese Egg Yolk Sponge favourite!)  Ever the experimenter I wanted to add a bit of flavour to this bake so I used vanilla sugar. I made this really simply by shoving a leftover vanilla pod, which I had scraped the seeds from for another bake, into a bag of sugar. I then left it to infuse it’s vanillary goodness for a couple of weeks. It smells lovely and gently flavours the sugar with a hint of vanilla. It’s a good way to get your moneys worth out of those more expensive ingredients as I hate to throw the pods away. I often pop a vanilla pod into any spirit that I have in my cupboard too. Vanilla Brandy or Vanilla Rum anyone?

Then to whisk in 5 tablespoons of water into the eggs and sugar - Rocambole

Then to whisk in 5 tablespoons of water into the eggs and sugar

The eggs should be seriously expanding and threatening to overflow the bowl by this point as they inflate rapidly. You need to continue to whisk the fluffy and shiny eggs whilst pouring in 5 tablespoons of water. This takes around 5 minutes of whisking.

Fold in the tiny amount of flour and baking powder

Fold in the tiny amount of flour and baking powder

In order to maximise the air in the cake and to avoid knocking the air out of the wonderfully fluffy eggs, sift in all 5 tablespoons of plain flour and half a teaspoon of baking powder. Then using your  best metal spoon fold in the dry ingredients gently. This is probably the smallest amount of flour that I’ve ever folded into a cake. It felt a bit odd as the flour just disappeared to the bottom of the bowl, but trust in the recipe, it definitely works!

Rocambole Carefully pour the mixture into a rectangular baking tin

Carefully pour the mixture into a rectangular baking tin

Line and grease a rectangular baking tin. I used a tin 37cm long by 22cm wide and 5cm high. Use a deep tin as it will rise in the oven.  This mixture is really delicate so to avoid knocking the air out of it, hold your bowl of mixture as close to your tin as possible and pour. It’s a very liquid mixture so try to pour it into all of the corners so you don’t have to move it around too much in the tin. Gently level the mixture with a spatula to avoid an uneven bake.

A fully cooked and curled Rocambole

A fully cooked and curled Rocambole

After baking it in a preheated oven (350 F/170 degrees Celsius) for 15-20 minutes, it will become golden brown and feel slightly firm and springy to the touch. I always check that a cake is cooked by using a cocktail stick, if it comes out clean from the sponge you know it’s done. Unfortunately I was trying my Mary Berry recommended foil backed parchment paper and it doesn’t always do what it’s told. In the heat of the oven it curled up and into the cake! Maybe a wider variety of paper is needed for this tin so that it reached the edges of the tin and can be scrumpled down over the lip of the tin to hold it in place?

Carefully lift your cake from the tin and prise any baking paper out of the sponge (if needed)

Carefully lift your cake from the tin and prise any baking paper out of the sponge (if needed)

Allow the cake to cool in the tin slightly so it holds it’s shape. Then carefully lift the cake out of the tin, by the baking paper. But don’t remove the baking paper.

Spread the Doce de Leite carefully onto the sponge - try not to take the cake with you

Spread the Doce de Leite carefully onto the sponge – try not to take the cake with you

Using a spatula and a palette knife , I tried to spread  a thin layer of doce de leite across the cake. This is easier said than done whilst holding a piece of frozen fruit on your burnt finger. The Doce de leite is very gooey and if it’s as thick as mine, it could pull holes in your cake (note the holes in my sponge above…) But who is going to check the inside of your cake? When it’s rolled up no one will notice  and it’s going to taste gorgeous anyway so throw it on as best as you can.

Carefully does it ... Roll Roll Roll your Rocambole

Carefully does it … Roll Roll Roll your Rocambole (excuse my slippers)

There is a bit of a knack to rolling up a Rocambole. I decided to neaten up my slightly rough edges, trimming the longest edge as straight as possible with my very best sharp knife. It’s not the easiest cake to trim as the sponge is very moist and delicate (so it sticks to the knife!). I only trimmed one edge in case I destroyed the other side. This cake was to accompany me to the Clandestine Cake Club and I didn’t have time to make another one (or anyone condensed milk!). Trimming the cake does have it’s benefits however, I could make sure it tasted good before serving it up to my friends! 


Ta da! One rolled up Rocambole!

Ta da! One rolled up Rocambole! (And one pan of soapy boiling water on the stove to dissolve all of the doce de leite)

Before I even attempted rolling the cake I made sure I had loosened all of the edges from the baking paper gently with my fingers to avoid tearing the sponge. It’s best to keep the sponge on the paper so you can use the paper to coax the cake over. I started the roll off by pressing a knife into the sponge about half an inch in from the shortest edge. I then folded this lip of sponge over to start the roll and give a really tight spiral. Then to let gravity do it’s job! Lifting the paper over,  letting the cake fall into place whilst coaxing it into a roll with your hands. Once you start it’s easy to get carried away! Hence my lack of photos of this process the Rocambole was all rolled up before Chris could get into the kitchen to take a photo for me!

Rocambole recipe Gently ease any slightly stuck bits  of cake off the paper using your finger tip...

Gently ease any slightly stuck bits of cake off the paper using your finger tip…

All of the pictures I could find of a Rocambole seemed to show a cake with a very long spiral with a very thin sponge so I chose to roll mine from the short edge to the short edge, to maximise my spiral. If you wanted to get more slices out of your Rocambole you could roll from long edge to long edge and get a much longer cake.

Just rolled Rocambole - trimmed edge to the front!

Just rolled Rocambole – trimmed edge to the front!

Once you’ve rolled up your Rocambole all it needs is a liberal dusting with icing sugar and you’re good to go! I recommend eating it quick as the doce de leite has a tendency to ooze out of the sides when left for a night. But if you like this effect then see if you can hang fire for a bit for an extra level of goo.  I can confirm that this a tasty cake. It’s definitely a winner if, like me, you have a sweet tooth as most of the flavour is derived from the sugar in the cake and the milky caramel doce de leite! It’s an extremely tender sponge that almost melts in your mouth. I’ve heard very good things from my Brazilian friend, who’s Grandma makes Rocambole. She covers the entire Rocambole in chocolate buttercream and adds some texture with a fork to create a chocolate log Rocambole! Now there’s a good idea for another Christmas bake to add to my list!

Clandestine Cake Club Newcastle at Pink Lane Coffee

Glorious Cake Collection at the Clandestine Cake Club Newcastle at Pink Lane Coffee

I took my little Rocambole along with me to the Clandestine Cake Club  at the lovely Pink Lane Coffee shop in Newcastle where we were baking around a ‘New’ theme. This could mean a new recipe, new baking tin, new ingredients. This was perfect for me as pretty much every recipe I bake is new to me and a bit of an experiment. There were some amazing cakes that night, my favourite being a chocolate and peanut butter layer cake (7 layers in total!). Check out Lisa’s blog for more gorgeous pictures of the beautiful cakes from all of the bakers who braved the January snow. When there’s cake nothing will get in my way. It was immense. I must admit I took an extra sneaky piece home for later too. I was so happy that all of my Rocambole got eaten.

So if that has whetted your appetite for a spot of Rocambole here’s what I used to make mine.

Ingredients

Doce de Leite Filling

1 unopened can of condensed milk (395 ml)

Alternative fillings…

If you don;t fancy simmering a can of condensed milk down in a pan I’m sure you could put a jar of nutella or jam or guava marmalade (another traditional Brazilian Rocambole filling) to good use here too.

Cake

  • 5 eggs
  • 5 tablespoons of vanilla infused  sugar (or just normal sugar will do)
  • 5 tablespoons of water
  • 5 tablespoons of plain flour
  • 1/2 teaspoon of baking powder

Happy Christmas – The Rosca de Reyes results are in!

A very decadent Rosca de Reyes - 3 Kings Cake

A very decadent Rosca de Reyes – 3 Kings Cake

Wow what a year this has been indeed! We’ve made it over half way around the world in 80 bakes, ran my first half marathon (raising over £700 for Oxfam!), baked (and devoured) some wonderful (and some not so wonderful…) cakes AND been very lucky indeed to win the Blog North Best Food and Drink Blog Award.

Great North Running

Great North Running

And that’s not even the end of this amazing year’s excitement, it doesn’t all finish there! I’m very excited to let you know that I won the online bake off and £500 of holiday vouchers for my Rosca de Reyes 3 Kings Cake! Amazing! Thank you all so much for reading, commenting and also voting for me. I can’t thank you enough for your support and love. We will be using the £500 of Cosmos Holiday vouchers to book our honeymoon in the new year, a trip somewhere hot and relaxing will be perfect after our wintery wedding (which is taking place in less than 2 days…)! Fingers crossed the cake stays upright!

A golden Rosca de Reyes

A golden Rosca de Reyes

The lucky winner of the £50 very.co.uk voucher is Jenny B. The company will contact you directly to arrange your voucher. Thank you so much for voting!

I can’t go without mentioning the 4 brilliant bakers and bloggers, in the Rosca de Reyes bake off. They are exceptionally good bakers and I’ve been enjoying their blogs for over a year now and follow them all on twitter. I really recommend checking out their blogs, if you haven’t done so already. They are very talented and inspirational foodie bloggers.

I hope you all have had a wonderful Christmas and are looking forward to the New Year as much as me. I will be returning shortly as a married baker, with a new name and everything. Looking forward to letting you know how my biggest challenge so far pans out… my 5 tier wedding cake!

Lots of love and happy new year!

Lauren x x x

p.s Now would be a perfect time to have a go at baking your own Rosca de Reyes to celebrate the Epiphany on January 6th.

p.p.s. My golden Rosca de Reyes – 3 Kings Cake even got a mention in the The Mirror within an article about Christmas eats and treats around the world!

44. A Healthy Christmas Pudding? – a very English recipe

image

Can this be real? Is there such a thing as a healthy Christmas Pudding when you soak your fruit in booze and add copious amounts of sugar? Well according to the Great British Bake Off (series 2 cookbook) it is. So what’s the difference you may wonder? It’s breadcrumbs, would you believe and no suet!!

image

Obviously I can never leave a tried and tested recipe alone so I accidentally modified it… I decided to make it nut free, adding the equivalent amount of dried fruit in place of the nuts to soak in the booze. Then promptly forgot about my decision and added the nuts as well. This will surely be an extra fruity pudding!

I have only attempted one Christmas Pudding, an original Bero recipe, full of suet and other wonderful stuff. However it didn’t cook all the way through despite it’s initial 3 hours of steaming and the additional steaming on Christmas Day itself.

I got a bit carried away when purchasing fruit for my enormous wedding cake   (which actually turned out to be a good thing – it’s a LONG story- but in a nutshell I ruined 3 cakes in the process of baking my 5 tiers so had to bake 8 fruit cakes in the end!) Even with the additional 3 cakes bakes I still had enough dried fruit to bake 2 Christmas Puddings! Hurrah! (I also have plans for my rather sad 3 wedding cake tiers, they will not go to waste!)

image

As with all good festive fruit recipes I started with soaking the fruit in Booze, Brandy to be exact, along with some lemon juice. The recipe only requires a soak over night but I decided to soak it in a tupperware pot in the fridge for a few days instead. Surprisingly the most effort in this entire pudding is the weighing of ingredients and bread crumbing. (Totally discounting the watching of the pot bubble for 3 hours of course…)

image

The breadcrumbs required a little preparation so a quick blast in the hello kitty toaster and a whizz with the blender makes some lovely breadcrumbs and decorates the kitchen beautifully in bread dust.

Whilst the bread is toasting you have time to whisk together the butter, honey and sugar until light and fluffy. Then to whisk in each egg individually. The more you whisk the lighter the pudding, so whisk away!

wpid-2012-11-25-18.16.09.jpg

Whisked up and fluffy butter, sugar, honey and eggs with a smattering of grated apple

Then to stir in the grated apple, spices, (nuts) and brandy soaked fruit.

Stirring in the spices, nuts and grated apple

Stirring in the spices, nuts and grated apple

With the grand finale stirring in the toasted breadcrumbs along with the dried fruit.

image

This forms quite a pale and loose mixture Once it’s all mixed together well it’s ready to be spooned gently into your pre prepared greased pudding bowls.

image

This recipe is enough to make two Christmas puddings. I used a 1lb bowl and a 3/4 1 lb. bowl.

image

Fill the pudding basins until at least 3/4 full and make sure the pudding is level by pushing the mixture level with a spatula and tapping the bowl gently on the worksurface to release any air bubbles.

image

Then for the exciting bit! I’ve read so much about wrapping puddings in greaseproof paper with a pleat (a double fold about an inch wide) in it to allow room to expand as the pudding steams, but never before have I actually had a go at it!

image

Both puddings needed a lid made out of a layer of greaseproof paper and tinfoil (both with wonderful pleats) before being trussed up like a turkey in lashings of my trusty cotton string.

image

There is definitely a knack to this technique. My theory is always to tie stuff as tight as possible, it needs to be water tight, (you don’t want to drown your pudding when you submerge it in your pan of boiling water) and when in doubt add more string and tin foil. I added a full coat of tin foil, wrapping the pudding basin from the bottom to ensure the water couldn’t seep into the pudding. It seemed to do the trick. I added an additional length of string, tying it to the string around the edge if the puddings to create a handy handle for lifting out in and our of the pot too.

image

Dinner plate face down in the pan

I had planned to economise and steam both puddings together however I failed to measure the pan…. So 2 separate pans were required to steam the little beauties.

image

Pudding basin balanced on top of the plate inside the pan

I popped a dinner plate (face down) into my largest pan and a saucer into my smaller pan to balance the puddings on. I boiled the kettle and carefully poured the boiling water into each pan until it reached 2/3 of the way up the side of the pudding basin. Then to pop on the pot lid (an essential bit of the steaming process to keep the heat and moisture in) and let the puddings steam gently in the simmering water. It’s a good idea to allow some of the steam to escape by creating a vent (I tilted my pan lid and as my other pan lid was broken many moons ago I used even more tin foil with a hole in the top to create a lid) This takes about 3 hours on a low heat. I had to keep my eye on the pans and top up the water a couple of times as a pan should never be left to boil dry (this can cause the pan to explode!). So please be careful! My pans and plates made a few worrying noise over the next few hours, clattering about so perhaps a smaller plate would be a better idea to avoid the rattling!)

image

Double Bubble – 2 pans steaming 2 puddings simultaneously

After 3 hours remove the puddings from the pans and allow to cool. Take off their tin foil and greaseproof paper and wrap them with a fresh coat. This will help to create a seal and prevent any mould from forming on your lovely puddings. I placed a clean saucer on the top of mine to weigh down the paper and create a good seal.

image

Freshly steamed and cooled pudding. Ready for a tin foil coat and a sleep in the fridge

These puddings will keep for up to a month in the fridge or up to 3 months in the freezer, but once defrosted they will need to be eaten within a week. If you were making a traditional pudding with suet they can be kept for about a year to mature so you can make them well in advance! I’ve just read that freezing your pudding helps to speed up the maturation process. So this could be a good option if you haven’t had a chance to prepare it in advance. My puddings are currently having a snooze in the fridge until 15th December as we’re celebrating Christmas a little early in the Prince household! I may even give them both a little drink of brandy to help keep them warm for the next 3 weeks. 🙂

The puddings looked a little paler than I expected after their 3 hours in their steam bath, I think this is due to the breadcrumbs and lack of flour. But I could tell that they were done as one pudding had shrunk back slightly from the side of the basin.  Unfortunately I can’t tell you how they taste yet, as I need to steam them for 3 more hours on Christmas Day (or 15th  December in my case – some of us have a wedding to prepare for and a 5 tier cake to finish decorating!) I will pop back to let you know how they turn out

Things I used to make Healthy Christmas Puddings 

  • 70g dried apple
  • 330g sultanas
  • 200g mixed peel
  • (total 700g of dried fruit – any combination could be used! I added more fruit to replace the nuts if you wanted to make a nut free version just omit the nuts below)
  • Zest of one grapefruit ( I had ran out of oranges so replaced this with the only citrus fruit I had to hand…)
  • 5 dessert spoons of Vanilla Brandy (to soak the fruit in)
  • Juice of 1 lemon (to soak the fruit in)
  • 50g sliced blanched almonds (I accidentally added the nuts which I had added more fruit to compensate for -you could reduce the amount of fruit you use by 100g if you would like to include the nuts?!)
  • 50g ground almonds
  • 75g brown sugar
  • 75g unsalted butter
  • 75g runny honey
  • 2 eggs
  • 1 medium apple grated (with  the skin on)
  • 125g toasted white breadcrumbs
  • 1/2 teaspoon all spice
  • 1/2 teaspoon cinnamon
  • 1/2 teaspoon ginger

(I heavily adapted this recipe to suit what I had in my cupboards. The original included pine nuts and fresh figs, so feel free to play around with the ingredients, your favourite fruit and nuts and what you can afford to include!)

  • 2 pudding basins (1lb each)
  • tin foil
  • greasproof paper
  • 2 saucepans and 2 saucers
  • Steam for 3 hours on a low heat
  • Refrigerate for up to one month or freeze for up to 3 months
  • On the day you wish to eat your pudding steam for 2 hours on a low heat before serving

image

Experimental Chocolate Chip Polvorón – Spanish Christmas Cakes or Mexican Wedding Favours

image

I adore Polvorón and wanted to have a go at creating a nut free version. What other flavours could I incorporate into this delectable sweet treat and not diverge too far from the traditional ethos of the the Polvorón which mainly consists of nuts…? What else but chocolate and cinnamon!

image

Using the same method as my original Polvorón attempt I replaced the nuts with dark chocolate and added a generous dose of cocoa powder.

And here we have it… a flatter chocolatey and chewier version of Polvorón!

image

Perhaps because they lack the nuts to hold them together and chocolate (unlike nuts) makes when baked, the little chocolate balls spread into perfectly round chocolate chip cookies.

image

I chose to use caster sugar rather than icing sugar to enhance the crunchy texture. It also added a wonderful chewiness to the cookie, with the sugar and chocolate combining to create a toffee in the centre of the crumbly cookie! Yum! They have been very popular in my house!

image

With a light dusting of icing sugar they look very Festive. The hint of cinnamon conquers up Christmas.These are would make a perfect homemade present, or to be eaten by the handful with a large bucket if tea. I really rather enjoyed making this Spanish Christmas cakes/cookie recipe up!

image

I’m looking forward to my further Polvorón flavour experiments!

image

Things I used to make Chocolate Polvorón

Makes about 40 small biscuits

Preparation: 15 minutes

Chilling time: 30 minutes

Baking time: 18-20minutes at 170degrees c

  • 220g butter (1 cup or 2 sticks)  room temperature
  • 250g caster sugar (2 cups or 240 grams) – rather than icing sugar to add an extra crunch that the nuts would normally add
  • 2 teaspoons vanilla extract
  • 250g all purpose flour (2 cups or 240 grams)
  • 100 g (1 cup) dark chocolate coarsely ground/chopped
  • 1/4 teaspoon ground cinnamon
  • 30g cocoa powder
  • icing sugar to dust the biscuits with

image

I’m entering these experimental Spanish Polvores into Chris’s Cooking Around the World Spain Round up. Pop on over to his blog for a round up of some inspirational international cooking! Thanks for reading!

43. Polvorón – Spanish Christmas Cakes or Mexican Wedding Cakes

image

Polvoron – you are always on my mind

I’ve had Polvorón on my mind for some time. I read about these crunchy little biscuits bites, months and months ago and they’ve been sitting patiently in my ‘Things to bake’ pile ever since.

They are quite an unusual discovery, something I had never heard if before. Traditionally Polvorón are eaten as wedding  cakes in Mexico made with pecans or as Christmas cakes in Spain, kind of like a Spanish Shortbread. Now I’m planning my own wedding I thought perhaps now is the time to incorporate an international flair into the festivities. Intrigued I launched into my own interpretation of the traditional recipe, basically determined by whatever ingredients I have in the cupboard.

image

Chopped up dried coconut

I don’t usually buy pecans or walnuts so they had to be substituted for good old almonds (a nut which is ever present in my cupboard and life…) and chunks of dried coconut roughly chopped.

Due to the speedy baking that was necessary (and seems to be happening more and more often in my house) I improvised yet again. No time to assemble to food processor so I grabbed the nearest heavy item (a glass jar), threw the almonds into a sturdy sandwich bag and hammered them with the jar until they were delightfully smushed. Feel free to use a pestle and mortar if you wish to be a tad more refined than I.

image

Beating the butter to a smooth paste

The ingredients are very similar to basic shortbread, with flour, butter and sugar.

image

Thoroughly whipped butter

This is another brilliant biscuit for busy bakers as I managed to whip up the dough first thing on a Saturday morning, chill it whilst I showered. I used my trusty hand held electric whisk to beat the butter and icing (powdered) sugar together. Then to whisk in the flour and vanilla extract.

image

Whisking in icing sugar, vanilla and finally flour

image

My combination of ground almonds, chopped blanched almonds and chopped coconut.

And finally the nuts of your choice.

image

The dough looks a bit scrambled eggy to start with…

image

Take a small amount of loose dough in your hand

I completely misunderstood the recipe which calls for the dough to be chilled. I shapped the dough by hand into about 35 mini golf balls.

image

squash it together and hey presto you have a ball!

I popped them all onto a greased and lined baking sheet covered them with cling film and popped them in the fridge to chill.

image

All the Polvoron lined up in a row – ready for chilling

(I think you’re supposed to chill the whole dough then shape it?!) But this gave me a chance to shower so in effect helped to speed up the process.

image

Delicately golden Polvoron fresh from the oven

I then spaced the little balls out evenly to give them room to spread whilst they baked. I popped the tray in the oven to bake it at 170 degree C for about 18-20 minutes, until they took on a delicately golden hue, whilst I applied clothes and make up.

image

Cooled and ready for a good dusting of spicy icing sugar

Just enough time to then allow the Polvorón to cool on the tray to set their shape for 5 minutes. Then to cool them fully on a wire rack to stop the butter sweating out of them and give them sticky bottoms.

image

Fully coated Polvoron

Once cooled fully I rolled the Polvorón in a bowl of icing sugar swirled with cinnamon giving them a fluffy white coat. As they set the sugar absorbed slightly into the biscuit adding an extra dimension of sweetness to the treat.

image

Happy Birthday Mel!

I then quickly bagged them up, tied with a pretty ribbon and dashed off with my pretty packages of Polvorón to celebrate my friends birthday! With a champagne fueled (10 minute) train journey to Durham. Followed by more food, cocktails and Polvorón.

image

Obviously I had to ensure their quality before sharing them with friends… they passed the test! Crunchy and sweet Polvoron

We declared them a tremendous cocktail accompaniment (and that’s not the frozen strawberry daiquiris talking).

Polvorón are buttery like shortbread but with an added crunch as they are smaller and denser than a traditional shortbread biscuit. The almonds brought a subtle creamy yet crunchy texture along with the coconut. I expect pecans would add even more bite to the biscuit. The Polvorón remind me a little of biscotti or amaretti biscuits which I also adore. What’s not to love about a delicious bite sized treat. Even better, as they’re so small you can obviously eat a whole handful of them in one go!

Polvoron – up close

I love the method of shaping these little biscuits into balls as I find rolling and cutting out biscuits a bit laborious  I quite enjoyed this hand made alternative and I’m already inventing my own nut free recipe for my friends who can’t eat nuts as I think everyone needs a bit of Polvoron in their lives!.

Things I used to make Polvorón

Makes about 35 small biscuits

Preparation: 15 minutes

Chilling time: 30 minutes

Baking time: 18-20minutes at 170degrees c

  • 220g butter (1 cup or 2 sticks)  room temperature
  • 250g powdered sugar (2 cups or 240 grams)
  • 2 teaspoons vanilla extract
  • 250g all purpose flour (2 cups or 240 grams)
  • 120 g (1 cup) almonds/pecans/coconut coarsely ground/chopped
  • 1/4 teaspoon ground cinnamon

Thank you to Sourdoughtheangrybaker for inspiring me to bake Polvoron! I had not heard of these wonderful cakes until you told me about them. Brilliant blog if you haven’t had a look already, I recommend reading.

42. Swedish Tea Ring – the cake for busy bakers

Planning to bake something in advance of an event or special occasion can be difficult. Sponge cake will dry out if baked too far in advance and if you freeze it you can’t ice it beforehand. I seem to be in a real baking frenzy at the moment. Partly because I’m in the process of baking my 5 tier wedding cake…

The teetering tower of fruit cake… shame 2 tiers need to be re-baked.

I’ve chosen fruit cake for my 5 tier wedding cake is because I love fruit cake and it will be Christmas(!) but also because I can plan it in and bake it in advance. Then take my time with icing it, hopefully resulting in a well organised and non stressful experience. Also fruit cake improves with age! The longer I soak the fruit and feed it BOOZE the better it will taste.

Swedish Tea Ring

So what else keeps well? A rich yeast dough, that’s what! Bring on another new discovery and favourite of mine, The Swedish Tea Ring!!

Marguerite Patten has been tempting me with this recipe for years and I finally found a reason to bake it! To give as a present to my friends Josh and Mark for looking after me in Manchester at the Blog North Awards last week.

It’s like a robust Chelsea Bun/Cinnamon Roll/Belgian Bun hybrid. Perfect for cinnamon junkies like me and for preparing in stages for the busy baker. I can also confirm it’s portability! It survived a 3 hour drive through lightening and torrential rain! That’s one sturdy bake.

Whisking the dry ingredients together…

One thing I dislike about making yeast doughs is the kneading time required. I no longer own a hand whisk with dough hooks attached and my food processor can only handle dough for 2-3 minutes before it starts rocking around the counter top precariously. So, in my mad baking frenzy, I improvised as best as I could do. I used my electric hand whisk and beat the dough together… Who knows if this is an acceptable baking practice?

Whisking in the egg

But despite my poor little electric whisk’s protests (it’s been through a lot this year) It managed to combine the wet dough together with minimal effort required from me. I call that a result (although the blown out birthday candle smell emanating from the little whisk’s motor might suggest otherwise…)

Whisking in the milk – making a wonderfully sticky dough

Now as Marguerite arranged each bit of this recipe in a different section of the book, I managed to confuse my recipe somewhat. I used the full rich yeast dough recipe and didn’t adjust it for the Swedish Tea Ring, which means you either make one massive tea ring or one modest sized ring (according to the recipe) and a smaller mini one for later with the off cuts. (I made 2!)

Poor little burnt out whisk – thoroughly kneading/whisking the dough

Whisk all of the dry ingredients together. Then whisk into the mix the butter, followed by the egg and then the milk until you get an elastic, wet sticky dough.

One thoroughly kneaded lump of richer yeast dough

Leave it in an oiled bowl and cover with greased cling film to prove. I popped mine in the fridge over night to prove slowly (although it should only take an hour or two in a warm spot).

Or if you’re in a hurry you could pop your bowl over a pot of soup on the hob to prove…

Remove the proven dough from the fridge and allow to come to room temperature (if you have proven it in the fridge).

Fully proven dough straight from the fridge

Kneaded the full proven dough thoroughly to re distribute the heat throughout the dough.

Kneaded and shaped into a rectangle ready for rolling out

Roll the dough out to a rectangle 10 inches by 8 inches about 0.5mm thick. I was feeling very precise so I even measured and trimmed the rectangle so it had straight edges, to avoid the misshapen ends I found when making Chelsea buns

Rolled and trimmed to perfection. (Note the ball off extra dough leftover…)

My favourite bit was smearing the entire rectangle of dough with melted butter. I don’t think you need to be precise here. I found a pastry brush too delicate for this job and slapped the lot on with my hand instead straight from the microwave. (It only needs about 30 seconds to melt the butter through). The more generous with the butter the more gooey your filling.

Smeared with butter

For those who adore cinnamon, don’t feel restricted by the recipe. Feel free to pour as much cinnamon into your sugar as you can handle. Give it a quick stir to combine and then throw it onto your butter dough until you have an even blanket of cinnamony wonderment. I like to use enough cinnamon to give the sugar a dark brown colour. I ran out of brown sugar so improvised with normal caster sugar. Perhaps brown sugar would produce more of a caramelised effect?

Generously coat the butter in cinnamon and sugar (I was clearly in a hurry when I took this photo – apologies for it’s blurriness!)

After watching the Great British Bake Off, I realised my rolling skills may bye somewhat lacking. I have a tendency to misunderstand which side is the long side of the dough so I took photos to make sure I can bake this again in the future. Roll the dough towards you from the longest edge to the longest edge creating a ‘swiss roll’ of cinnamon dough.

Cinnamon swiss roll

Don’t worry if some of your sugar falls out of the roll. There’s plenty in there to make it taste wonderful. Keep the roll as tight as possible and if you have some melted butter leftover, it’s a good idea to spread a bit along the longest exposed edge to help ‘glue’ the dough to itself. I would also add a bit to one end to help later on…

Keeping the roll tight with one hand and glueing with butter the dough together

Press your fingers along the join in the dough to encourage the dough to combine and stick together. Turn the roll over so the join is firmly disguised under the roll of dough. Gravity should help to force the roll to stick together and stop the sugary goodness running out whilst it bakes.

Firmly joined together – then hide this join underneath the roll of dough

This also means you have the smooth (and prettier) side of the dough roll to play with. The most difficult bit of this bake is definitely joining the two short edges of dough together as they are very sugary and don’t want to stick.

This is my Chelsea Bun attempt but it’s very similar! The swirl of cinnamon at each end makes it difficult to join but making sure you have straight edges when you roll out the dough (unlike here – look at the overlap!) makes it much easier to join

I coaxed them together with butter and nipped the edges together with my fingers until they begrudgingly worked with me.

The troublesome join

I breathed a huge sigh of relief when it finally stayed in place! It could almost be one MASSIVE cinnamon doughnut at this point. But it had to have another little rest to prove again (about 20 minutes) before the next step…

a MASSIVE cinnamon doughnut

Now here my recipe reading skills escape me again. What I failed to understand was Marguerite meant for me to cut completely through the ring to create a fan of cinnamon buns in the shape of a ring, like this…

Marguerite’s Swedish Tea Ring – How it should look in real life – fully exposed cinnamon

Unfortunately the photo was on a completely different page and I interpreted the instructions like this…

Partially exposed cinnamon – my interpretation

Brandishing my sharpest kitchen scissors I snipped delicately and diagonally into the ring to partially expose the cinnamon swirls. I must admit I was nervous that this slicing would compromise the integrity of my dough join so was possibly overly hesitant at this stage.

Snippity snip

All it needed was to be placed into a moderately hot oven for 30 minutes or so, until it turned golden brown.

Swedish Tea Ring ready for the oven

As the Swedish Tea Ring is essentially a bread dough I also made sure it was baked through by knocking the bottom of the ring to listen for the resounding hollow tap.

Fully baked (and a bit more irregular in shape than Marguerite’s)

The baked Swedish Tea ring is a tempting sight with glitterring cinnamon peeking out from the dough (although not the most organised of rings it still looks inviting to me!)

Lemon Glace Icing

Once the ring cooled fully I whipped up a batch of lemon glace icing. It hides an enormous amount of irregularities and flaws, especially if you layer up your icing! Again I can;t say I followed Marguerite’s recipe exactly. I like a tart lemon flavour so I sloshed in a bit of lemon extract to give an extra punch to the icing. I also free poured the icing sugar and mixed it with enough lemon juice to create a runny yet thick icing. (This does take quite a bit of icing sugar!).

free pouring icing – balanced over a big mug

When the icing is just about right in consistency it should taste good (obviously!) not be gritty, the sugar should totally melt into the liquid and it should part when stirred in the bowl. (see the picture above) This means it’s starting to hold it’s shape a bit whilst still being runny to cascade over your tea ring and coat the cake in thick white goo.

iced and decorated Swedish Tea Ring

It’s best to pop your Swedish Tea Ring on some greaseproof paper (or a plate) before you pour the icing over it to catch the icing waterfall. It needs some time to dry and set. I iced mine just before bed so it had time to set over night before being deposited into it’s travel box. Please note you may need more than 2 hands and a palette knife to prise your cake from the paper after it’s iced!

The final Swedish Tea Ring

Mary Berry recommends decorating cakes in groups of threes. I didn’t have the traditional galce cherries in my cupboard but I always have a store of sultanas, hence the trio of sultanas dotted on each section of ring. It’s also best to add these decorations while your icing is still wet.

The Swedish Tea Ring in it’s rustic glory

I loved this bake. It was a pleasure to make, especially as I could spend an hour at a time doing each step making it a more manageable bake to do after work over 2 evenings. The contrast of the sharp and sweet icing against the warming cinnamon is so comforting, just what you need after a long drive in the winter night. Each slice reveals a beautiful cinnamon swirl…

A cinnamon swirl in every slice

I can recommend it with a celebratory gin or a cup of tea. Whatever your preference, I think you’ll enjoy this one. I enjoyed seconds, and could have even squeezed in thirds if I wasn’t being polite!

A chunk of Swedish Tea Ring

It was a good job I had baked my mini Swedish Tea Ring and froze it for later on that week for my friend’s house warming, as it then made a special appearance in a photo shoot for the Sunderland Echo who published an article on my Blog North Award. You can see the mini Swedish Tea Ring being balanced on a cake stand by me here

Double Swedish Tea Ring – Little and Large


Things I used to make my Swedish Tea Ring

1 quantity of Richer Yeast Dough

  • 7g of dried instant yeast
  • 3 oz sugar
  • 1 lb plain flour
  • pinch of salt
  • 3 0z butter/margarine (you choose)
  • 1 egg
  • just under 1/2 pint milk (room temperature)

Swedish Tea Ring

Use 8 oz of richer yeast dough to make one tea ring or the full quantity of richer yeast dough to make a larger ring (and a mini ring like me)

Filling

  • 1 oz melted butter
  • 2 oz brown sugar
  • 2 teaspoons of cinnamon (although I added enough to ensure the sugar was a dark brown colour…)
  • Sultanas to decorate (although it should really be glace cherries)
  • 30-35 minutes 350F, Gas mark 3-4 or 170 degrees C

Lemon Water (Glace) Icing

  • about 200g-300g icing sugar (you may need more to get the right consistency)
  • about 3-4 tablespoons of lemon juice
  • a good slosh of lemon extract (not essence)

Winner! Best Food and Drink Blog North Award for Aroundtheworldin80bakes

image

I still cannot believe it. I was stunned when I found out that Foodie Sarah had nominated me for the Blog North Awards for the best food and drink blog. (Thank you very much Sarah!).  I was ecstatic to discover that I had been shortlisted from 400 other nominated northern blogs down to 5. So I almost hit the floor when I heard my name announced as the winner of the Best Food and Drink Blog at the awards ceremony in Manchester last week!

I had toyed with the idea of going to the awards but thought that I would never in a million years actually win as the other shortlisted blogs are really fantastic.
I really recommend having a read of the wonderful food and drink blogs
Northern Food
Squidbeak
Offally Good
Little Red Courguette

And also the other categories too!

I came to the conclusion that I would go along for the sheer delight and experience of being shortlisted and to visit my friends Josh and Mark too. BEST DECISION EVER.

I merrily jumped in the car straight from work and flew down the motorway, through torrential rain and lightening, in the merry bliss of enjoying an amazing experience, with the car packed full of international baked goods to share with the boys. It wasn’t until I hit the one way system in Manchester that my tummy did a little flip. (I should also note that this is the furthest I’ve ever driven by myself before, ever! )

We were treated to some wonderful readings from other shortlisted bloggers, my favourite being Victory Garden a Hudderfield postie with a very entertaining blog of his observations of northern folk encountered en route. It wasn’t until the second interval that I started to feel a bit nervous….

The brilliant Culture Vulturess , who I’ve been following on twitter for quite some time, announced the winner of the Food and Drink Blog award and I did a little squeak and staggered down the staircase and up on to the stage, to babble my thanks and amazement at winning. I’m not entirely sure what came out of my mouth at this point but I know I thanked everyone, A LOT. And then my legs realised that I was on stage, speaking in public and momentarily refused to work to get me back down the stairs and off the stage. Once I regained the use of my limbs, I trotted off in a happy haze clutching my winners envelope, with a £50 cheque, a year’s web hosting and a winners badge to adorn my blog.

Me, on stage babbling a few words

Wow! Can you tell how OVER THE MOON I am??! It still feels like a dream and I’m still (almost a week later) smiling very widely. Who would have thought a year ago that I would be half way around the world in 80 bakes  and the winner of a Blog North Award?? I could never have dreamed this would happen.

I cannot thank you all enough. Thank you for reading, thank you for voting, thank you encouraging me! Thank you for sampling my sometimes bizarre and experimental cakes!

Thank you for a memorable and inspiring evening. I thoroughly enjoyed the relaxed and intimate event and had the opportunity to listen and chat to some very talented people! I am such a lucky girl.

I came away even more excited to continue blogging and baking and to complete my challenge. Bring on the next 39 bakes!

Just in case you want to know more about the awards you can find more details on the blognorth website here.

Also just in case you would like to see there’s a little article on my blog award on Sky Tyne & Wear website and Chris Evans gave me a little mention this morning on his BBC Radio 2 breakfast show (36 minutes in – thanks Mam!)

40. Chinese Rice Cakes – Half way aroundtheworldin80bakes!

Hasn’t time flown? One year in and we’re already half way Around the World in 80 bakes and what better destination to reach than China, one of my most favourite places in the world!

The Great Wall – look how far we walked

China has always been my ultimate must visit country. We visited just before the Beijing Olympics. Travelling around on over night trains from Shanghai to Beijing, climbing the Great Wall (sometimes on my hands and knees  – those steps are steep!) and sampling all of the delights of tasty chicken spine (!) and dried fish skin (yum).

Chinese Street Food – we didn’t eat the seahorses on sticks

Chinese Rice cakes have always intrigued me. I found the recipe in Marguerite Patten’s book and was surprised to discover how little rice flour they actually contain! However they do contain LARD! You may recall my love of lard from previous bakes such as Wiltshire Lardy Cake


These are such a quick little cake to bake and the results are impressive. Paul Hollywood would be proud of my equal sized rice cakes and even bake.

Chinese Rice Cakes – Paul Hollywood would be proud, look at the consistent size of the batch!

All you have to do is sift the dry ingredients together; plain, rice and corn flour, with baking powder, salt and sugar.

Ready to rub in the lard and rice flour

Rub the lard into the flour… My least favourite bit as I still shudder at the smell of lard. It’s definitely pungent.

Lardy times

Then bring together the mixture by stirring in a tablespoon of water, almond extract and half an egg. What a peculiarly precise measurement from Marguerite! I struggled to decide what half an egg was, so I cracked an egg into my cupped palm, over a bowl. I chopped the yolk in half with my finger and slid half (ish) of the egg into the mix. Keeping the other half for glazing the cakes later on.

Sticky dough ready for shaping

Once the mixture is quite sticky it’s ready to be divided and rolled into equal sized balls and plopped onto a greased and lined baking sheet. It’s easier to use your hands to roll them into smooth balls.

Lined up and ready for my close up – Chinese Rice Cakes

Once they’re on the sheet and spaced out nicely press a blanched almond into the centre and give them a quick egg wash with the other half of the egg. This means they will flatten a little onto the sheet and the almond will stick to the dough as it bakes. You will also get a wonderful golden crust on your cakes.

Perfectly spaced and oven ready Chinese Rice Cakes

Into the oven for for 15 -20 minutes at 205 degrees celsius and…

Just baked Chinese Rice Cakes

Ni Hao Chinese Rice Cakes ah hoy!

The Final Bake – Chinese Rice Cake

What a tasty little cake! The almond extract really comes though although if I were to make it again I probably would add more almond extract and some ground almonds too for more of an extravagant bake and richer flavour. Marguerite Patten’s recipes tend to be a bit more on the economical side, using minimum amounts of ingredients as she was baking during the war and making do with rations and tight budgets. I often double the quantities to make a larger batch and feed my hungry friends and family. The lard adds the extra moisture needed to give a crumbly yet light texture when baking with gluten free flours such as corn and rice which can be a bit dry side for my liking. They keep for quite a while in an airtight container and freeze really well too. Then easy to defrost as and when needed for a rice cake fix.

All in all a very quick, efficient and consistent bake. I would definitely bake these again and know that I won’t be able to resist experimenting with the ingredients.

Things that I used to make Chinese Rice Cakes

Margeurite Patten’s Recipe

This makes approximately 15 cakes

Preparation time: 10 minutes! (My kind of preparation!)

Cooking time: 15 -20 minutes

  • 4 oz (118g)  plain flour
  • 1 oz (30g) ground rice (rice flour)
  • 1/2 oz (15g) Cornflour
  • 3 oz (88g) sugar
  • 2/3 tsp baking powder
  • 3 oz (88g) lard
  • 1/2 an egg (quite difficult to measure!)
  • 1 tablespoon water
  • 1/2 tsp almond essence (I used extract as it’s stronger)
  • pinch of salt
  • blanched almonds to decorate
  • 15-20 minutes at 205 degrees Celsius