The Final Frontier – Decorating and Assembling my 5 Tier Wedding Cake

The decorated wedding cake in my kitchen

The decorated wedding cake in my kitchen

When I engaged in creating hundreds of Hydrangea blossoms to adorn the wedding cake with I didn’t really stop to think too hard about how I was going to get them on the cake… It can’t be that hard right? I purchased a pot of edible glue (amongst many other things from the lovely cake shop) and trotted off to carry on baking, pushing all thoughts to the back of mind about how edible glue works.

Some of the cakes resting nicely in my kitchen cupboards

Some of the cakes resting nicely in my kitchen cupboards

Fast forward 3 months to December 2012 and I have now 5 iced wedding cakes resting nicely in their cardboard cake boxes, up on some book shelves in our spare  room/wedding dumping ground. I have 1 extra iced cake just in case of any disasters and 2 naked fruit cakes leftover from the epic baking stage of this cake.

We were going to celebrate Christmas early this year, what with the wedding being on 30th December. So I started wrapping all of my presents very early. I was wrapping until 11 one night and popped everything under the tree only to look up and discover yellow stuff running down the walls, behind the tree. I showed Chris and he discovered that I had also placed all of my freshly wrapped presents into a quickly mounting pool of water gathering under the tree.

The wall was quickly turning into a water feature in our house. It also joins onto the spare room. A spot of investigating further revealed that the flood had started in the spare room, saturated the wall and then seeped into the living room and across the floor! Thank god my dress was at my parents house and thank god for Kate’s cake boxes! They were the perfect protection against any damp that was lingering in the air (there was a lot!). Luckily the shelves weren’t up against the soaked wall too and lucky that I had been wrapping presents to discover the leak as I wouldn’t have noticed it until we were swimming in our sitting room.

We're all having a dehumifier party

We’re all having a dehumidifier party

One emergency cake evacuation later and removal of everything out of my kitchen cupboards, the 8 cakes had a new dry home!  Our landlord delivered a dehumidifier to get rid of the damp and the stink and we were good to go. Although further calamities were awaiting me whilst Chris was away for his stag do and I had friends round for festive fizz, mulled cider and spare wedding cake tasters. The dehumidifier started to leak! I then flooded the toilet trying to mop it up and broke a handle off the door just before everyone arrived. I think it was best to get all the bad luck out of the way before the wedding.

Sticking a milliong sugar flowers in place

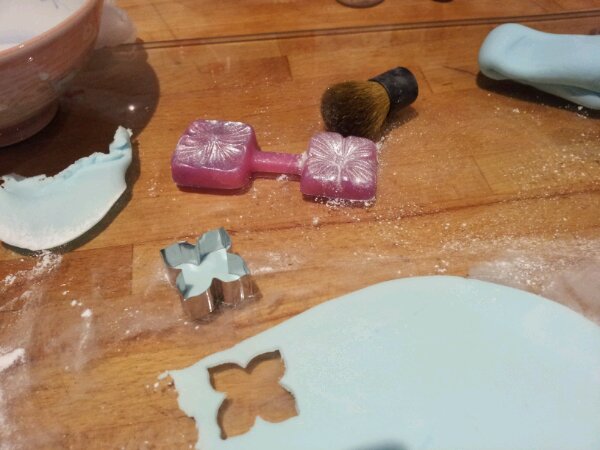
Sticking  millions of sugar flowers in place

To give myself plenty of time to glue the flowers on to the cakes I set aside a Saturday the week before Christmas to give them a chance to dry fully and me to repair any breakages/falling offs. This happened to coincide with the painter coming to repair our flooded flat. It made for an interesting 5 hours of glueing flowers whilst directing decorators to dust pans, brushes and keeping the cat at bay.

Edible glue takes a ridiculously long time to dry! In hindsight I think royal icing would have been a MUCH better idea… I used a cocktail stick to smear a little spot of glue onto the back of each flower (which had become really rigid and quite fragile so had to be handled extremely carefully). The moulded reverse of each flower results in grooves and ridges that the glue disappears into. It needs a bit more glue so that the it can actually touch the cake.

The glue should be tacky before attempting to apply it to the cake… If you try to stick it on while the glue is still runny you will have a happy game of chase the flowers as they fall off the cake leaving a trail of glue which has now taken on some of the blue food colouring all down the cake. Many of the flowers fell on the floor and smashed this way but I also realised that I have quick reflexes, almost a cake decorating ninja.

The painters were highly amused by my antics in the kitchen where I didn’t even stop for a cup of tea for 5 hours whilst contorting myself into all shapes to catch the falling flowers and hold 4 flowers in place with each hand until the glue dried enough to support their weight. Patience and flexibility were useful qualities to have a this stage in the cake decorating process. It’s a good job I do yoga.

Almost there but not quite yet...

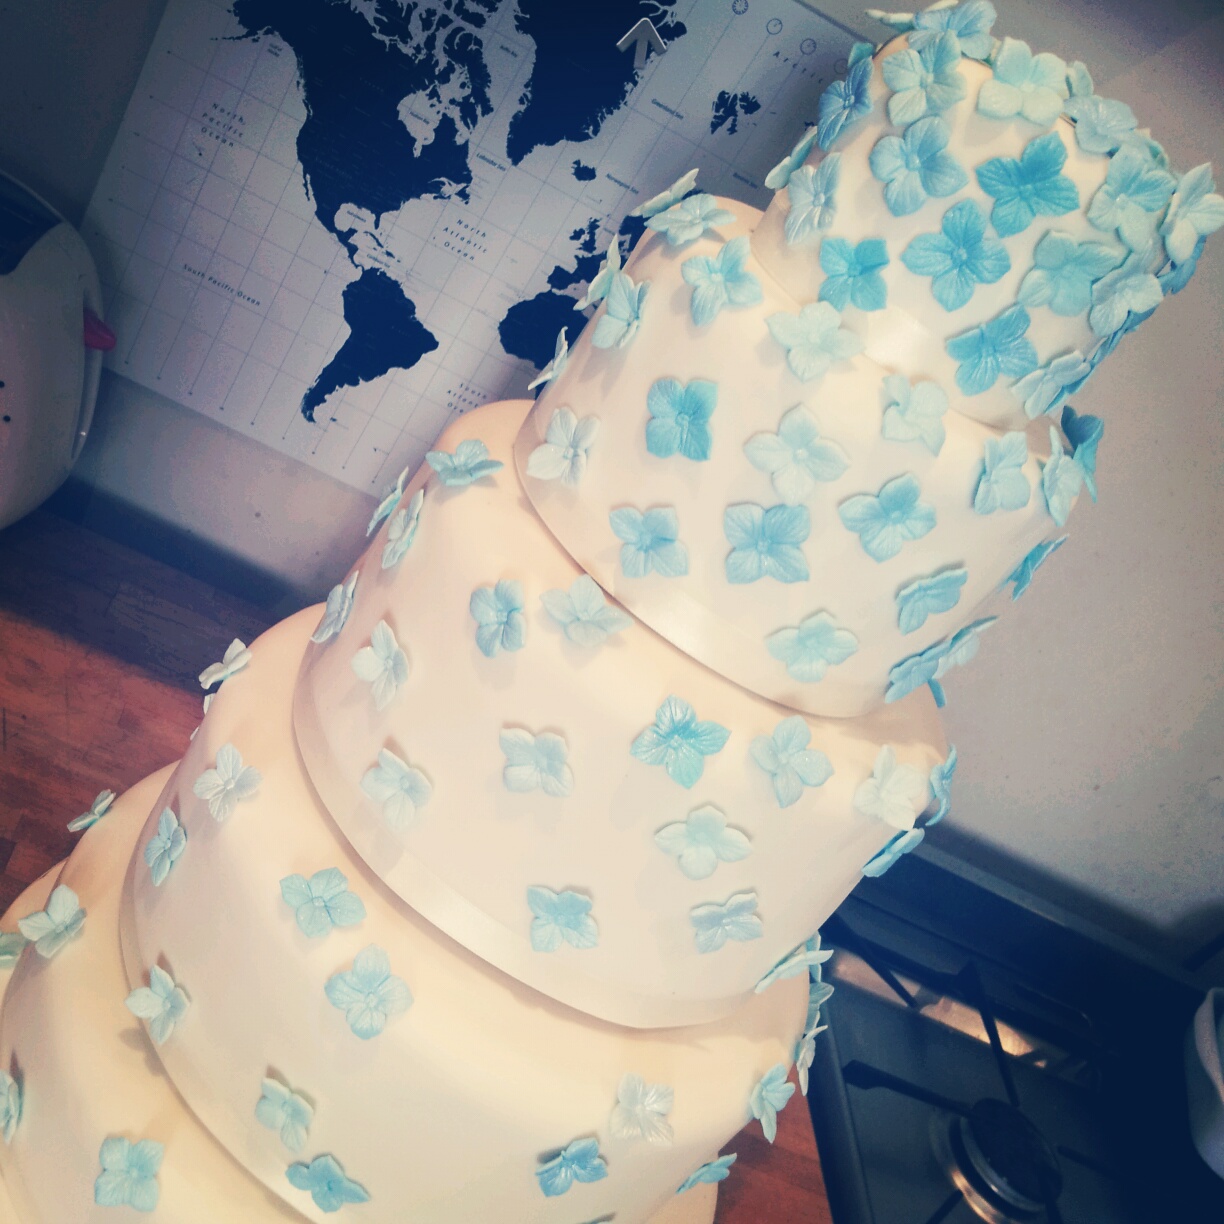
Almost there but not quite yet… have a look at the varied blue hues in the hydrangea

Zoe Clark’s original design for this cake uses buttercream icing to cover all of the cakes. The sugar flowers can then simply just sit on the buttercream and be held in place. No glue required. The fondant icing that I used, had now hardened and had no give to it to help hold on to the flowers, so it really was the glue doing all of the hard work.

I realised after about an hour of catching and reapplying flowers that I needed to paint the flowers with glue, leave them for about 5 minutes and then the glue would be just about right to stick it onto the cake. Some flowers also had to be rejected as when they dried they hardened into such a curly shape that they lacked a flat area on the back where I could paint the glue on.

I wanted the flowers to appear as natural as possible cascading down the cake.  I chose a combination of hues of the blue hydrangea blooms and applied them randomly at different angles to the cake to give a more varied finish. Tapering off towards the bottom of the cake.

The decorated wedding cake in my kitchen

The decorated wedding cake in my kitchen

With most of the flowers stuck into place, reserving a gap down the back of the cake, so I had some space to pick each cake up and stack it back together later on. I retired for an essential lie down.

A couple of hours later the glue was really dry and the flowers were stable enough so the cakes could be returned to their boxes and shelf for safe keeping.

One Tier - complete with a full round of dowls - how to ice a wedding cake

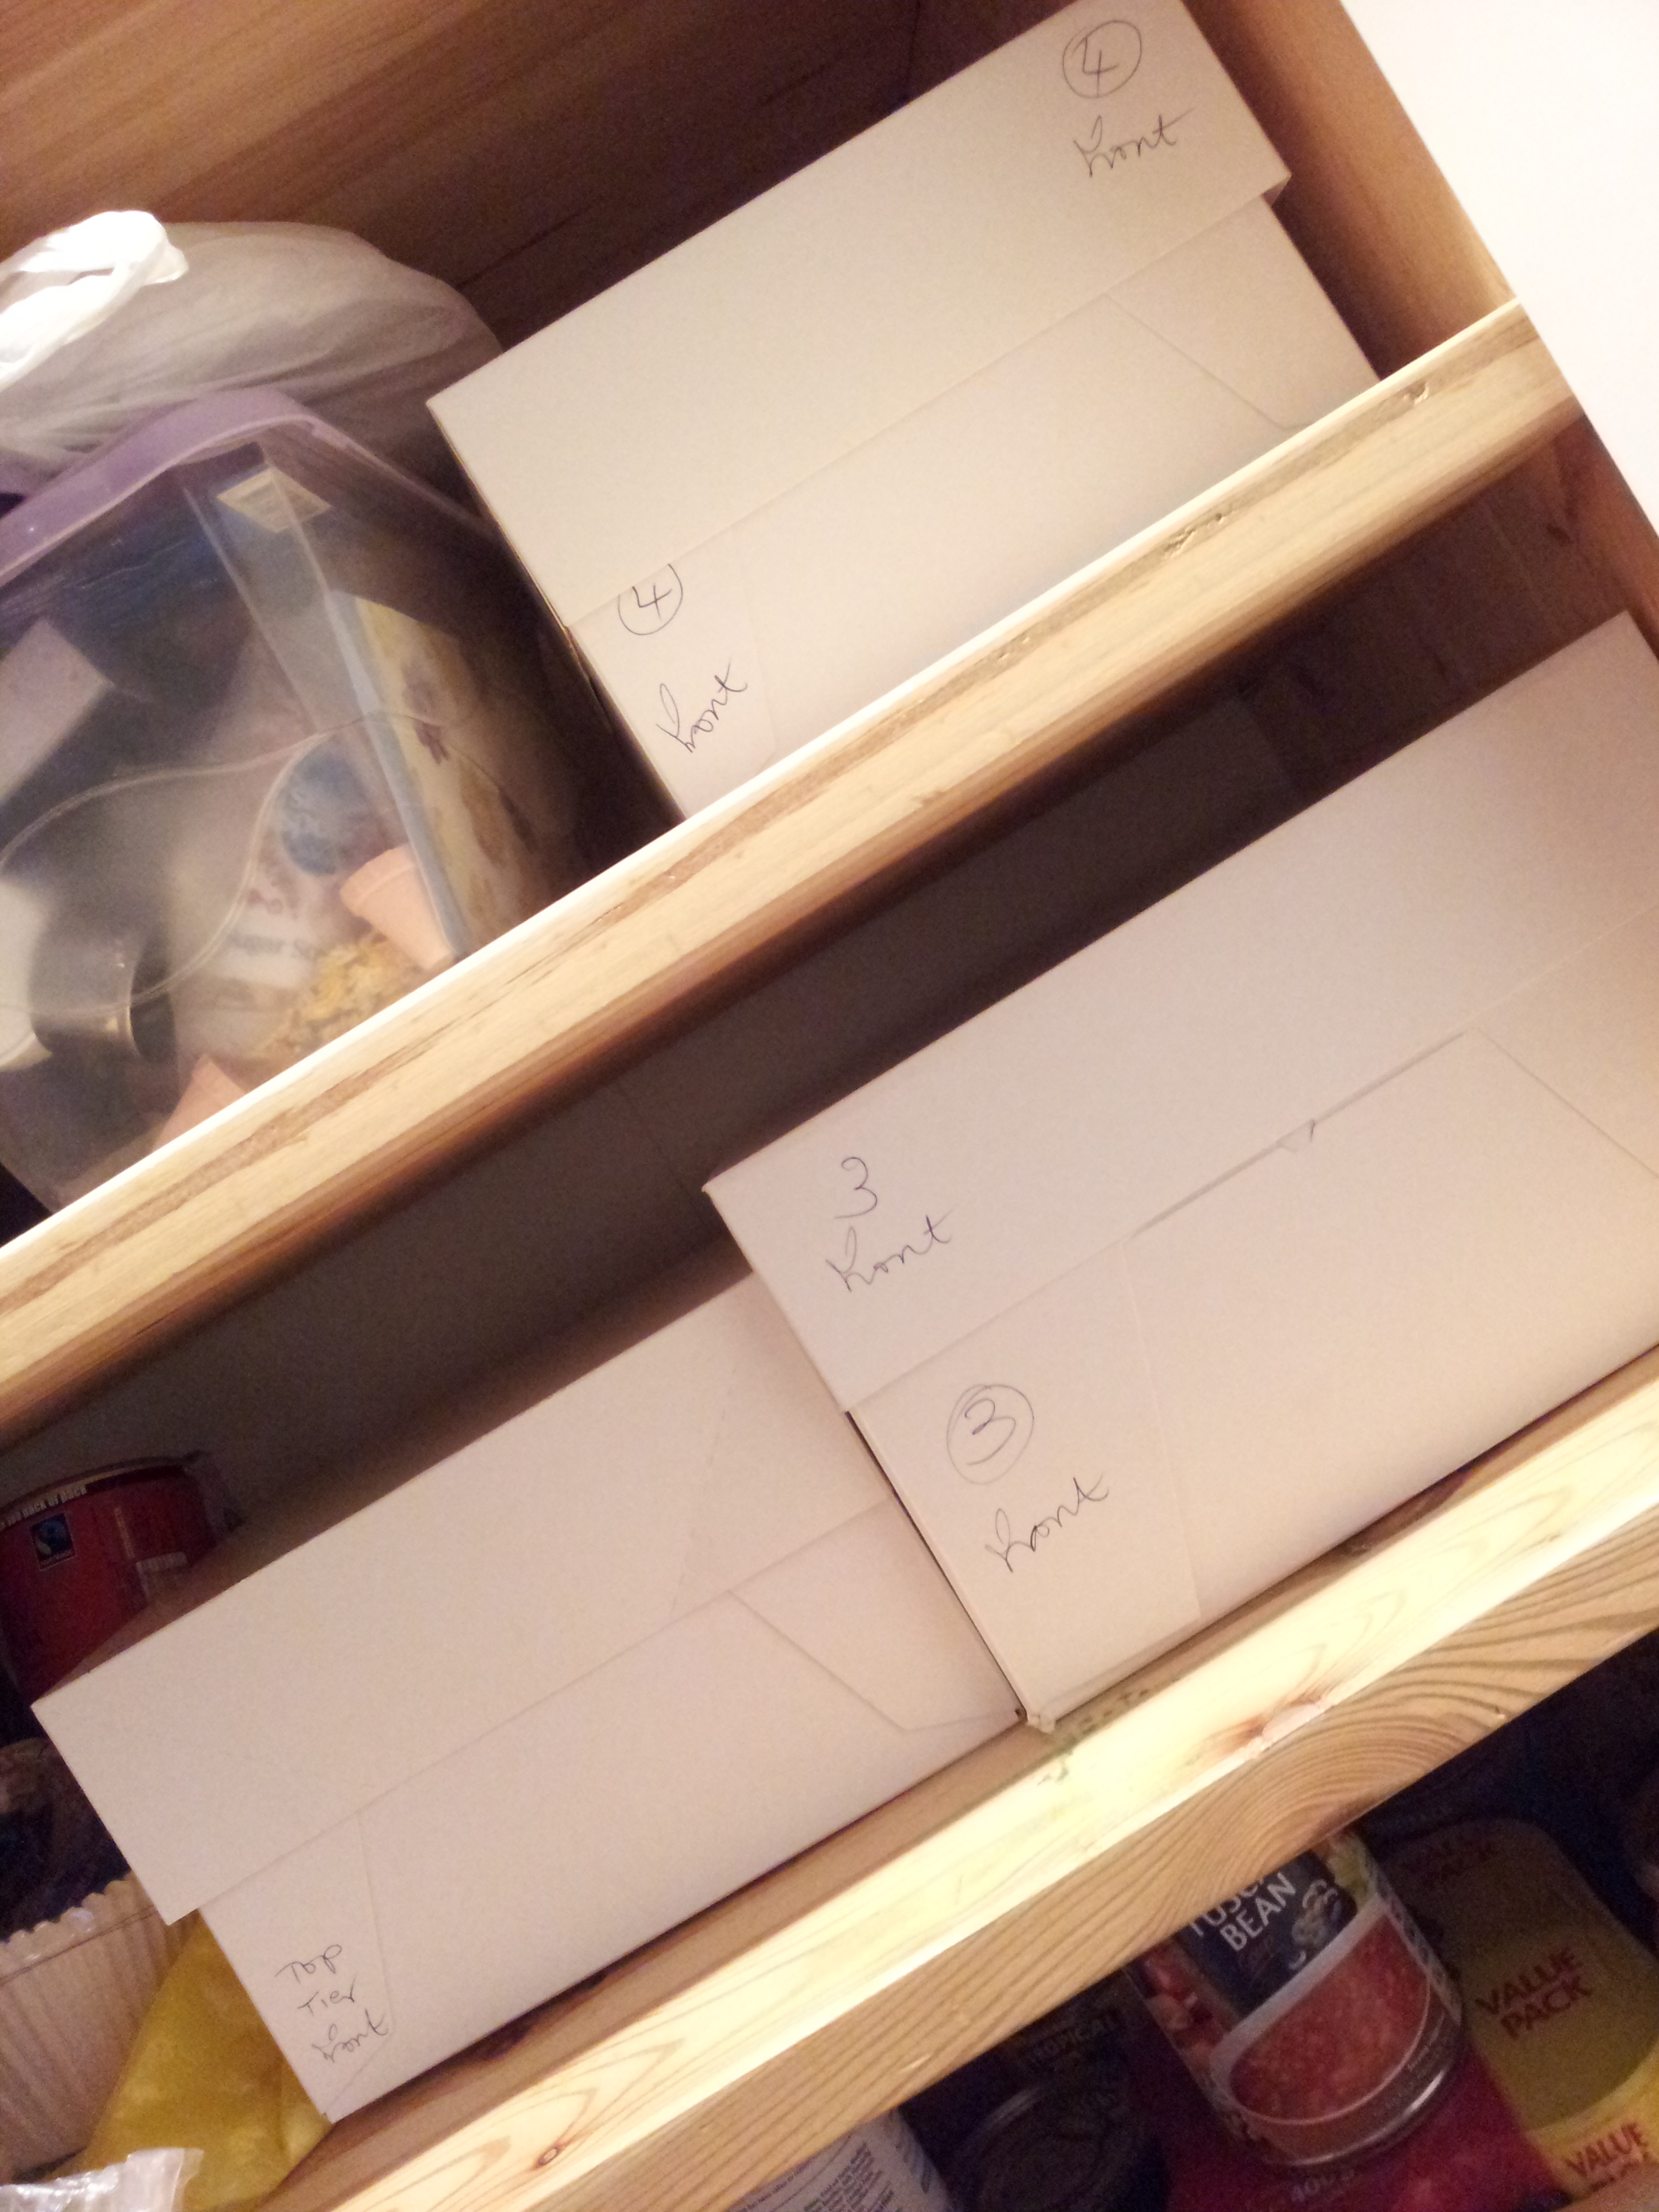
Back in it’s box. One Boxed Tier – note the gap down the back – no flowers here yet so it can be handled without damaging the decoration.

I arranged to deposit and arrange the cake at Jesmond Dene House the day before the wedding. It was an exciting and cautious trip in the car trying to keep all the flowers on the cake and intact.

I hired a cake stand to add extra height to the cake and whipped up a batch of royal icing to glue the cakes together and popped it in a icing bag so pipe it easily into place in situ.

All together now in Jesmond Dene House. The day before the big day! (please excuse the lack of make up and scraped back hair it was a busy day! BUt the cake is almost as tall as me!)

All together now in Jesmond Dene House. The day before the big day! (please excuse the lack of make up and scraped back hair it was a busy day! But the cake is almost as tall as me!)

Each tier of the cake required a generous dose of royal icing to hold it in place but not too much so it oozes out the sides. When royal icing dries it’s rock solid. That cakes wasn’t going to be moving anywhere!

With all 5 tiers stacked and arranged with the floral cascade running down the front and the joins in the ribbons running down the back I could then add more flowers to fill in the gap that I left to pick the cake up down the back. Amazingly only 2 flowers fell off in the process! Royal icing was a perfect glue and each flower didn’t need to be held in place for hours!

The final result was everything that I had hoped for. The 5 tiers of fruit cake ontop of the cake stand made it almost as tall as me! Please excuse the lack of make up and scraped back hair.

Birds eye view of the cake in place in the great hall at Jesmond Dene House

Birds eye view of the cake in place in the great hall at Jesmond Dene House

I have no idea how the wonderful staff at Jesmond Dene House managed to manoeuvre the gargantuian cake upstairs. The 12 inch tier by itself was just about all I could carry!

The Final Result! The Wedding Cake

The Final Result! The Wedding Cake

When we arrived at JDH after the ceremony it was amazing to see everything all together. I loved it. The flowers, the cake, the vintage glass, the real fire, and the sweets and treats I’d made. It was a dream come true with all of my most favourite people in the world together in one room! It was the most perfect day.

Cutting the cake!

Cutting the cake!

And then we got to cut the cake and the dancing began. I didn’t sit down all night but I managed to squeeze in a sneaky slice of wedding cake and it was truly my best ever cake. Rich, extremely fruity and moist, with not too much of an alcoholic burn. The 3 months of maturing were a really good idea! I love the amaretto and cherries. I will definitely be using this recipe again in the future.

What an adventure. This is without doubt my most epic bake yet. Exciting and exhausting in equal measures. I daresn’t even think how much time and energy I spent on the whole cake process, in fact I’m not even going to consider it (or how much I spent on eveything along the way) as it would detract from the very happy memories. I’m so proud that I could make my own wedding cake. Who would have thought a year ago when I hadn’t even made pastry before that I’d be baking and icing a 5 tier wedding cake?  I’m very grateful for the help I’ve had along the way too. It was all the more special that I made it myself and that I could share with all of our family and friends. I even posted some to my Aunty Carol in Canada. Cutting the wedding cake is supposed to bring good luck to the marriage. I wonder if making it yourself gives you extra kudos in the luck stakes?

I’ve saved one naked cake for a special occasion and I still have enough cake left for one last slice. I’m saving that one for a rainy day. I’ll even get the wedding photos back out and relive it all just one more time…


This is part 4 of the 4 stages of wedding cake baking! You can read more about my epic wedding cake adventures here…

Part 1 – My 5 tiers of fruit wedding cake – My biggest booziest cake yet 

Part 2 – How many sugar flowers does it take to make a wedding cake?

Part 3 – Where to start icing a 5 tier wedding cake?

Part 4 -The Final Frontier – Decorating & assembling my 5 Tier wedding cake

Where to start when icing a 5 Tier Wedding Cake?

Me and my pride an joy - The 5 Tier iced wedding cake with ribbon in Kate's wonderful kitchen

Me and my pride and joy – The 5 Tier iced wedding cake with ribbon in Kate’s wonderful kitchen

If you’ve ever visited my tiny flat you will quickly realise that there is very little room to turn around never mind ice, stack and store 5 tiers of fruit cake. Thankfully I have a wonderful friend called Cake Poppins who kindly offered to spend the day with me in her amazing kitchen complete with all of her expertise and wonderful non stick cake decorating equipment. I cannot thank Kate enough for her help and guidance. If you haven’t checked out Kate’s blog I thoroughly recommend it !

Cath Kidston Jamaican Black Cake

Cath Kidston Jamaican Black Cake –  one of my previous attempts at cake icing

Never before have I attempted any sort of technical cake assemblage that requires dowling. I have attempted rather slap dash icing of cakes with layers of marzipan and fondant icing. My results have been passable, but on my wedding cake passable would not suffice. It needed to be perfect. No pressure there then.

One of the 5 Tiers of Fruit Cake

One of the 5 Tiers of Fruit Cake

Before the cakes could even go near any icing a great deal of planning and shopping was required. I packed up a car full of cake and sugar based goods and headed round to Kate’s. The fumes eminating from the cakes made for a very happy journey.

To start with you need to purchase drum style cake boards (the ones that are half an inch thick to add extra height to the cakes). Each board needs to be exactly the same size as the cake. I purchased a 4, 6, 8 10, and 12 inch round boards. The 4 inch was pretty difficult to find but you can definitely buy them online.

I have absolutely no idea how much marzipan and fondant icing we went through and so engrossed was I in mastering the kneading, rolling and enveloping the cakes in icing I forgot to take any photos along the way. (sorry!) My guess is that about 6 packets of marzipan disappeared in the process, which would be around 6 x 500g = 3 kg of marzipan. As a rough guess the same amount of fondant ivory icing was used to cover the 5 cakes.

A slosh of vodka was required (not for me) but to sterilise the cake boards.

3 jars of apricot jam were used to coat the cakes and the boards prior to the application of the marzipan. This helps to stick the marzipan to the cake and the cake to the board.

There was a lot of tea, cake and rolling going on that Sunday afternoon. Gaps in the cake need to be filled with marzipan, a bit like smoothing putty into cracks in a wall before you paint it. You can even add a sausage of marzipan around the edge of the cake to fit it neatly to the board, if there’s a gap. I learnt so many brillliant tips.

Kate introduced me to cake spacers. A truly wonderful invention. They consist of 2 equally thick pieces of wood (rather ruler shaped) which you place on either side of your marzipan or fondant. You then place the rolling pin onto the rulers and roll away from you (preferably on a non stick board). Turning the fondant at regular intervals so it doesn’t stick. This means you get evenly flattened fondant, giving a smooth and much less holey finish than I often achieve. You have to press with all your weight rolling from your hands all the way up to your elbows evenly. If like me your a rolling novice you then get equally spaced bruises up your arms too. Kate’s an absolute pro!

Once the marzipan layer is on the cake, it’s best to get the layer of fondant on whilst it’s still tacky so it all sticks together. The less you touch the final fondant layer the better finish you get. Only touch the fondant covered cake with the backs of your hands to avoid leaving any fingers prints please. Smoothing the edges down with a plastic cake smoother, pushing the excess fondant down and squeezing it out in to the bottom of the skirt of the cake. Which can then be trimmed away with a lovely sharp palette knife, being careful not to cut into the cake (!)

Once all 5 cakes have a double coat of icing you carefully wrap a thin ribbon around the bottom of each cake. Double sided sticky tape is useful to stick the ribbon together. This gives a really professional looking image. I chose ivory ribbon to blend into the fondant and give a really sleek finish.

The Iced Wedding Cake

The Iced Wedding Cake – you can see the ribbon edging neating up each cake tier

Icing the 5 cakes took around about 5 hours. Then Kate showed me how to make sure the cakes are level, how to cut the dowels to size, where to insert dowels (plastic rods) to hold the weight of the cake above and how to stack the 5 tiers together.

Using a spirit level, a hack saw, a dowling guide template and a marker pen we forced the plastic dowels strategically into all 4 iced cakes, all in the right places so you can’t see any plastic dowels on the finished cake! The top tier didn’t need any dowels to as there was no other cake to support above it.

One Tier - complete with a full round of dowls - how to ice a wedding cake

One Boxed Tier – complete with a full round of dowls – ignore the flowers these were added later on…

The final result was very impressive! Seeing all 5 tiers stacked up in their smooth white finish was worth all of the effort! Then all we had to do was carefully take it apart again, box the cake and manouvere it all back into my car. Then the task of finding a suitable storaged place in my tiny flat to rest the cakes whilst the fondant set.

Almost there but not quite yet...

Almost there but not quite yet…

There was still a month to spare before the wedding and I still had to glue all of the hydrangea flowers to the cake, box it back up again, transport it to Jesmond Dene House AND stack the entire cake, glueing each tier together. And then to eat it! So close and yet still so far to go…

This is part 3 of the 4 stages of wedding cake baking! You can read more about my epic wedding cake adventures here…

Part 1 – My 5 tiers of fruit wedding cake – My biggest booziest cake yet 

Part 2 – How many sugar flowers does it take to make a wedding cake?

Part 3 – Where to start icing a 5 tier wedding cake?

Part 4 -The Final Frontier – Decorating & assembling my 5 Tier wedding cake

How many Hydrangea Sugar Flowers does it take to make a Wedding Cake?

SEAN_ELLIOTT_PHOTOGRAPHY-703

After you’ve spent an inordinate amount of time baking 8 enormous boozy fruit cakes, how do you decide which wedding cake design to go for? Do you opt for a classic look, a fashionable design or something to match your colour scheme?? For those that know me, you will know that there has never been a colour scheme in my life. I don’t manage to match things very well. In fact if things clash that’s probably for the better. (

I couldn’t bring myself to decide on just one colour for my bouquet, as I love so many colours so I went for a bit of everything. It was only a last minute decision to leave out the bright pink roses from the bouquet. I decided it may be a little bit too much.  You can even see the blue hydragena flowers peeking out between the hyacinths. It was touch and go as to whether these flowers would bloom with it being a December wedding. It was clearly meant to be!

My wedding flowers

My wedding flowers – a little bit of everything

Part of me longed for a classic cake that I would love forever and part of me me wished for an entire room of different types of cake from around the world. Unfortunately there is not enough space in my freezer to create such an awesome display unless I baked them all the day before the wedding which in reality, was never going to happen.

Petite Italian Lavender Meringues

Petite Italian Lavender Meringues

As a compromise I baked as many extras as I could possibly manage. Opting for petite Lavender Meringues

Mini Brownie Bundts and Madeleines

Table Treats – Mini Brownie Bundts and Madeleines

and mini bundt brownies and madeleines to adorn the tables with.

I found so many gorgeous cake designs flicking through endless pages of Pintrest and magazines but many were way out of my skills set. One favourite was an impossibly beautiful white damask lace design on a pale green fondant  I made many many trips to my local cake decorating shop and experimented with different technniques,  I was never going to be able to use a stencil. (I practiced with a little one I had in the house and I always managed to smudge it or it oozed out of the sides.)  I was then going to make millions of sugar roses, but I made about 4. It took me ALL night and I felt angry. It was way too fiddly and my roses always turn out ridiculously enormous and ‘rustic’ looking.

Green Damask Lace Cake – The Cake Parlour

Another of my favourite designs was a tiered cake with a cascade of hydragena blossoms. Little did I know that both of these cakes were designed by the same woman the amazing Zoe Clark. (I have since purchased her books as I love her designs!)

I continued in an experimental vein ordering lots of plastic sugar tools online and waited a month for them to arrive. I attempted to make fondant pearls by hand but didn’t think about how they needed to dry so ended up with one lump of sugar pearl. That would never do.

One lump of pearl for me please

Just the one lump of pearl for me please

Back to the drawing board and my two favourite designs. My Mam invested in a hydrangea cutter and mould for me (thank you Mam) rather than watch me struggle with trying to do everything for myself.

Zoe Clark’s design used pink blossoms which is lovely but I’m not much of a pink girl. Instead I experimented with a few different colours including, lilac, baby blue, teal and finally decided upon ‘hydrangena blue’. I coloured some florists paste with food colouring and added a little more to get the right colour. I also left some to dry for a couple of weeks to see how the colour developed as it can fade as it dries out fully. I had found my winner. I made 3 slightly different shades of hydrangea blue paste to give the flowers more of a natural look and variety in the final cascade.

Using a tooth pick add a dot of your chosen food colour gel to the florists sugar paste and knead it until it's the colour you need.I chose hydrangea blue. Beware adding too much colour in one go, once it's in you can't take it out! You may need to colour your paste in advance to allow it to dry a little so it's not too sticky!

Using a tooth pick add a dot of your chosen food colour gel to the florists sugar paste and knead it until it’s the colour you need. I chose hydrangea blue. Beware adding too much colour in one go, once it’s in you can’t take it out! You may need to colour your paste in advance to allow it to dry a little so it’s not too sticky!

When adding food colouring gel to sugar paste it always makes the paste sticky. I find it much easier to handle if I colour it a few days before I need to use it.

Roll out the colourful florist's paste on a lightly dusted surface - making sugar flowers hydrangea

Roll out the colourful florist’s paste on a lightly dusted surface

You can add a little icing powder to the worksurface when you’re rolling it out but not too much as it will dry the paste out and it will crack. Florists paste isn’t cheap but it has a special ingredient (albumen) which allows you to work it into much thinner and more delicate shapes than normal sugar paste. It also dries really hard quite quickly so it keeps it’s shape. I tried to make my own (I know this was not my best idea!) I thought it would be cheaper to buy powdered albumen and knead it into sugar paste. In reality this was an extra faff on that I didn’t have the time for. It was much easier to just buy pre made florists paste and mix my own colour. If you’re feeling extravagant you could even buy yours in the shade you really want.

strategically press your cutter into the paste and carefully lift it away from the paste - sugar flowers hydrangea

Strategically press your cutter into the paste and carefully lift it away from the paste

My hydrangea cutter and mould instructions informed me that I needed vegetable fat to smear on the silicon mould to prevent the paste from sticking to the mould. It was late, I was all ready to cut out some flowers so I wasn’t going to make it to any shops. Improvising I took some pearl lustre powder and popped it in a shallow bowl.

Pearl Lustre Powder makes a great alternative to vegetable fat and icing sugar

Pearl Lustre Powder makes a great alternative to vegetable fat and icing sugar

Using a brand new clean blusher brush I coated the mould liberally with a combination of edible pearl and baby blue lustre powders.

Dust like your life depends on it

Dust like your life depends on it

Et voila. I have satisfactorily released flowers with a touch a sparkle and glamour that I was going to have to paint on afterwards. Success and time saved!

Using a clean blusher brush first the mould with lustre powder to stop it sticking. You can use trex but I discovered this saved me a job later on!

Using a clean blusher brush first the mould with lustre powder to stop it sticking. You can use trex but I discovered this saved me a job later on!

The little mould that I loved to hate. The first 50 flowers were a breeze but your fingers do start to ache after so much cutting, folding and pressing! The trick is to fold the mould over carefully so you don’t dislodge the flower inside. Or if the paste is too thick it oozes out of the sides of the mould when pressed…

image

There is a lot of patience and gentleness required in this process…

The pressed Hydrangea Blossom

The pressed Hydrangea Blossom – look at that beautiful detail

If you’ve lustred up the mould enough it should pop out quite easily but you might need to coax it out if it’s a bit stubborn. (Spot the cocktail sticks in the background). Flipping over the mould allows gravity to do the work for you and release the lovely detailed blossom into your palm.

Gently coax the flower out of the mould by peeling the mould away from the flower or let gravity do it's job

Gently coax the flower out of the mould by peeling the mould away from the flower or let gravity do it’s job

The final result! I also added a little baby blue edible lustre powder to the mix to ad depth and variation to the blossoms. I was glittering for a week after this!

Hey presto! You have a sugar flower all sparkly and full of lustre which helps bring it to life

Hey presto! You have a sugar flower all sparkly and full of lustre which helps bring it to life

I found a good way to make the flowers look more realistic was to gently roll themeach one in my cupped hand before leaving them to dry. This gives more shape to the petals, so they don’t appear too flat and fake. Then repeat times a million… This is probably an extreme exaggeration but I lost count of how many flowers I actually pressed. I used about 2 and half 500g packs of florists paste to create maybe around 150 hydrangea blossoms. Not all of them ended up on the cake however as I dropped some on the floor… Some snapped after they dried. They are quite delicate little flowers! And some flowers just weren’t that pretty (sorry flowers but some had to be prised apart and suffered the consequences) so they didn’t make the cut.

Gently roll the flower in your hand to encourage the edges to bend in slightly and create a bit of variety

Gently roll the flower in your hand to encourage the edges to bend in slightly and create a bit of variety

The flowers need to be held in shape whilst they dry. You can splash out on a special sugar paste foam mat if you like, or you can wrap an egg box in cling film and pile them all up like me. Crinkled up tin foil works really well too. It may also be a good idea to add layers of cling film to stop the flowers sticking together. I know I’m biased but don’t they look pretty all sparkly and delicate??

Line an egg box with cling film and pop all your pretty flowers in to hold their shape whilst they dry. Repeat repeat repeat...

Line an egg box with cling film and pop all your pretty flowers in to hold their shape whilst they dry. Repeat repeat repeat…

It takes about a day for the flowers to dry out. I made mine in stages so I could spend an hour or two at a time pressing hydragenas until I thought I had enough. Then  all that’s left to do is ice the 5 tiers of fruit cake and assemble it all.

The Final Result! The Wedding Cake

The Final Result! The Wedding Cake

This is part 2 of the 4 stages of wedding cake baking! You can read more about my epic wedding cake adventures here…

Part 1 – My 5 tiers of fruit wedding cake – My biggest booziest cake yet 

Part 2 – How many sugar flowers does it take to make a wedding cake?

Part 3 – Where to start icing a 5 tier wedding cake?

Part 4 -The Final Frontier – Decorating & assembling my 5 Tier wedding cake