Lauren’s Layered Lamington Cake

Lauren's Layered Lamington Cake

Lauren’s Layered Lamington Cake

You may realise by now that I LOVE Lamingtons. They are definitely one of my Australian highlights, alongside the cake shops in St Kilda and the koalas hanging out in eucalyptus trees. It’s been a while since I baked any of these sweet treats and I must apologise it’s been quite some time since I wrote. It’s been a bit hectic what with getting married having a last minute trip to Berlin and oh yes fitting in the proper job too… I promise I will get back to some international baking VERY soon (and also share with you the photos of my wedding cake too!). In the meantime I wanted to share with you an experimental Layered Lamington Cake that I made up the other day.

I had promised Chris a tiered Lamington Cake for the wedding. Something that I had imagined in my mind but frankly in amongst baking and icing 5 layers of fruit cake, making 150 sugar flowers, our house flooding 2 weeks before the wedding and baking brownies and Lavender meringues I never had the opportunity to bring to life. Until now. So here it is! A slightly smaller scale Layered Lamington Wedding Cake for Chris. Next time I will bake 2 more smaller cakes and stack them one on top of the other… for a tower of layered Lamington!

Lauren's Layered Lamington Cake

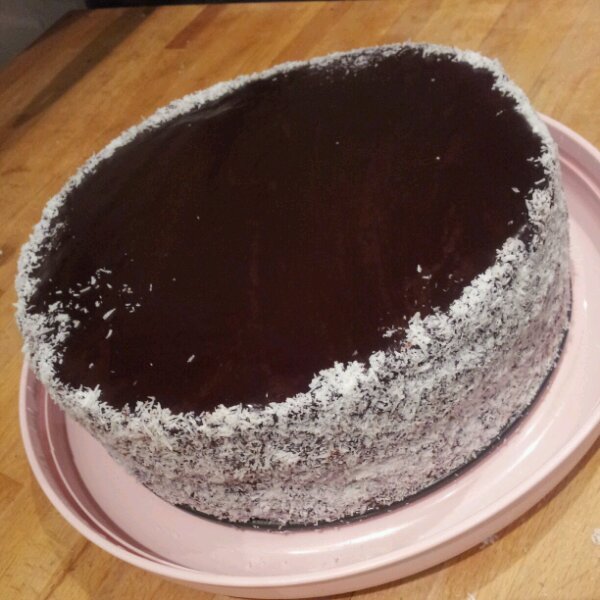
Lauren’s Layered Lamington Cake – 3 layers of coconut madeira, double chocolate coated and jam sandwiched

I wanted to make a more grown up version of the Lamington. More luxurious, decadent and slightly prettier than the Lamington bricks that I’ve made previously. To produce this I incorporated the coconut into the sponge, which meant I could keep the top of the cake coconut free to showcase the shiny chocolate ganache, whilst preserving the coconut and chocolate Lamington tradition. I double coated the cake in chocolate soup sauce first before a double chocolate ganache layer to increase the luxuriousness of the Lamington. And then to add an extra level of height and flavour why not add a third layer of sponge, one more than your traditional Lamington sandwich. It’s an extremely indulgent cake. One to be enjoyed on a special occasion perhaps. It takes a bit of organising and assembling, but I can assure you it’s worth the effort! Chris definitely enjoyed it and so did my friends. If you fancy having a go I’ve included the instructions below.

As the cake is entirely encased in chocolate and contains a double layer of jam it’s  a light and moist sponge. I’m hungry just reminiscing about it now! Hope you enjoy it as much as me.

Lauren’s Layered Lamington Recipe

Coconut Madeira Sponge Cake

  • Caster Sugar 250g
  • Butter 300g
  • Self Raising Flour 400g
  • Desiccated Coconut 50g
  • Pinch of salt
  • Milk 6 tablespoons
  • 2 x 8 inch round cake tins
  • Bake at 170 degrees Celsius (fan)  for 25-30 minutes
  1. Cream together sugar and butter
  2. Sift in flour and baking powder and gently fold it into the creamed butter and sugar
  3. Fold in desiccated coconut
  4. Fold in milk
  5. Gently pour mixture into 2  greased and lined 8 inch round cake tins
  6. Carefully level the mixture
  7. Bake in the middle of the oven until the cakes shrinks back from the sides of the tin, is golden brown and a skewer comes out clean from the sponge
  8. Let the cakes cool in the tin for 10 minutes to hold their shape
  9. Remove from tin and place on cooling rack
  10. When fully cooled carefully split one cake in 2 down the centre with a sharp knife
  11. Carefully level the other sponge removing the top (you can then sample the top bit of the sponge!)

Filling Strawberry Jam  (you could buy a jar or make it yourself)

  • 1kg strawberries
  • 1kg granulated sugar
  • ½ lemon, juice only
  • small knob of butter
  1. Heat equal amounts of fruit and sugar in a large pan
  2. Stir until all of the sugar has dissolved
  3. Stir in lemon juice and butter
  4. Stop stirring and boil rapidly (about 10minutes)
  5. Keep boiling the jam and checking the consistency of the jam every 10  minutes and take it off the heat once it coats the back of a spoon (this could take up to an half an hour but hopefully less!)
  6. Allow the jam to cool and set slightly in the pan

Icing

  • Butter 25g
  • Sifted icing sugar 450g
  • Sifted cocoa powder 50g
  • Milk 120ml
  • Vanilla Extract 2 tsp
  1. Sift all of the ingredients into a large bowl
  2. Put the bowl over a pan of boiling water
  3. Melt the butter over a low heat
  4. Stir together to make a thick chocolate soup
  5. Remove from heat
  6. (but if it gets too hot pop it back on the heat to warm through)

Chocolate Ganache

  • Plain chocolate 140g
  • Double cream 200ml
  • Milk chocolate 25g
  1.  Heat the double cream over a low heat in a pan
  2. Break up the chocolate into small pieces
  3. Allow the cream to become piping hot then take it off the heat
  4. Throw in the chocolate and stir until it’s really smooth and shiny

Layered Lamington Assembly

  1. Have a pre-prepared cake stand/plate to arrange it all onto
  2. Turn the bottom of the sponge face upwards (from the one sponge that you’ve split in 2) spoon a generous amount of chocolate icing soup onto the sponge and spread it evenly over the sponge base and sides. (Lamingtons are supposed to be encased in chocolate and this will help to fix it to your stand too…)
  3. Give it a few minutes to ‘set slightly’ then flip over the sponge so the chocolate is face down on your cake plate.
  4. Spoon half the jar of strawberry  jam onto the sponge and spread evenly.
  5. Place the other half of the sponge cake on top of the jam and press gently.
  6. Spoon the rest of the jam on top of the sponge and sandwich the final layer of sponge on top. (smoothest side up)
  7. Rest the cake in the fridge for 5-10 minutes to set the jam and hold sponge in place
  8. Pour the chocolate soup all over the cake and smooth with a palette knife. Removing excess icing to give a smooth ‘crumb coating’ and hold the cakes in place
  9. Return to the fridge to allow it to set for 5 minutes
  10. Pour the hot chocolate ganache all over the cake and sides. Ensure you have a smooth and shiny coat by tilting the cake to run the ganache down the sides, use a palette knife if necessary to sharpen the edges of the cake.
  11.  Use a hairdryer if needed to melt the ganache slightly to create a smooth finish
  12. Repeat ganache layer again to double coat the cake.
  13. Whilst the chocolate is still wet carefully sprinkle the sides of the cake with desiccated coconut, use a cupped hand to press the coconut into the ganache, leaving the top of the cake free so the ganache shines through
  14.  Allow the ganache to set at room temperature to maintain the high gloss finish and serve in huge chunks with a bucket of tea.

Happy Christmas – The Rosca de Reyes results are in!

A very decadent Rosca de Reyes - 3 Kings Cake

A very decadent Rosca de Reyes – 3 Kings Cake

Wow what a year this has been indeed! We’ve made it over half way around the world in 80 bakes, ran my first half marathon (raising over £700 for Oxfam!), baked (and devoured) some wonderful (and some not so wonderful…) cakes AND been very lucky indeed to win the Blog North Best Food and Drink Blog Award.

Great North Running

Great North Running

And that’s not even the end of this amazing year’s excitement, it doesn’t all finish there! I’m very excited to let you know that I won the online bake off and £500 of holiday vouchers for my Rosca de Reyes 3 Kings Cake! Amazing! Thank you all so much for reading, commenting and also voting for me. I can’t thank you enough for your support and love. We will be using the £500 of Cosmos Holiday vouchers to book our honeymoon in the new year, a trip somewhere hot and relaxing will be perfect after our wintery wedding (which is taking place in less than 2 days…)! Fingers crossed the cake stays upright!

A golden Rosca de Reyes

A golden Rosca de Reyes

The lucky winner of the £50 very.co.uk voucher is Jenny B. The company will contact you directly to arrange your voucher. Thank you so much for voting!

I can’t go without mentioning the 4 brilliant bakers and bloggers, in the Rosca de Reyes bake off. They are exceptionally good bakers and I’ve been enjoying their blogs for over a year now and follow them all on twitter. I really recommend checking out their blogs, if you haven’t done so already. They are very talented and inspirational foodie bloggers.

I hope you all have had a wonderful Christmas and are looking forward to the New Year as much as me. I will be returning shortly as a married baker, with a new name and everything. Looking forward to letting you know how my biggest challenge so far pans out… my 5 tier wedding cake!

Lots of love and happy new year!

Lauren x x x

p.s Now would be a perfect time to have a go at baking your own Rosca de Reyes to celebrate the Epiphany on January 6th.

p.p.s. My golden Rosca de Reyes – 3 Kings Cake even got a mention in the The Mirror within an article about Christmas eats and treats around the world!

42. Swedish Tea Ring – the cake for busy bakers

Planning to bake something in advance of an event or special occasion can be difficult. Sponge cake will dry out if baked too far in advance and if you freeze it you can’t ice it beforehand. I seem to be in a real baking frenzy at the moment. Partly because I’m in the process of baking my 5 tier wedding cake…

The teetering tower of fruit cake… shame 2 tiers need to be re-baked.

I’ve chosen fruit cake for my 5 tier wedding cake is because I love fruit cake and it will be Christmas(!) but also because I can plan it in and bake it in advance. Then take my time with icing it, hopefully resulting in a well organised and non stressful experience. Also fruit cake improves with age! The longer I soak the fruit and feed it BOOZE the better it will taste.

Swedish Tea Ring

So what else keeps well? A rich yeast dough, that’s what! Bring on another new discovery and favourite of mine, The Swedish Tea Ring!!

Marguerite Patten has been tempting me with this recipe for years and I finally found a reason to bake it! To give as a present to my friends Josh and Mark for looking after me in Manchester at the Blog North Awards last week.

It’s like a robust Chelsea Bun/Cinnamon Roll/Belgian Bun hybrid. Perfect for cinnamon junkies like me and for preparing in stages for the busy baker. I can also confirm it’s portability! It survived a 3 hour drive through lightening and torrential rain! That’s one sturdy bake.

Whisking the dry ingredients together…

One thing I dislike about making yeast doughs is the kneading time required. I no longer own a hand whisk with dough hooks attached and my food processor can only handle dough for 2-3 minutes before it starts rocking around the counter top precariously. So, in my mad baking frenzy, I improvised as best as I could do. I used my electric hand whisk and beat the dough together… Who knows if this is an acceptable baking practice?

Whisking in the egg

But despite my poor little electric whisk’s protests (it’s been through a lot this year) It managed to combine the wet dough together with minimal effort required from me. I call that a result (although the blown out birthday candle smell emanating from the little whisk’s motor might suggest otherwise…)

Whisking in the milk – making a wonderfully sticky dough

Now as Marguerite arranged each bit of this recipe in a different section of the book, I managed to confuse my recipe somewhat. I used the full rich yeast dough recipe and didn’t adjust it for the Swedish Tea Ring, which means you either make one massive tea ring or one modest sized ring (according to the recipe) and a smaller mini one for later with the off cuts. (I made 2!)

Poor little burnt out whisk – thoroughly kneading/whisking the dough

Whisk all of the dry ingredients together. Then whisk into the mix the butter, followed by the egg and then the milk until you get an elastic, wet sticky dough.

One thoroughly kneaded lump of richer yeast dough

Leave it in an oiled bowl and cover with greased cling film to prove. I popped mine in the fridge over night to prove slowly (although it should only take an hour or two in a warm spot).

Or if you’re in a hurry you could pop your bowl over a pot of soup on the hob to prove…

Remove the proven dough from the fridge and allow to come to room temperature (if you have proven it in the fridge).

Fully proven dough straight from the fridge

Kneaded the full proven dough thoroughly to re distribute the heat throughout the dough.

Kneaded and shaped into a rectangle ready for rolling out

Roll the dough out to a rectangle 10 inches by 8 inches about 0.5mm thick. I was feeling very precise so I even measured and trimmed the rectangle so it had straight edges, to avoid the misshapen ends I found when making Chelsea buns

Rolled and trimmed to perfection. (Note the ball off extra dough leftover…)

My favourite bit was smearing the entire rectangle of dough with melted butter. I don’t think you need to be precise here. I found a pastry brush too delicate for this job and slapped the lot on with my hand instead straight from the microwave. (It only needs about 30 seconds to melt the butter through). The more generous with the butter the more gooey your filling.

Smeared with butter

For those who adore cinnamon, don’t feel restricted by the recipe. Feel free to pour as much cinnamon into your sugar as you can handle. Give it a quick stir to combine and then throw it onto your butter dough until you have an even blanket of cinnamony wonderment. I like to use enough cinnamon to give the sugar a dark brown colour. I ran out of brown sugar so improvised with normal caster sugar. Perhaps brown sugar would produce more of a caramelised effect?

Generously coat the butter in cinnamon and sugar (I was clearly in a hurry when I took this photo – apologies for it’s blurriness!)

After watching the Great British Bake Off, I realised my rolling skills may bye somewhat lacking. I have a tendency to misunderstand which side is the long side of the dough so I took photos to make sure I can bake this again in the future. Roll the dough towards you from the longest edge to the longest edge creating a ‘swiss roll’ of cinnamon dough.

Cinnamon swiss roll

Don’t worry if some of your sugar falls out of the roll. There’s plenty in there to make it taste wonderful. Keep the roll as tight as possible and if you have some melted butter leftover, it’s a good idea to spread a bit along the longest exposed edge to help ‘glue’ the dough to itself. I would also add a bit to one end to help later on…

Keeping the roll tight with one hand and glueing with butter the dough together

Press your fingers along the join in the dough to encourage the dough to combine and stick together. Turn the roll over so the join is firmly disguised under the roll of dough. Gravity should help to force the roll to stick together and stop the sugary goodness running out whilst it bakes.

Firmly joined together – then hide this join underneath the roll of dough

This also means you have the smooth (and prettier) side of the dough roll to play with. The most difficult bit of this bake is definitely joining the two short edges of dough together as they are very sugary and don’t want to stick.

This is my Chelsea Bun attempt but it’s very similar! The swirl of cinnamon at each end makes it difficult to join but making sure you have straight edges when you roll out the dough (unlike here – look at the overlap!) makes it much easier to join

I coaxed them together with butter and nipped the edges together with my fingers until they begrudgingly worked with me.

The troublesome join

I breathed a huge sigh of relief when it finally stayed in place! It could almost be one MASSIVE cinnamon doughnut at this point. But it had to have another little rest to prove again (about 20 minutes) before the next step…

a MASSIVE cinnamon doughnut

Now here my recipe reading skills escape me again. What I failed to understand was Marguerite meant for me to cut completely through the ring to create a fan of cinnamon buns in the shape of a ring, like this…

Marguerite’s Swedish Tea Ring – How it should look in real life – fully exposed cinnamon

Unfortunately the photo was on a completely different page and I interpreted the instructions like this…

Partially exposed cinnamon – my interpretation

Brandishing my sharpest kitchen scissors I snipped delicately and diagonally into the ring to partially expose the cinnamon swirls. I must admit I was nervous that this slicing would compromise the integrity of my dough join so was possibly overly hesitant at this stage.

Snippity snip

All it needed was to be placed into a moderately hot oven for 30 minutes or so, until it turned golden brown.

Swedish Tea Ring ready for the oven

As the Swedish Tea Ring is essentially a bread dough I also made sure it was baked through by knocking the bottom of the ring to listen for the resounding hollow tap.

Fully baked (and a bit more irregular in shape than Marguerite’s)

The baked Swedish Tea ring is a tempting sight with glitterring cinnamon peeking out from the dough (although not the most organised of rings it still looks inviting to me!)

Lemon Glace Icing

Once the ring cooled fully I whipped up a batch of lemon glace icing. It hides an enormous amount of irregularities and flaws, especially if you layer up your icing! Again I can;t say I followed Marguerite’s recipe exactly. I like a tart lemon flavour so I sloshed in a bit of lemon extract to give an extra punch to the icing. I also free poured the icing sugar and mixed it with enough lemon juice to create a runny yet thick icing. (This does take quite a bit of icing sugar!).

free pouring icing – balanced over a big mug

When the icing is just about right in consistency it should taste good (obviously!) not be gritty, the sugar should totally melt into the liquid and it should part when stirred in the bowl. (see the picture above) This means it’s starting to hold it’s shape a bit whilst still being runny to cascade over your tea ring and coat the cake in thick white goo.

iced and decorated Swedish Tea Ring

It’s best to pop your Swedish Tea Ring on some greaseproof paper (or a plate) before you pour the icing over it to catch the icing waterfall. It needs some time to dry and set. I iced mine just before bed so it had time to set over night before being deposited into it’s travel box. Please note you may need more than 2 hands and a palette knife to prise your cake from the paper after it’s iced!

The final Swedish Tea Ring

Mary Berry recommends decorating cakes in groups of threes. I didn’t have the traditional galce cherries in my cupboard but I always have a store of sultanas, hence the trio of sultanas dotted on each section of ring. It’s also best to add these decorations while your icing is still wet.

The Swedish Tea Ring in it’s rustic glory

I loved this bake. It was a pleasure to make, especially as I could spend an hour at a time doing each step making it a more manageable bake to do after work over 2 evenings. The contrast of the sharp and sweet icing against the warming cinnamon is so comforting, just what you need after a long drive in the winter night. Each slice reveals a beautiful cinnamon swirl…

A cinnamon swirl in every slice

I can recommend it with a celebratory gin or a cup of tea. Whatever your preference, I think you’ll enjoy this one. I enjoyed seconds, and could have even squeezed in thirds if I wasn’t being polite!

A chunk of Swedish Tea Ring

It was a good job I had baked my mini Swedish Tea Ring and froze it for later on that week for my friend’s house warming, as it then made a special appearance in a photo shoot for the Sunderland Echo who published an article on my Blog North Award. You can see the mini Swedish Tea Ring being balanced on a cake stand by me here

Double Swedish Tea Ring – Little and Large


Things I used to make my Swedish Tea Ring

1 quantity of Richer Yeast Dough

  • 7g of dried instant yeast
  • 3 oz sugar
  • 1 lb plain flour
  • pinch of salt
  • 3 0z butter/margarine (you choose)
  • 1 egg
  • just under 1/2 pint milk (room temperature)

Swedish Tea Ring

Use 8 oz of richer yeast dough to make one tea ring or the full quantity of richer yeast dough to make a larger ring (and a mini ring like me)

Filling

  • 1 oz melted butter
  • 2 oz brown sugar
  • 2 teaspoons of cinnamon (although I added enough to ensure the sugar was a dark brown colour…)
  • Sultanas to decorate (although it should really be glace cherries)
  • 30-35 minutes 350F, Gas mark 3-4 or 170 degrees C

Lemon Water (Glace) Icing

  • about 200g-300g icing sugar (you may need more to get the right consistency)
  • about 3-4 tablespoons of lemon juice
  • a good slosh of lemon extract (not essence)

38. South Korean Sweet Potato Cake with Creamy Coconut Custard Frosting

This recipe was inspired by what I had left in my fridge. One lonely sweet potato. Upon returning from holiday to Amsterdam I needed a quick and exotic bake for my sister’s birthday. I wasn’t entirely sure that everyone would enjoy a South Korean sweet potato cake but hey, this is what you get when your little sister sets up an international baking blog challenge!

This was actually quite quick to make, the most time being spent peeling and dicing the sweet potato so it could be boiled and mashed into a gloriously orange mush.

Mushed Sweet Potato

I love sweet potatoes and have been eating them a LOT in my preparation for the Great North Run which is (gulp!!) next Sunday!! They promise many vitamins (A, C and B6), antioxidants AND they have anti inflammatory properties! Perfect for soothing those aching joints and muscles post running! ..So this cake is (almost) practically healthy!

Creamy butter and sugar

I started by creaming the butter and two types of sugar together with my handheld electric whisk for about 5 minutes until it became lighter and fluffy.

Then add one egg at a time and vanilla and keep on whisking

Then add the vanilla and eggs, one at a time,vanilla and keep on whisking until they’re incorporated completely. It take about 5 minutes to whisk the mixture up until it’s very light and fluffy.

Lots of fluffy eggs, sugar and butter

Then onto the dry stuff. In a separate bowl I mixed together the flour, baking powder, and salt.

Dry stuff, flour, baking powder and salt

Then to stir in the milk to the sweet potato along with the syrup (as I don’t keep maple syrup in my cupboard I substituted it for golden syrup 🙂

IN with the syrup!

Stir it all together until it’s a milky sweet potato soup

Sweet potato soup

Then to gently fold in a third of the flour to the fluffy eggs and butter mixture

Folding in the flour

And then fold in a third of the sweet potato soup

Folding in the sweet potato soup

And alternate folding in a third of the flour and a third of the soup until all the ingredients are incorporated creating an orange flecked liquid batter.

All in!

The original recipe was to make two 9 inch round cakes. But I wanted one big cake and I love my lazy cake pan (PushPan) and use it at every opportunity I get! It really speeds up the process as it’s really non stick and leak proof! AND my favourite bit! No lining required! No wasted paper and effort. Just a quick spritz with cake release et voila! One quick cake! I wish I could afford more of them.

Just baked. Look at that deep brown!

I used one 9 inch tin to cake all of the batter in a 180 degrees C (or 350 degree F)  oven for 40 to 50 minutes. Until it’s baked evenly, with a golden top. This cake shrank back beautifully from the sides of the tin too to tell me it was ready for eating. I made sure it was done by sticking a cocktail stick in it and it came out clean on my check.

I always leave a cake to cool in it’s pan for at least 15 minutes before turning it out to cool fully on the wire rack. I learnt this the hard way as I once took my Christmas cake out of the tin straight away and it fell into 3 massive chunks in my hands. I did shed a tear at this after waiting patiently for it by the oven for 5 hours. They definitely need a bit of cooling to hold their shape! (Luckily I managed to stick my cake back together with jam and a bit of marzipan to cover the cracks and no one knew the difference!)

Tester sweet potato cupcakes

I was worried that this cake might be a bit odd on our English palettes so I made some tester cupcakes alongside my large cake. I needn’t have worried! It was delicious! I has only meant to try the corner of one cupcake and 2 minutes later the whole thing has disappeared into my tummy. It’s quite a sweet and slightly savoury sponge. A bit like carrot cake but without the grated carrot texture. It’s also a lot more moist than carrot cake.

You could stop here as the recipe didn’t give any sort of filing or frosting and the cake is sweet enough to eat as a sponge in it’s own right. HOWEVER if like me you want to take things a step further I found an amazing recipe for Creamy Coconut Custard Frosting, which is very reminiscent of rice pudding with a whole can of evapourated milk but with dessicated coconut instead of rice. Delicious! And what I love even more about this recipe is it takes 15 minutes with no trace of icing sugar to be swept up from every corner of your kitchen afterwards! This is a great alternative to buttercream which my family aren’t a huge fan of.

Throw into a pan egg yolks,  evapourated milk, sugar and vanilla

Choosing my heaviest sauce pan I added the sugar, egg yolks and milk to it along with the vanilla and stirred it all together

Continue to stir over a medium heat for 12 minutes until it thickens

Once it reaches the ‘pudding’ stage (it’s as thick as pudding) take the pan off the heat, throw in the dessicated coconut and Bob’s your uncle you’ve made coconut custard!

Then it needs to be cooled completely before spreading it over your cake.

Creamy Coconut Custard Frosting

As Mary Berry ‘s sage advice is to include a little of what’s in your cake on your cake so I lovingly adorned the cake with slices of coconut too.

South Korean Sweet Potato Cake and Coconut Custard Frosting

I was very pleasantly surprised by this cake and the combination of coconut custard. This was my very first ever attempt at making custard too and given the opportunity (and a spoon) I could merrily eat the whole pan of it by itself. That would definitely warm you up on a winter’s night! It was so sweet and comforting. You probably couldn’t eat more than one slice as it is quite a dense cake but I’m always up for a challenge. Now I’m thinking about it again I wish I had another huge chunk to tuck into! I’m happy to report that my sister enjoyed it too!

Sweet Potato Cake and Coconut frosting a sideways glance

Things I used to make South Korean Sweet Potato Cake

  • 1 cup of soft butter
  • 2/3 cup white sugar
  • 2/3 cup brown sugar
  • 3 eggs
  • 1 teaspoon vanilla extract
  • 2 cups all-purpose flour
  • 1 cup cake flour
  • 1 tablespoon baking powder
  • 1 teaspoon kosher salt
  • 1 1/3 cups milk
  • 1 medium sweet potato, peeled, cubed, boiled, and mashed
  • 1/3 cup maple syrup (golden syrup)

15 min  Creamy Coconut Custard Frosting

Things I used to make Creamy Coconut Custard Frosting

  • 1 (13-ounce) can evaporated milk
  • 1 cup sugar
  • 1/2 cup butter or margarine
  • 3 egg yolks
  • 1 teaspoon vanilla extract
  • 1 1/2 cups flaked coconut

36. Wiltshire Lardy Cake – Let Them Eat Lard! – 18th Century Clandestine Cake Club – EAT Festival

Wiltshire Lardy Cake at the Clandestine Cake Club

Lard in a cake? Sounds vile doesn’t it? I’ve always been perplexed by this notion of animal fat in food. Long gone are the days when we made Yorkshire Pudding with blisteringly hot fat and yet we still use butter and such like in all our cakes which I guess is a tad more appealing than pork blubber.

Wiltshire Lardy Cake

I purchased a pack of lard to bake some Chinese cakes but never found the right occasion to bake the Lardy beauties. I was greatly amused in my favourite Chinese Bakery to see little signs in front of some of the buns proclaiming “I contain lard”. Like they were sharing a guilty secret with us. This was another case of serendipity,  me having the perfect random ingredients required to bake something unusual for a very special EAT Festival Clandestine Cake Club.

Clandestine Cake Club – 18th Century Cakes – note the oranges and cauliflour!

The theme was 18th century cakes. (It’s harder than you would think to find a genuine 18th century recipe online.) A bit of research/googling later I realised in the 18th cake was spicy (the spice trade was blooming) and mainly contained readily available ingredients such as Lard and yeast!

I reverted back to good old Marguerite Patten and found Wiltshire Lardy cake. A very traditional English recipe. (I realise I’ve baked A LOT already from England but I promise to be more exotic again soon.)

Marguerite instructed me on making a basic yeast dough. I could tell how authentic (and genuinely old this recipe is as it uses the measurement ‘gill’ I have never heard of this before and it took a bit of deciphering!)

Now attempting to follow a recipe and instructions located in 3 different sections of a book is sure fire way to get me to make mistakes. I did not fail. Was it the late night baking efforts or my recipe coordination skills that are lacking?! Probably a bit of both!

The Food Processor did a wonderful job of distributing the yeast and rubbing the butter into the flour. Saved me a job!

The recipe instructed me to make a yeast paste. I ignored this as I know dried instant yeast doesn’t need to be mixed with liquid first. If I was using fresh yeast (which is a bit more difficult to find these days and more tricky to encourage) I would have followed the recipe to the letter, using blood temperature water and whatnot. With the instant yeast all you need to do is chuck it in with the flour and give it a stir to distribute it throughout. Simple.

Proving Time

After creating the basic yeast dough and leaving it to prove I fully embraced the lard. The technique required is very pastry like and it requires a little planning and preparation.

I set out my;

– glass work surface protector on top of a damp tea towel to hold it in place
– rolling pin
– flour for dusting
– lard
– spices, sugar and dried fruit

Proven Dough

Pastry is not my strong point I’m unashamed to admit. I’ve only tried to make flaky pastry once and I shed a few tears over the sheer effort and complicated origami folding required. It was distinctly lacking in flakes too after all the hard work!!

To start with the dough needs to be knocked back and kneaded gently to distribute the yeast and warmth again. Then on a floured board it needs a good flattening with the rolling pin. Roll it into a rectangle.

Rectangular Rolling and dotting of LARD

Then to dot dollops of lard all over, (but leaving the final third empty)! I was in the throes on smearing the distinctly stinky lard in dots onto my flattened dough and crazily folding it into envelope shapes when Super Hans (the cat) joined me wailing for a bit of lard.

One Fold

Two Folds

Seal the edges with the rolling pin

Roll it out and repeat!

Turn clockwise and roll into rectangle

The animal fat smell most surely lured Super Hans into the kitchen. Is this a good sign?! I guess if it’s good enough for the cat to eat it’s good enough for me. Lard most certainly passes the Super Hans taste test. However a wailing cat is not conducive to pleasant baking experience…

Super Hans the noisy Cat. He enjoys a nice bit of lard.

I merrily proceeded to fold the dough up as required and smeared all the lard into it, then returned to the Lardy Cake recipe to discover I was supposed to have folded the fruit and spices into the dough along with the lard! Damn. Back to the rolling pin and floured board for me to fold in the remaining ingredients. My Lardy dough had a very through folding and rolling! It is a bit more difficult to roll dough when it has dried fruit sandwiched in it, but don’t despair if a few raisins pop through. I think it gives it character.

Folding (again) this time WITH the sugar, fruit and spices!

Folded and ready to be rolled with fruit, sugar and spices

Rolled out and ready to be folded again

Second half of the fruit and sugar and yet more folding!

Another fold (don’t worry the fruit is going to peek out in places!)

This Lardy cake definitely has ‘character!’

I was very lucky that my friends Jill and Jonny brought me back some amazing spices from their Indian Honeymoon including some cinnamon bark, which I whizzed up in my spice mill on my food processor. It smells AMAZING, much fresher then my normal ground cinnamon. I added rather a lot of my Indian spices to the sugar mix.

Hand Shaped chunky lardy cake

Once I had folded everything into the dough, it needed to be shaped and coaxed by hand into a chunky square. I plonked the square dough into a round, greased and floured cake tin. Then to squash the dough into a round, ensuring there are no gaps along the edges or on the base of the dough to avoid any holes in the cake. It needed a bit more time to prove and then into the oven!

Squashed-into-a-cake-tin Lardy Cake

While it was baking away I prepared my glaze to pour over the cake as soon as it came out of the oven.

Just Baked – Wiltshire Lardy Cake

I was very nervous taking this cake along to the Clandestine Cake Club as it wasn’t as pretty as the other 18c cakes, which included a Wedgewood Iced Pepper Cake (beautiful!!), a basket of oranges! (marzipan encased chocolate and ganache cakes! So very realistic!) and I brought along LARD!? I made sure I sampled my cake first in case it was horrid and I needed to remove it from the table. But I was very pleasantly surprised.

Post Glaze – Just Chilling – Wiltshire Lardy Cake

It actually tastes rather nice. It’s a distinctly brown cake. The sugar glaze adds a nice crunchy texture and the lard (dare I say it) gives the cake a slightly savoury feel, a little bit like the Herman the German Cake. I couldn’t see any layers despite all the meticulous folding but perhaps I messed that up with my accidental double folding and rolling. I’m not entirely sure it’s supposed to result in layers either! Marguerite doesn’t really go into that much detail.

A sideways glance of Wiltshire Lardy Cake – No layers in sight but plenty of fruit and spice

But as you may realise by now I am a sucker for a fruit cake and this ticks all my boxes, fruity, spicy, sugary. It’s always the way isn’t it? The things that are the least healthy, taste the best!

A fine selection of 18th Century Cakes

The Clandestine Cake Club was held in the Alderman’s House, which is absolutely beautiful. I’ve walked past so many times and it is only open on special occasions. It was perfect for our 18th century cake feast. As it was part of the EAT Festival we had additional guests to entertain with our cakes. It was a fabulous atmosphere with lots of tea flowing, cake demonstrations and sugar craft too. I’m looking forward to our next meeting in August.


Alderman’s House – Clandestine Cake Club

More Clandestine 18th Century Cakes


Rose cupcake decorating – look what I learnt!

Wiltshire Lardy Cake

Ingredients

Plain Yeast Dough

  • 12oz Plain flour
  • Pinch of salt
  • 1oz margarine
  • 1-2oz sugar
  • 1/2oz fresh yeast or 14grams instant dried yeast
  • Approx 1and ½ ‘gills’ tepid water, milk & water or milk (7.5 imperial fluid ounces or 213ml)

If using fresh yeast…

  1. Cream the (fresh yeast) yeast with a tsp of sugar
  2. Add tepid liquid and a sprinkling of flour
  3. Put into a warm place until sponge ‘breaks’ through

If using dried yeast ignore these 3 steps above and add instant dried yeast directly to the flour at this point

  1. Sieve flour and salt into a warm bowl
  2. Rub in margarine and add sugar
  3. When ready work in the yeast liquid and knead thoroughly
  4. Put into a warm place to prove for about 1 hr until it doubles in size
  5. Knock back and knead again until smooth


Lardy Cake

  • 4 oz Lard
  • 4oz Sugar
  • 4oz dried fruit
  • Little spice (mixed spices, cinnamon, ginger, cardamom,)
  1. Roll our the plain yeast dough into an oblong shape
  2. If it’s a bit sticky flour the board well
  3. Divide the lard and sugar into 2 equal portions, cutting the lard into tiny pieces
  4. Dot  half the lard onto the all over the dough and half the sugar and fruit, with a light dusting of spice on to the dough
  5. Fold in the same way as for flaky pastry
  6. Fold the dough over one third at a time, closing it like an envelope.
  7. Seal the edges by pressing it with the rolling pin
  8. ‘Rib’ the dough with the rolling pin. (Press the rolling pin into the dough lengthways to create ridges equally spaced across the dough)
  9. Turn the dough clockwise and roll out flat to a oblong shape
  10. Add flour as required to prevent the dough sticking to the board
  11. Re-roll the dough and repeat with the remaining lard, sugar, fruit and spice
  12. Fold again and roll into a neat square or oblong shape
  13. To fit into a 7 or 9 inch tin
  14. If using a round tin mould the dough with hands to the required space
  15. Put the mixture into a warmed, greased and floured cake tin, making sure it comes no more than two thirds of the way up the tin.
  16. Prove for 20 mins in a warm place
  17. Bake in the centre of a hot oven (425-450F or Gas Mark 6-7) for 15 mins
  18. Lower heat to 375F/Gas Mark 4 for 20-25 mins
  19. Either dust the cake with caster sugar when cold or brush with glaze when hot (1 tablespoon sugar and 1 tablespoon water)
  20. Enjoy with a big cup of tea and revel in the lardy glow

28. Jamaican Black (Rum) Cake – The most alcoholic cake I’ve ever baked

Jamaican Black Cake

Officially the most alcoholic cake that I have EVER baked. Jamaican Black cake is most definitely not for the faint of heart or soberest of people. Containing 2 bottles of dark rum and a half bottle of Brandy, the fumes emanating from the cake are enough to make you slightly squiffy, never mind devouring a full slice!

Dark Rum (not just any dark rum but Marks and Spencers Dark Rum)

I happened upon the idea of a Jamaican Black cake when looking for Christmas cake recipes and I spotted it for sale at the continental Christmas markets. I required a wonderful cake recipe to bake for my first ever venture into the world of Clandestine Cake Club where the theme was cakes with beverages and also something luxurious for my mam’s mothers day present too. This is how I ended up scouring shops for a ridiculous amount of prunes, raisins, booze and Angostura Bitters. Did you know that they are difficult to find despite their 47% volume and are rumoured to be poisonous in large quantities… Good job this only needed 2 tablespoons of the pink stuff!

rum soaked fruit

I soaked the mammoth amount of dried fruit in an entire bottle (1 litre) of rum for about 2 weeks. I had to split the fruit into 2 jars as I simply did not have a vessel large enough to contain the copious amounts of booze and fruit.

I probably should have read the recipe more carefully as I would then have discovered that this recipe is enough to yield 3 or 4 cakes. I had produced a Jamaican Black Cake factory!! [I’ve revisited this recipe and reduced it down to Just the one Jamaican Black Cake here if you want to bake fewer cakes.]

The recipe also did not specify the volume of the bottles of booze so I shall let you know what worked for me (and as per usual I did end up substituting something for things that I like better. I hope that doesn’t detract from its Jamicanness? (or Trinidad – ianness origin also).

Rum soaked fruit… how much can I cram in to the food processor?

I figured that soaking fruit in this sheer amount of rum as well as being highly decadent is enough to ensure a good result (or get you very drunk so you no longer care what the cake actually tastes like). The idea behind such a long soak is to help macerate the fruit and also creates a much denser and moist texture than traditional fruit cake/Christmas Cake. I also think that it might make a wonderful Christmas pudding.

Maybe a bit more…

Following the long rum soak the fruit required mushing up. My weapon of choice was my food processor. Rather dangerously I crammed the entire fruit and rum mix into the bowl and forced the lid on. It took rather a lot of whizzing to get the mix to condense down into a fruit paste but it’s a determined little processor and did a wonderful job. Adding the Angostura bitters left a pink hue to the mixer bowl for future Jamaican Black Cake memories.

Eeek! Full to capacity but valiantly managed to macerate the fruit fully

With the food processor chugging away I had a chance to get on with ‘browning the sugar’. This is a new technique for me and undoubtedly adds to the depth of the final cake colour. Light brown sugar is heated in the pan until it melts to create a caramel. Adding a little water (in total half a cup) at a time. I struggled to get the sugar to melt and in frustration tipped all the water in, which wasn’t a good idea as it crystalised into chunks and required a much more vigorous heat and stir to get a smoother caramel. And even then it was still on the crunchy textured side for my liking. But I figured the heat of the oven would help to incorporate the crystals into the cake, I’m pretty sure I was right too! No sign of crunchy sugar lumps in the final cake.

Bubbling and browning the sugar to a caramel

Perhaps I was multi tasking to the extreme as I then attempted to beat the butter, sugar and eggs together whilst macerating the fruit and drowning/browning the sugar. But hey I have 2 hands, why not use them?!

Creaming the butter and sugar

After a short while I realised I don’t own a bowl big enough to house all of the cake ingredients in. I now had 3 separate and extremely full bowls which were already overflowing!! Once I stirred the browned liquid sugar into the beaten eggs and sugar I then only had 2 massive bowls of stuff to combine…

Mixing the browned sugar into the mix

Tonnes of butter, sugar, eggs and browned butter!

A spot of logical thinking brought me to the conclusion that this was possible, I just needed to divide the mix in order to conquer it.

Emmmmm how do I combine all of this???

I poured roughly half the beaten eggs, butter and sugar into one large mixing bowl. I then decanted half of the mushed up fruit and rum on top of the batter. This meant I had some space to fold the mixture together with my metal spoon. Although some ingredients fell over board I feel I salvaged the majority of it.

Hope it doesn’t overflow…

I repeated the process in a separate bowl with the other half of the mixture. Although I’m sure my guess work is highly accurate I couldn’t help but notice one bowl of batter looked a bit blacker than the other which worried me that I had put more fruit in inequality bowl than the other but there was nothing to gain by fretting about it and these monster cakes needed a.good 3 hours in the oven so I had to plough on.

It was a bit of a tight squeeze!!

Fully combined all of the ingredients!!

I had already greased and double lined 2 round springform cake tins with an extra high collar fixed on the outside with string to prevent the cake top from burning. I used a.22cm tin and a 20cm tin and found I still had cake to spare so quickly greased my favourite bundt tin (with a very generous layer of butter as I couldn’t line the moulded tin with paper and wanted to make sure I could get the cake back out again!!) Due to its shape I also couldn’t tie a protective collar of greaseproof paper round the bundt tin so opted for a lid of tin foil over the top. This scrunched up edges to create a seal over the top of the tin and stayed put throughout the baking process.

Doubled lined and dressed in collars – cakes ready for the oven

I smoothed the tops of the cakes as flat as I could as I wasn’t expecting them to rise very much.

I did check on the cakes regularly and turned them slightly so as to avoid burning the edges. But I resisted opening the oven for at least 2 hours to keep the heat in and the cakes rising. No one wants a sunken and heavy cake…

Trio of Jamaican Black Cakes hot out the oven

After 3 hours they were definitely done and the skewer came out clean.

The final touch was to pour half a bottle of rum over the 3 cakes whilst they were still in their tins and warm.

More rum glistening on top

What a wonderful cake! It was definitely worth the extra preparation time and although it’s not traditional to ice a Jamaican Black Cake, my Mam loves marzipan and royal icing so I created a Cath Kidston -esque star design especially for her using the largest of my trio of cakes. This wasn’t the easiest cake to ice as the cake was still rather moist (and full of rum) so I struggled to get the icing to stick. Some say that it is too sweet with the layers of icing, but I actually really quite liked it. It is very similar to a Christmas Cake however it smells so much more of booze and brings a lovely rose to the cheeks.

Cath Kidston Jamaican Black Cake

The second cake which I baked in the bundt tin required some coaxing to remove it from the tin. (I implemented a cocktail stick to loosen the cake around the sides, then I let gravity do the rest of the work, turning the tin upside down on a plate.) I took this to my first ever Clandestine Cake Club and shared the cake with lots of other cake lovers. I will tell you more about this another time 🙂

Jamaican Black Bundt Cake – note the slight cocktail stick indentations… oops but rum hides all sorts of sins

The more traditional shaped Jamaican Black Cake

The Towering Trio of Jamaican Black Cakes

Things that I used to make Jamaican Black Cake…

An insane amount of dried fruit and alcohol! Although I didn’t stick completely to the combinations below I think you can play around with which dried fruits you use depending on what is available provided it all adds up to the same total amount of dried fruit. I also worked from 2 different recipes to make sure I had a good all rounder recipe and that I made it as authentically as possible.

[Since creating this recipe I have revisited it and reduced it so you can also now follow a recipe for Just the One Jamaican Black Cake if you prefer!]

Fruit Puree Base:

Soak the fruit in rum for up to 2 weeks (or at least 3 days) prior to macerating

  • 500g prunes
  • 500g dark raisins
  • 750g currants
  • 500g dried cherries
  • 250g mixed candied citrus peel
  • (Total of 5 and 1/4 pounds of dried fruit or 2.4 kilograms)
  • 1 bottle cherry brandy (I had to make do with plain old Brandy and used a 500ml bottle)
  • 1 bottle rum and/or Bailey’s (I used a 1 litre bottle of dark rum. I didn’t include Baileys)  -Other recipes also suggest using Manischewitz Concord grape wine which doesn’t seem to exist in England so I just opted for adding a bit more rum
  • 2 tbsp Angostura bitters

Browning:

Heat the sugar in a heavy based pan until it melts and then add a little bit of the water at a time until it becomes a dark caramel. Careful not to burn it, but it will come very close to being burnt to achieve ‘browned’ perfection.

  • 500g brown sugar
  • 1/2 cup boiling hot water

Cake:

Beat the sugar and eggs together and then beat the eggs in one by one. (You will need a big bowl as it gets a bit messy with 8 eggs!) Add all the flavours to the egg mix.

Sift the dry ingredients together and then fold it into the beaten eggs, sugar and butter.

Then mix in the fruit puree and browned sugar liquid.

Pour into 3 greased and double lined cake tins.

Bake at 120 degrees celsius (250F) for 3 hours

  • 500g unsalted butter
  • 500g sugar
  • 8 eggs
  • 1 tsp lemon essence (I didn’t have this so used lime juice instead…)
  • I used the zest of 2 whole limes (but then realised the recipe said 2 tsp lime rind)
  • 2 tsp almond essence
  • 2 tsp vanilla
  • 500g plain flour (I used plain white flour but you could make this cake gluten free by using your favourite gluten free plain flour or a combination of gluten free flours such as 250g cassava flour + 250g rice flour)
  • 4 tsp baking powder
  • 2 tsp mixed spice
  • 1/2 tsp grated nutmeg

The Final Touch:

Pour a generous amount of rum/brandy onto the top of your cake. It should absorb rather a lot of rum at this point. The cake will get darker with the more rum that you force feed it. It may take a day for the cake to absorb the rum but it will get there.

Wait until the cake has cooled completely before removing it from the tin and pop the cakes in an airtight container. I even left one cake in the tin for a week with tin foil over the top while it absorbed the rum (and I had ran out of containers big enough to keep it in!

MORE RUM 1 500ml bottle of dark rum for pouring on the hot cakes

Keeping Your Jamaican Black Cake:

The cake should keep for (at least) a month in an air tight container. Or perhaps even longer if you can resist eating it as it’s almost pickled with that amount of alcohol in it! Tin foil is also a good idea help seal in the rum and prevent the cake from drying out.

I froze my final cake and I think it will keep for at least a month in the freezer before I decide what to do with it.

This recipe was created using inspiration from Auntie Olga’s Trinidad Black Cake  and the Naparima Girls’ High School Cookbook.

Thank you for reading!

Happy Mother’s Day Mam! Here’s a Cath Kidston-esque cake just for you

Happy Mother’s Day! Cath Kidston inspired cake

Happy Mother’s Day to my Mam! I wanted to bake something special, Cath Kidston -esque and chocolate free for my Mam and came up with this haphazard star cake. I will tell you all about the inside of the cake later on as it’s still a little secret (and we haven’t tried it yet!).

After some frantic last minute icing shopping I managed to get a layer of marzipan and royal icing on the very alcoholic cake in record breaking time. Fingers crossed it’s all set in place now as there was no time to let the icing dry before adding the decorative touches. Especially with the cake inside having taken 2 weeks of soaking and 7 hours of preparing/baking. I’m hoping it tastes good!

The various colours of icing and star shape cutters

I attempted to colour my own icing after failing to create purple with red and blue food colourings I managed to use some silver spoon blue liquid colouring to create the blue icing and I was lucky to have some pre coloured red icing left over from Christmas too, that needed to be used up.

Glitter plate

I rolled the different colours of icing out using my mini silicon rolling pin and used a variety of star cutters to cut out the shapes.  Adding a liberal coating of glitter on each star to give it a bit more sparkle. I found tipping the glitter onto a plate and swishing the stars in the glitter made life a bit easier and a good generous layer of glitter to boot. Although the curious cat also got a bit glitterified too in the process.

Super Hans the glittery cat

I don’t own edible cake glue so I made my own with a bit of water and liquid glucose and used a knife to spread it on each star (sparingly) as I didn’t want the colours to bleed into the white icing and ruin the effect. The idea is to create just enough stickiness to hold the decorations on.

Stars climbing up the side of the cake

I got a bit carried away and put as many red and blue stars on to the cake as I could fit, including a few that are climbing up the side of the cake… I was envisaging a Cath Kidston fabric print and hope that it kind of conjures up that image but with more glitter 🙂

I’m off to take it to my Mam now. Let’s hope she likes it!

Star shaped and sparkly

All shapes and sizes

25. Happy Birthday to me! Triple Lemon, Triple Layer Victoria Sponge – Extravagana – England

image

Triple Lemon, Triple Layer Victoria Sponge

Ok, ok I’ve baked rather a few things already from good old England so it may not be that exotic to choose a Traditional Victoria Sponge. However! I know a true test of baking skill lies in the creation of a perfect sponge. I’ve never made one of these before but I sure have eaten my fair share of them. I have pondered over baking a layered cake for quite some time and debated over experimenting with a Hummingbird Bakery venture delicious although it would have been it involved too many ingredients that I couldn’t find so back to Marguerite Patten! Always wanting to try something a little bit different, and having rather a lot of home made lemon curd still to use up, I made mine a triple lemon triple layered Victoria Sponge…
image

The Marguerite Patten recipe for Victoria Sponge has so many variations I think you need a Home Economics degree to put it all together! After engaging my non mathematical brain I managed to measure out in ounces (reading my scales correctly this time- I recently realised that I’ve been reading Llbs instead of ounces… This may explain why my last sponge cake went SO very wrong…)

The Many Variations of Marguerite

I used the variation for one 10 inch cake tin, the plan being that I would simply split my one cake in half and fill it with buttercream and my lemon curd.

image

Whisking the eggs well

As I was making probably the biggest cake in Marguerite’s recipe options I had to increase all the ingredients from 4oz to 6oz. Simple?

image

Creaming the butter, sugar and lemon zest together

I simplified the method for myself: 6oz of butter and 6 of sugar creamed together. 2 medium eggs to be whisked ‘well’. 2 lemons zest and half a lemons juice added to the butter then beat the eggs gradually into the butter being careful not to curdle the lot.

image

Scrambled eggs?

Then to fold in the 6oz of plain flour and ta da we have a cake mix!

image

Folding in the flour

Careful not to knock the air out of the mixture I lovingly spread it as flat as I could get it into the greased and lined tin. 35minutes at 180 degrees and I had one slightly thinner than I expected lemon sponge.

image

Spread as even as possible in the tin

image

One slightly sad looking thin lemon sponge

This rather sad looking sponge would be impossible split down the middle and ice. So I just had to bake another 2 layers!! It would have been a bit of a disappointing cake had I not. To speed up the process I doubled the ingredients to make enough for 2 cakes in one go. I wasn’t entirely sure this was technically the best thing to do but hey I didn’t want to be on all night. The problem being I only have one round cake tin so I had to bake one sponge at a time in order to re use the tin. This meant cooling the cake quickly and hoping the last sponge wouldn’t be airless and dry after the sponge mix had sat around waiting to be plopped into the tin.

image

Citrus buttercream

Throwing an unmeasured amount of butter and icing sugar into the food processor, (probably around 1 and a half packs of butter and enough icing sugar to make a good smooth sweet texture) I whizzed it all up with a splash of orange extract and vanilla too. I ran out of lemons by this point so thought any citrus would be a good move…

I am not very good at icing cakes with buttercream. My cupcakes always look a bit sad so this was a bit of a trial by fire. I’ve watched Lorraine Pascale ice cakes and it looks easy so I do what I do best and make it up as I go along. Lorraine made a mint sugar syrup and spread it on to her layered sponge cakes before icing, so I thought this must be a good idea although it did mean deviating from Marguerite’s recipe somewhat.

Lemon Syrup

Using what I had left over from the sponges I simmered the juice from all of the zested lemons with some sugar (enough to cover the bottom of the pan) to make a lemon drizzle. When it and the cakes had cooled slightly I spread a generous sticky coating on all 3 sponge layers to add to the lemony flavour and to help keep it moist.

The Terrible Trio

The exciting bit was then whacking on a thick layer of lemon curd followed by buttercream then smushing on a sponge layer (and it cracked slightly but no one will see this once I coat the entire thing in buttercream. The problem was the lemon curd started to dribble out everywhere! For the second layer I put buttercream first then lemon curd which helped hold it in place a bit better.

Layer 1! Lashings of Buttercream

Layer 2. I could stop here for a traditional Victoria Sponge…

Lemon Curding it up

Layer 3! Looking a bit rustic

It was looking enormous and slightly lopsided. I had obviously not spread the buttercream evenly but the leaning tower of Pisa look is so in right now (I tell myself). Once the third sponge layer was added I spread the remaining butter cream, around the sides of the cake, sealing all 3 layers in. Smoothing the cream round with a palette knife. I saved a little buttercream to finish it off after the entire cake had a little rest in the fridge to ‘set’.

All 3 leaning layers encased in buttercream

The cake was so massive I had to take some shelves out of the fridge just to squeeze it in! Once I smoothed on the final finishing touches of buttercream in an attempt to hide some of the crumbs that had broken off the sponges and worked their way into the cream I faced a little challenge. How to cover the leaning tower of cake up to keep it fresh in the fridge?! It was too big for any of my cake boxes and I had welded it to my glass cake stand with buttercream so it wasn’t possible to move it.

Cake Tent

I fashioned a rudimentary cake tent by selotaping cocktail sticks underneath the glass cake stand and gently folding 2 sheets of tin foil around the cake and skewering them onto the sticks. The cocktail sticks meant the tin foil didn’t touch the buttercream but would stop it all drying out in the fridge. Perfect!

Triple Lemon, Triple Layer Victoria Sponge

Once you start you can’t stop

This cake was immense!! I loved the sharp lemon flavour of the Curd combined with the gentle citrus buttercream. The sponge was probably a bit dry around the edges (hence the loose crumbs) so I would probably take it out the oven a little sooner if I was making it again. But hey for a first attempt at a layered cake I was happy. The tilt definitely gives it a certain je nais sais quais. I enjoyed the quirky take on the traditional Victoria Sponge. I took some to work and one comment was “that is the best cake that I have ever tasted’ which is high praise indeed!

Ps. This cake was perfect for trying out my lovely new cake slice!

The Caribbean Christmas Cake Collection Continued…

Caribbean Christmas Cake Collection

This post has been a long time in the making. About a month ago I began the Caribbean Christmas Cakes after an extreme test of my patience in greasing and lining 14 assorted mini cake tins and baking the little blighters for a couple of hours. I don’t mind this of course as I know the fruits of my labours are worth the effort and the wonderous rum, raisin, cinnamon and coconut smell that permeated the entire house let me know just how wonderful it will be.

The baked cakes

I’ve tended to my little cakes every week, topping them up with a bit more rum, until they could take no more. They still required a little house of marzipan and another week to dry out all in their specially purchased enormous Tupperware box.

Roll out a lot of marzipan... this has got to fit round 14 cakes

I decided one Saturday night, before heading out for a party to attempt to coat them all in a quick blanket of marzipan. I managed to finish 9 of them before I decided enough was enough and I would very much like to go to have a dance instead.

Firstly they needed to be glazed with apricot jam to make the marzipan stick…

Warming Apricot Jam

Then as all the cakes are very different shapes and sizes, they each needed to be fitted individually for their marzipan house. In an attempt to minimise rolling out marzipan, as it is frankly infuriating with its tendency to stick to the work surface just as you get it to the right thickness and it’s perfectly smooth so you have to start again, I squeezed as many on to one sheet as possible and trimmed it so there was very little excess to remove on the cake itself.

cutting each cake its own marzipan house

Once it was face down on the marzipan I had to simply lift the marzipan up and force it to stick to the sides of the cake, achieving a (relatively) smooth finish. I’m not too bothered about getting it perfect at this stage as the fondant should cover any major flaws…

Off with its head! (far too wonky)

Occasionally I got too frustrated with the cake being all oddly shaped and cut a lump off it. This didn’t really help matters as the cake was no straighter after being hacked into. I just made a big mess and dropped cake everywhere… but it did mean that I had a midnight snack when I got back in later on. 🙂

Then for the fondant

After a week the marzipan was settled enough to add the final icing layer. I was greeted by a fantastic whiff of almond and rum when I came back to the little cakes. The white fondant icing needed to be kneaded until it was pliable and then rolled out in the same way as the marzipan, however a bit more carefully and precisely (if I can ever be precise?!) as this is the layer that everyone sees. Cue more irritated rolling pin action.

I didn’t have any vodka to brush onto the marzipan so I used the rum in the cupboard. I’m sure that will do the same job and perhaps enhance the rumness of the cake while it’s at it?

Trim its skirt

The cakes needed a little trim to tidy the edges and I ended up rolling the cakes themselves around like a rolling pin (as they’re so small) on the worksurface to smooth them out and flatten the icing down. It’s impossible, even with my childrens sized rolling pin to roll the icing smooth on the cakes. Then they needed a quick polish with the palm of my hand to bring the icing to life.

I love the film Elf. It always makes me think of candy canes so as an homage to Elf I wanted to make Candy stripe cakes. I was very kindly donated a block of red fondant which is amazing!! (Thanks Lucy!) I rolled it out and using many handy palette knife/ruler cut strips of red icing.

Lines and lines and lines and lines

Then I glued them on to the cakes using a dab of water.

Chunky Candy Stripes

Not bad for my first attempt even if I do say so myself (and as I was completely making it up as I went along). Not content with just one design, I had ordered some daisy flower cutters from Ebay and thought I could perhaps christen them and pass them off as Poinsettia?

The daisy/poinsettia flower cutters

Poinsettia Flowers

I added some silver edible ball things (can’t remember their real name) by mixing a tiny bit of icing sugar with water to make a paste then squishing them into the cakes. There’s still 5 more cakes that require some attention and I have some holly leaf cutters and green food colouring to play with 🙂

All shapes and sizes welcome in this collection of cakes

4 hours of icing later... 9 down, 5 more to go.

I’m also entering this in Vanessa Kimbells’ fantastic Let’s Make Christmas Competition as I will be packing up these mini cakes in cellophane with lashings of ribbon and giving them to my friends and family very soon! Have a look at her blog and competition below…
 

17. Matcha Green Tea Drizzle Cake – Japan

I love Japan. This is probably an understatement. The North East of England has slowly but surely caught on to the variety of foods that other countries can offer. For a long time we only had one sushi restaurant. I’m happy to report that we now have at least 3 that I’m aware of. Wagamama posed quite a revolution when it first opened its doors and we all queued down the street for a chance to eat some gorgeous food.

The Golden Palace

Traditionally Japanese food focuses more on savoury things rather than cakes I found this fantastic recipe for a Green Tea Drizzle Cake in the Wagamama cookbook.

A delicious slice

I went to Japan last year after dreaming about it for many, many years. I love that pretty much everything has green tea in it. I ate so much Green Tea ice cream…

My favourite ice cream parlour (this may have bee rose but I ate so much I forget)

went to a Tea Ceremony,

Me making Matcha in the Tea ceremony

Tea Ceremony

dressed up in kimono

The Full Kimono Experience

Kimono

and ate tonnes of sushi and noodles and maple leaf cakes (if I can find a recipe I will be attempting this very soon!)

The best cold soba noodles I have ever had. EVER

I’m quite adventurous when it comes to food and when in Japan of course I’m going to experiment a bit further, so yes I ate Bento boxes on the bullet train til they were coming out of my ears, (octopus legs and all)

Tasty Octopus Legs

but I drew the line at raw horse meat which was almost eaten by accident, slightly lost in translation somewhere…

No raw horse meat here!

Luckily during my Hello Kitty splurges I also insisted on purchasing Matcha (Green Tea Powder although the bamboo whisk is yet to see daylight and is still sealed in its packet at the back of the cupboard) My Asian cooking obsessions mean that I regularly purchase bizarre things from the Chinese Supermarkets, so I have a cupboard full of tapioca pearls, jasmine essence and of course gunpowder green tea.

The strong stuff

We had friends coming round for takeaway and I thought Green Tea Cake would be a perfect light end to the meal. It was quite a quick bake too, so just enough time to whip up a double batch as I wanted to bake one to take with me to my friends house the night after too.

Unlike a normal sponge cake, the sugar and eggs were beaten together in a bain marie until it tripled in size.

Eggs and sugar into the whisk

Whisk it all until it triples in size

Magic

then flour, baking powder and matcha powder were folded in.

Matcha Green Tea Powder (and flour)

I divided the batter between the 2 tins and set them away to bake whilst I brewed up the strongest green tea I’ve ever made. It goes against my tea teachings to use boiling water when brewing green tea, but that’s what the recipe called for so I followed the instructions, wincing at the bitter green tea smell.

Brewing tea

I sieved the stewed tea to separate out the leaves and then reduced the tea down to a syrup with sugar.

Dark green tea

When the cakes they had to rest in their tins until cooled. I pierced the top of the cakes with a skewer and then poured the syrup generously over the 2 cakes.

Green Tea Syrup

They needed a little more resting and then wrestling out of the sugary tins, as the syrup hardened and required some brute force to release the cakes. Normally with a drizzle cake I use a solid tin and can dunk it in hot water to release it, but as this wasn’t water tight with a loose bottom I didn’t want to drown it before we had a chance to eat it!

Drizzled

Having saved a little syrup back, I ‘spiked’ the crème fraiche with green tea.

Green Tea spiked Creme Fraiche

I usually don’t like cream on the side of my cakes, but this was divine! The cake didn’t taste anything like how it smelt, which to be honest wasn’t the best smelling cake I’ve made.  (Nor was it the prettiest!)

The Final Cake

It was clean tasting and refreshing, with a crispy coating on the outside and soft and moist on in the inside. Beautiful! I would definitely recommend this to anyone.

The cake was enjoyed by all

Bonsai Trees at Hiroshima Peace Park


Things that I used to make my Matcha Green Tea Drizzle Cake (Courtesy of Wagamama Cookbook) 

This will make 1 Matcha Green Tea Drizzle Cake. I doubled these ingredients and made 2 cakes at the same time. (Just in case you’re feeding a few people! The cake should serve about 6-8 people)

For the cake

  • 110 g plain flour
  • 10 g matcha (powdered green tea – you can get this in most oriental supermarkets)
  • ½ tsp baking powder
  • 75 g butter
  • 110 g caster sugar
  • 4 eggs

For the green tea syrup

  • 2 tbsp green tea leaves (I used gunpowder loose green tea leaves to make the syrup)
  • 150 ml boiling water
  • 150 g caster sugar
  • Don’t forget to save a little of the syrup to spike the crème fraîche  with!
  • about 200 g crème fraîche  to serve