A Christening Cake with a history. 3 years on our final tier of wedding cake transformed.

Christening cake. Two tiered iced fruit cake with duck egg blue polka dots and bunting

Christening cake with a history. In a previous life it was a tier in our wedding cake. 3 years on it’s had a make over and tasted great!

As you may recall I got a bit carried away when baking our 5 tier fruit cake for our wedding almost 3 years ago. I ended up baking 8 cakes in total (!) We managed to eat most of the cakes but had one 7 inch round cake left.  So I carefully wrapped the cake in greaseproof paper and tin foil and popped it in a biscuit tin and put it in the back of the  cupboard and forgot about it. It managed to survive our house move and kitchen renovations too!

image of 3 year old fruit cake preserved in brandy ready for transforming into christening cakle

The original 3 year old wedding cake, full of booze and deeper in flavour and colour.

It’s a well known English tradition that you save the top tier of your wedding cake for the christening of your first child. Fruit cake keeps extremely well, provided you give it a good drink of booze every now and then. It also needs to be kept in a dry cool environment.  It’s important to store it in a tin,  not a plastic container, as the cake will sweat in plastic. And sweat means mould which you really don’t want! A layer of greaseproof paper and tin foil helps to stop the cake from drying out and keep the booze, which preserves the cake, in.
Every time I moved the cake (about once a year) I had a quick peek in the foil and topped it up with the orange brandy liqueur that I used in our original wedding cake. Drizzling just enough booze over the top of the cake to make it slightly damp (about 2-3 tbs). After 2 years I replaced the paper and foil.

Cutting the cake!

The actual wedding cake in it’s moment of glory.  (Any excuse to include another photo of it…)

I was a bit nervous about feeding a 3 year old fruit cake to my family but on close inspection the cake looked absolutely perfect just much darker than when I first baked it from absorbing all that delicious brandy.

I had such high ambitions and a million ideas on how to decorate the cake but with very limited time and a 5 month old baby who needs feeding every hour or so my ability to make fondant hot air balloons and elephants totally escaped me. And to be honest sugar craft has never been my strong point!

IMG_20151010_153818.jpg

I gave up sugar crafting and instead ate a lump of marzipan with a cup of tea.

As a compromise I opted for the smoothest finish I could manage of white fondant with duck egg blue polka dot design (much simpler and quicker!) And a year later I realise I’ve clearly got an unhealthy obsession with duck egg blue polka dots as I’ve just decorated the little one’s room in them too!

Image of duck egg blue and gold polka dots on bedroom wall

Polka dots galore

And don’t tell anyone but I cheated and bought a polystyrene 6 inch round to decorate for the top tier to give extra height and interest! As I was baking loads of chocolate cupcakes, flapjacks and brownies for my non fruit cake loving nieces and nephews I didn’t want to bake another round cake to ice as sponge cake can’t be iced a month in advance!

Our traditional English christening cake. 3 year old wedding fruit cake

Our traditional English christening cake. 3 year old wedding fruit cake

I iced the fruit and fake cakes a month in advance to give it a chance to dry and set. Making the cakes more durable and easy to transport. I iced them directly onto half inch thick drum cake boards for extra height with a layer of marzipan and fondant.

To hide any rough edges I pinned white ribbon into the drum boards around the edge of the cake. And found some beautiful grey polka dot ribbon that my friend gave me which worked perfectly to make a decorative bow on the top tier. As the cakes were on their drum boards I used dress making pins rubbed with brandy to pin the ribbon directly into the board without fear of the pins rusting.

Once the cakes were iced, buffed and smoothed (method here) I dabbed the small fondant polka dots (cut out with the round end of a fine piping nozzle) with a spot of brandy to help it adhere to the fondant.

I stored the cakes in cardboard cake boxes to protect them and help them dry and then all I had to do was make the bunting cake topper using some glitter sticker letters and paint my cardboard letters. So you definitely know our little one’s name!

I was so impressed with the cake. It actually tastes better than I remember. The orange brandy really popped and had intensified throughout the cake which was moist and rich. Fruit cake definitely gets better as it ages. The more mature the better. I’m so pleased I saved the cake. Not only did it save me from having to bake one whilst clutching a small baby but I managed to slice it into half inch fingers and feed our 50 family members and keep a couple of pieces for me to enjoy and savour later on!

Traditional, tasty and time saving. What’s not to love?

Liked this post? You can read about our epic wedding cake adventure here…

Part 1 – My 5 tiers of fruit wedding cake – My biggest booziest cake yet 

Part 2 – How many sugar flowers does it take to make a wedding cake?

Part 3 – Where to start icing a 5 tier wedding cake?

Part 4 -The Final Frontier – Decorating & assembling my 5 Tier wedding cake

Pick and Mix Pancakes! Porridge, banana and coconut

image

Not exactly a bake or a cake but I’m currently going through a bit of a pancake obsession. Mainly due to entering into the whole baby led weaning adventure. I wanted to find something nutritious, tasty and sugar free that we could all enjoy together.

I attempted (and burnt) a lot of banana pancakes first. They’re sweet but have more of a frittata taste and texture to them than I like in my pancakes. However they went down a storm!

Next up sweet potato pancakes. Really easy to fry up and rather tasty! They could be served as a savoury side dish or with fruit and yoghurt to sweeten them up further. Again the baby loved them so we’re onto a winner

Porridge pancakes were by far my favourite. They’re more savoury than the others but they’re fluffy and the perfect companion to fruit and yoghurt to increase the sweetness (and a good drizzle of maple syrup for me of course!). I then attempted a banana porridge pancake hybrid which was all the more delicious.

Coconut pancakes were also extremely popular in our house. Fluffy, light and sweet.

All of these pancakes require very little effort, are pretty simple to make and can be frozen for future snacking. I have a small bowl attachment for my hand (stick) blender which works wonderfully to blend the ingredients together for all 4 types of pancake.

The trick to good pancakes is getting the temperature right when frying them. I use a large non stick frying pan on an induction hob with coconut oil as it has a high smoking point. Setting 5/6 on the hob seems to have enough sizzle to it.

I use an ice cream scoop to put the batter into the pan which helps to make mini round pancakes.

Flipping the pancakes as soon as the edges are cooked (not wet or runny) and using a two palette knife approach to gently lift and flip them over means they’re easier to handle and much less likely to end up a scrambled mess. *I learnt the hard way.

Depending on the thickness of your pancakes they take a minute or two on each side to cook through. The sweet potato pancakes take a little longer (about 4 mins each side) but if you’re making mini pancakes you can squeeze about 6 in one pan and cook them in batches.

Ingredients
Banana pancakes
Makes approx. 10-15 mini pancakes
Freezer friendly
1 banana
1 egg

1. Blend the banana and egg to make a runny batter.
2. Heat coconut oil in the pan in a medium heat
3. Spoon batter into small rounds in the pan. About 5cm diameter.
4. Cook for about 1/2 mins and flip over for another minute.
5. Remove from heat carefully using two spatulas (they’re a delicate pancake!)
6. Leave to cool on kitchen paper and serve still warm.

They freeze really well too and baby enjoyed them cold from the fridge the next day too!

Sweet potato pancakes
Makes approx. 15 mini pancakes
Freezer friendly
1 large sweet potato
2 eggs
Coconut oil to fry pancakes in
Optional 1tsp cinnamon

1. Peel and cut sweet potato into small chunks. Steam until cooked and soft
2. Whizz up the sweet potato and egg in the blender to make a thick runny batter.
3.. Spoon batter into hot greased pan.
4.. Cook for about 5 mins each side or until golden brown.
5. Serve as savoury snack or with yoghurt and fruit.

Porridge Pancakes
Makes approx. 20 mini pancakes
Freezer friendly

1 1/3 cup porridge oats – blended to a fine flour
1 tsp baking powder
1/2 cup natural/greek yoghurt
2 eggs
1/2 cup whole milk
1 tsp vanilla extract
1tsp cinnamon
1tsp mixed spice
1/2tsp ground ginger
*Optional Blueberries/raspberries to drop into the batter as pancakes are cooking to make fruity porridge pancakes
Coconut oil (to fry the pancakes in)

1. Blend oats to a fine flour
2. Add baking powder
3. Blend in rest of ingredients
4. Leave batter to thicken for a couple of mins.
5. Cook in hot greased pan until golden brown on each side. (2/3 mins each side)
6. Serve with yoghurt and fruit or as a hand held snack.

Banana Porridge Pancakes
Makes approx 20 mini pancakes
Freezer friendly
1 1/3 cup porridge oats – blended to a fine flour
1 tsp baking powder
1 ripe banana
2 eggs
1/2 cup whole milk
1 tsp vanilla extract
1 tsp cinnamon
1 tsp mixed spice
1/2 tsp ground ginger
Coconut oil (to fry the pancakes in)

1. Blend oats to a fine flour
2. Add baking powder
3. Blend in rest of ingredients
4. Leave batter to thicken for a couple of mins.
5. Cook in hot greased pan until golden brown on each side. (2/3 mins each side)
6. Serve with yoghurt and fruit or as a hand held snack.

Coconut pancakes
Makes approx 15 – 20 mini pancakes
Freezer friendly

2 eggs
1/4 cup coconut flour
1/8 cup (or I used half of a 1/4 cup of milk as my cups don’t come in 8th measurements) cup coconut milk (hardly seems worth opening a can for such a small amount but it really enhances the coconut flavour)
1/2 tsp bicarbonate of soda
1/8 cup (or I used half of a 1/4 cup) wholemeal flour
2 tbs melted coconut oil
*plus additional coconut oil for frying pancakes

1. Beat eggs together
2. Beat in coconut milk
3. Beat in the rest of the ingredients
4. Let the batter stand for a minute or two to thicken.
5. Heat oil in pan and spoon batter into small rounds.
6. Cook for 1-2 mins each side.
7. Serve with fruit and yoghurt as you like 🙂

The ‘what if we never sleep again?’ Seeded Coconut Banana Cake

image

Banana bread is an excellent way to use up over ripe bananas. I stash mine ready peeled in the freezer until I have enough to bake with or to make instant ice cream (!)

I haven’t had a chance to bake as much since our little one arrived but now I’ve got a ring sling to wear him in I’m baking as much as possible! This recipe is quick, actually kind of healthy as its full of fruit, nuts and seeds and makes 2 cakes so what’s not to love??

I wanted to bake something to fuel us through the long sleepless nights and experimented with my best ever banana bread recipe to create a tasty and nutritious seeded coconut banana cake and my my it is delicious, especially warm from the oven.

I’ve replaced the butter with coconut oil which works really well and adds a further coconut dimension to the cake. I love the nuttiness wholemeal flour brings to this bake too along with the sunflower and pumpkin seeds for an additional energy boost. They also look pretty baked into the top of the cake providing little green and golden flecks.

It’s flavour deepens over time and the bananas ensure the cake retains it’s moisture so it’s good for at least a week in an airtight container. (If you can savour it for that long.)

I split this cake into 2 cake tins which means I can stash one in the freezer for a rainy day or unexpected guests. Just wrap it in tin foil and it will keep in the freezer for a month or two.

Things I used to make my Seeded Coconut Banana Cake

¤ 125g caster sugar
¤ 250g coconut oil (solid)
¤ 2 eggs
¤ 3 over ripe bananas (defrost them a bit first if they’re frozen)
¤ 170g plain flour
¤ 40g wholemeal flour
¤ 40g coconut flour
¤ 3tsp baking powder
¤ 2tsp vanilla extract
¤ 40g of chopped/diced pre soaked prunes or other dried fruit. (Make sure the fruit is plump by soaking in hot tea/fruit juice/booze for a few minutes or overnight if you have the time first)
¤ 40g mixed seeds (or chopped nuts) sunflower, pumpkin, chia and sesame seeds; and walnuts, flaked almonds work well.
¤ 1 tsp cinnamon
¤ 1 tsp vanilla extract

☆ 2 x 8 inch round cake tins greased and lined
☆ 20g flaked almonds, dessicated coconut and mixed seeds for the topping
☆ Runny honey to drizzle over after baking

1. Beat the sugar and coconut oil together until smooth

2. Beat the eggs into the oil until it forms a smooth paste

3. Mash the bananas first. Or if using a stand mixer throw them straight into the mixture and beat. Mix the bananas into the oil until combined.

4. Fold in the flour, baking powder, cinnamon and vanilla.

5. Fold in the dried fruit

6. Pour the batter into the greased and lined cake tins. Smooth the top of the cakes with a spatula.

7. Sprinkle the tops of the cakes with a generous handful of mixed seeds and nuts.

8. Bake the cakes in the middle of the oven for 30-35 minutes and 160 degrees c. (Fan assisted) until golden brown and a skewer comes out clean.

9. Whilst the cakes are hot drizzle runny honey over the tops of the cakes and allow it to seep into the sponge.

10. Cut yourself a massive slice whilst still warm and shove it into your face whilst basking in the glow of baking yourself 2 cakes in one go. It’s even better washed down with a lovely cup of tea.

Tea Heaven at Ringtons Tea Party

I LOVE tea. It goes with everything.  Good day? Celebrate with a cup of tea! Bad day? Consolations over a cup of tea. Cake? Best served with a cup of tea.

I’ve drank matcha green tea in a Japanese Tea Ceremony, tried iced matcha in a tea house, learned how to drink tea in China, drank milk tea in Hong Kong, Apple tea in Turkey and extremely sweet mint tea in Morocco.
Continue reading

Gadgets Galore! My dream kitchen of the future

Having recently renovated our kitchen I’ve been daydreaming A LOT about what we would have in our kitchen if money was no object and when technology developments bring us some very exciting new gadgets.

After: The new kitchen complete with porcelain butler sink

Our new kitchen complete with porcelain butler sink

So if I ever win the lottery I will be investing in some serious kitchen gadgets. Here’s my wish list…

10. American fridge freezer with ice and water dispenser. We had one on our travels in America and it was awesome.  Ideally I’d love a smart fridge that can tell you when you’re running low on certain ingredients or even better automatically order for you and get them delivered to your door!

Samsung showcase fridge Samsung showcase fridge

9. Retro Roberts Internet Radio:
Spending a lot of time in the kitchen I love listening to Spotify and the radio, especially BBC 6 music and Absolute 60s (Sunday morning Beatles Brunch is my must listen to show!) I love the vintage Roberts Radios and this one would look gorgeous in our kitchen. I’m saving up for this. One day I’ll get it!

Retro Roberts internet radio

Retro Roberts internet radio

8. Kitchenaid: I saved up for a long long time to be able to purchase my Candy Apple Kitchenaid. It’s definitely been worth the investment as I’ve used it more than any other gadget that I own. From making quick cakes to kneading and proving breads it really lightens the load. It means I can really go to town with my baking marathons. Whipping up 100 cupcakes in a couple of hours! I even splashed out on the ice cream maker attachment. It looks amazing on display in my work top too.

7. Kitchenaid Kitchenalia: The only problem with owning a Kitchenaid is that you then lust after the rest of the range to complete your collection! Of course I’d love the matching kettle, toaster, blender, and full accessory kit! It’s an expensive habit!

6. Hands free recipe reminder: There’s some amazing work going on locally at Newcastle University’s Culture Lab. They’ve developed the ‘Ambient Kitchen’ to help people with dementia to cook meals. It gives audio prompts along the way to help you finish cooking your meal. It’s also been used to help teach English as a foreign language too. I think this technology could be useful in a lot of kitchens including mine! I cook/bake a lot using online recipes on my touch screen phone.  This means I end up with flour all over my phone (and camera if I’m blogging it too). Wouldn’t it be brilliant if your laptop/phone/tablet connected to your kitchen and talked you through the recipe?

Ambient Kitchen at Newcastle University

Ambient Kitchen at Newcastle University

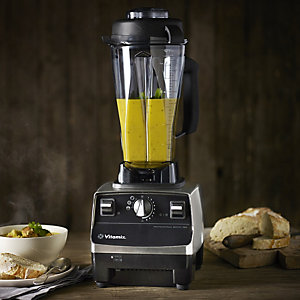
5. Vita Mix: I’ve tried food processors and I’ve set fire to food processors. I’ve come to the conclusion that I need one that’s robust to do the job. This one from Lakeland sounds fantastic. It can even grind wheat to make fresh flour and vegetables to make hot soup.

Vitamix

Vitamix

4. A proving drawer: Those of you who watch The Great British Bake Off will already be aware of the magic proving drawer. This would be an awesome addition to my kitchen helping to prove my bread quickly and evenly for that quick loaf.

3. Dishwasher Something that I just couldn’t be without in our kitchen. We inherited one with the house and it’s temperamental to say the least. I’m surprised and relieved that it’s lasted so long despite it’s cracked door! We always use the eco setting to save energy and load it up to the max too. Not sure what we’ll do when it finally gives up!

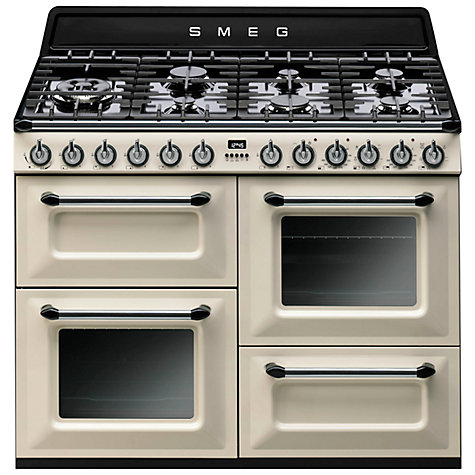
2. A range oven I love my new oven but in an ideal world I would knock back the chimney breast in the kitchen to make way for a full sized range oven. Ideally a Smeg or a Rangemaster oven as I don’t think I’ve got the know how for an Aga despite their beauty.

Smeg Range Oven

Smeg Range Oven

1. Technology that works together and is good for the environment: There’s so much available on the market and with the ever expanding ‘Internet of things’ appliances and apps can actually talk to each other to make life even easier in the kitchen and home. I’d love to be able to switch my oven on or off from my phone so my tea was ready and waiting for me when I arrive home! I bet in a few years we’ll all be texting our kettles on our way home!

Legal and General produced an interesting blog on the kitchens of the future which inspired this post. You can read their full article here.

Hello baby, new kitchen and New York

Busy baking something extra special

I’ve been a bit busy baking something extra special. Here’s my 3 month bump…

I haven’t really managed a lot of baking recently. There’s been rather lot going on… We had to get a new kitchen (long story) and we’ve also been having a baby! So a baking break was inevitable. This may be the longest I’ve ever gone without baking anything and needless to say I was getting a bit twitchy.

After: The new kitchen complete with porcelain butler sink

After: The new kitchen complete with porcelain butler sink

We were without a kitchen for almost 2 months before Christmas. There’s only so much shop bought cake and bread you can manage before craving something wholesome and home made.

During the renovations...

During the renovations…

Floods and leaks seem to follow us round. We discovered a leak in the kitchen which had penetrated the walls so the kitchen had to be gutted, plaster stripped and walls dried.  Luckily we had spontaneously booked our official honeymoon to New York prior to this discovery so we escaped whilst our builder friend got on with the work. It also meant that I could start to construct my kitchen the way that I wanted it, complete with a porcelain Butler Sink and revamp my old kitchen dresser.

There’s a million things that I’d love to put into my dream kitchen but right now I’m very happy with my oven that works, my Candy Apple KitchenAid and subway tiles.

Before we packed up the kitchen into the living room and flew off, I managed to squeeze in baking our Christmas Cake at 5 am. I left it to rest quietly at my mams away from all the dust and debris.

New York was amazing.  A real foodie adventure.  I had a list of bakeries and delis that I wanted to sample and frankly stuffed myself silly with all sorts of cakes, sweets, meats and delicious eats.

Red pizza pie was my absolute favourite and could have gorged on this for days.

I almost considered becoming a vegetarian for a while after our trip as we were served gargantuan amounts of meat and beautiful pickles at Carnegie Deli. I managed half of my sandwich before being defeated by the meat. In man vs. food. Food most definitely won.

I took the  ‘healthy’ option at Katz Deli opting for a real life Knish which I’ve always wanted to try (after I attempted to make them myself) and it was so so good.  Deep fried with a crispy coating and stuffed with mashed potato.  So comforting in the cold November chill.  Accompanied by Matzoh Ball Soup which technically was more ball than soup. The clear chicken broth was the panacea I needed to counteract all the meat.  I must learn how to make that!

We traveled up to Ithaca to visit friends taking in the glorious autumnal colours and waterfalls everywhere you turn.  Deer frolicking (and causing havoc) outside the window. It was like being in a Disney film. Punctuated by BBQ’d meat, beans, slaw,  Mac n cheese, ice cream, chocolate cake, red thai prawn curry, fusion foods, hot apple cider and hot chocolate. We took a much needed step back from the hustle and bustle of busy New York.  We were sad to leave but the Big Apple was calling and we had to head back.

I’m attempting to finish my final few around the world in 80 bakes when I get a moment with my hands free, so it may take some time yet so please bear with me.

But I did manage to bake and ice a cake one handed whilst carrying the little one last week so we’re getting our cake fix and starting him in the kitchen early. 🙂 I’ll also be sharing some of my own quick bakes along the way too.

Baby's first bake

Baby’s first bake

69. Ukrainian Sweet Chestnut Babka

Sweet Chestnut Babka recipe

Sweet Chestnut Babka

Seinfeld introduced the idea of the Babka to me. It’s an enriched sweet dough usually flavoured with chocolate popular in Eastern Europe. The episode focuses on Jerry and Elaine’s desperation to get their hands on the last Babka in the bakery. I’ve wanted to find out what all the fuss was about for ages. It was definitely worth the wait.

Sweet Chestnut Babka recipe

Sweet Chestnut Babka

I love how beautiful the Babka looks in all it’s braided glory. Dark brown sweet chestnut stripes peeking through the sweet dough, glistening in their honey glaze. I also love how complicated and impressive it looks too! I’ve plaited bread before, before but this was my first attempt at a braid and it’s not as difficult as you’d think.

Traditionally Babka, which means Grandmother in Polish, is a comforting bread flavoured with chocolate and baked at Easter time. As I like to do things differently (and I had ran out of chocolate) I found a tin of chestnut paste in the cupboard and thought I would put it to good use.

Babka swirls

Babka swirls

It’s absolutely delicious with it’s soft light texture and not too sweet, although you can add more sugar if you wish. I added cocoa powder to my chestnut paste along with poppy seeds to give a nod to the traditional chocolate and nut versions. The cocoa added depth to the chesnut paste and poppy seeds feature heavily in many European bakes and give a lovely crunch.

Having never baked with chestnut before, I was so happy with the result. I bought the tin on an impulse and it’s lay at the back of the cupboard forgotten until now. It’s an unusal flavour, rich nutty and rather savoury. Do check your can to see if it’s sweetened or natural. If unsweetened you’ll need to add sugar to you get your preferred level of sweetness. You could add chocolate chips, or use chocolate spread or nutella (or anything you fancy!) if you prefer.

How I made my Sweet Chestnut Babka

  1. Mix ingredients together til fully incorporated
  2. Knead for 10 mins until the dough is smooth and springs back when pinched
  3. Place in bowl, cover with cling film and leave to prove for 1-2 hours till doubled in size.
  4. Knock back the dough.
  5. Knead lightly on oiled work surface and roll out to a rectangle approx 5mm thick.  30 cm by 20cm.
  6. Spread even layer of chestnut paste over the dough and sprinkle lightly with Poppy seeds and light brown sugar.
  7. Roll dough up from long edge to long edge to form a sausage of dough with a spiral of chestnut running through the centre
  8. Cut the dough sausage with a sharp lightly oiled knife lengthways all the way along the sausage. Cut all the way through the dough to spilt it down the middle and expose the filling.
  9. Seal the strips together at one end
  10. Twist the two halves together,  folding one half of the dough over the other keeping the stripes of filling in the outside
  11. Seal the other two ends together to form a braided ring. You can trim the ends of the Babka with sharp knife to seal the twists together before joining the ends to form a ring
  12. Lift carefully onto a greased and lined baking sheet.
  13. Cover with greased cling film and prove for 1-2 hours till doubled in size
  14. Bake for 25 minutes at 200 degrees Celsius.
  15. Brush all over with honey syrup whilst still hot
  16. Cool and eat!

Things I used to make my Sweet Chestnut Babka

Dough

  • 350g strong white flour (you could use all white strong flour if your prefer)
  • 115g strong wholemeal flour
  • 25g butter
  • 1 tablespoon sugar
  • 1 tsp salt
  • 1 1/4 tsp instant yeast
  • 300ml milk
  • 1/2 tsp vanilla extract
  • splash of water and vegetable oil if needed to bring the dough together into smooth ball

Sweet Chestnut Paste

  • 300g chestnut puree (unsweetened)
  • 30g cocoa powder
  • 50 g light brown sugar
  • splash of milk to mix the paste together until smooth and spreadable (not too runny or thick)
  • *1 tbs sugar to sprinkle over paste
  • * 2 tsp Poppy seeds to sprinkle over paste

Honey Syrup

  • 2 tbs runny honey
  • 30ml water
    boil gently for 1- 2 minute to thicken syrup

68. Speculoos Kransekake Christmas Tree Cake – Norwegian Ring Cake

Vanilla Shortbread Kransekake recipe

Vanilla Shortbread Kransekake


Traditionally Kransekake (Norwegian Ring Cake) is eaten at Christmas or on special occasions.  It’s a stack of about 18 almond ring shaped biscuits held together with lashings of ornate royal icing.

Speculoos Kransekake

Speculoos Kransekake

Now as I can never leave a recipe alone I had to switch this up and make it even more festive with a (Speculoos Kransekake (recipe below) and Vanilla Shortbread Kransekake (recipe below) instead. The sweet spices blended together makes a moreish fragrant biscuit. I loved it so much I kept going and for Christmas day made an enormous shortbread version, which is closer in colour to the traditional almond version.

Although I’m straying from the Norwegian almond tradition my Speculoos and shortbread versions are much cheaper to make and meant I didn’t have to make another trip to the shop for expensive ground almonds. You can buy Speculoos spice already mixed but I enjoy grinding and blending my own fresh spices for an extra punch.

I always have an abundance of spices in my cupboard so this is a perfect Christmas bake for me. And as we just put our tree up. The combination of  pine needles and freshly baked Speculoos floating through our house is like a piece of Christmas Heaven.

The Kransekake is baked in a special set of tins, called Kransekake pans. I couldn’t get my head around how it would all fit together so ploughed on rolling out on the work top as many long Speculoos sausages by hand to press into the tin as i could eek out of the dough. You can make this without the special tin, if you feel like shaping the circles yourself and bake them directly on a baking sheet instead, but the tin makes it a bit easier. Each tin holds 3 biscuit rings.

Roll the dough into smooth sausages and place carefully in to the pans. Press the ends together to seal the ring.

Roll the dough into smooth sausages and place carefully in to the pans. Press the ends together to seal the ring.

The dough is a little crumbly and took a bit of perseverance to roll it long enough to fill the larger rings, but it’s worth the effort. It’s best to make thin sausages to get more out of your dough and also the dough puffs up as it bakes. If the rings are too thick they will merge, making it difficult to get them out of the tins and also leaving you with rough dishevelled edges.

Kransekake pans hot from the oven

Kransekake pans hot from the oven

In hindsight I should have doubled the dough recipe as I ran out so had to make do with 11 rings rather than 18. This meant that the rings didn’t quite taper off in size as they should and I had to employ some clever royal icing layering to get the rings to fit together.  So don’t look too closely at my piping skills please! (I’ve doubled the recipe for you at the bottom of this page so you’re good to go!)

Glue the rings together with a good slick of royal icing

Glue the rings together (starting with the largest ring on the bottom!) with a good slick of royal icing

I also probably should have decided on my piping pattern before launching headlong into the design on the kransekake. But I got a bit carried away as per usual and ad libbed. I think my favourite pattern is the zig zags as I wanted to make it look like a Christmas tree. I love the contrast of the stark white snow icing against the brown Speculoos hues.

I got a bit carried away with the icing patterns... zig zags, stripes, and polka dots

I got a bit carried away with the icing patterns… zig zags, stripes, and polka dots

My original plan was to use white chocolate to fuse the rings together to add to the decadence of the bake, however I forgot to buy any, so royal icing it had to be. Having only used royal icing to glue together the tiers of my wedding cake before (when I used the pre mixed merriwhite powder available from cake decorating shops) I wanted to try powdered egg whites to avoid using raw egg whites to bind the icing together. It worked really well, so well in fact I went on to ice a gingerbread house and my goddaughter’s christening biscuits with it too. (I used sachets of Dr Oekters powdered egg whites so pregnant ladies and children can eat as much icing as they like without the worry of salmonella.)

I also think dark chocolate icing would be stunning against the spiced biscuit. perhaps dusted with a little gold lustre powder/spray for extra festiveness.

When I made Speculoos last time I made a soft dough so it could be piped in shapes directly onto the baking sheet. This dough needed to be firm and malleable so it would hold it’s shape and support it’s own weight. I didn’t add any liquid to this dough and left out the treacle to make sure it wouldn’t spread too much during baking. Although a little treacle might help to roll it out as it is quite a dry dough and had a tendency to crumble when molding it.

To add to the depth of flavour and darkness of the biscuit I used a combination of light and brown sugars.  Feel free to use your preferred sugar to reach the colour biscuit you prefer.

Things I used to make Speculoos Kransekake

Speculoos Spice Blend

  • 4 TBS ground cassia (or cinnamon if you can’t get cassia)
  • 4 TSP ground ginger
  • 8 cardamom pods (discard the pods and grind the seeds)
  • 2 star anise (grind the seeds only)
  • 1/2 TSP white pepper
  • 1/2 TSP pink Himalayan salt (or any salt will do)
  • 1/2 TSP black pepper
  • 6 cloves (ground)
  • 1/2 TSP nutmeg

Speculoos Dough

This is double the quantity from my previous version of Speculoos biscuits so it should be enough to make 18 rings!

  • 220g butter
  • 400g light brown sugar
  • 100g dark brown sugar
  1. Beat the butter and sugar together until light and fluffy. Bearing in mind you’re using brown sugars so the colour change won’t be as dramatic as when using white sugar. It looks more like a big lump of soft sugar…
Beaten brown sugars and butter

Beaten brown sugars and butter

2. Then beat the rest of the dry ingredients and speculoos spice mix in until it comes together into a ball. It is a slightly dry crumbly dough so it will take some work to bring it together.

  • 600g plain flour
  • 1/2 tsp bicarbonate of soda
  • 2 eggs
  • splash of almond extract
  • splash of vanilla extract
Slightly crumbly spicey speculoos biscuit dough

Slightly crumbly spicey speculoos biscuit dough

3. Chill in the fridge for an hour.

4. Roll the dough into 18 smooth sausages and arrange in the greased kransekake tins. Gently pressing the ends of the sausages together to seal the rings. If you have any dough left over you may want to cut a little star out and bake to adorn the top of your stack.

5. Bake for 10 -12 minutes at 190 degrees c until slightly puffed up and firm to touch.

6. While the biscuits are baking beat together the royal icing as described below.

7. Allow the biscuits to cool in the tin before coaxing gently out of the tin. You may need to separate some rings that have merged as they bake with a knife.

8. Starting with the biggest ring on the bottom apply a thin line of royal icing to the underside of each ring, gluing it in place. Stack the rings one on top of the other working your way from the largest to the the smallest ring.

Glue the rings together with a good slick of royal icing

Glue the rings together with a good slick of royal icing

9. Once the full stack is glued together and fully assembled take a deep breath and with a steady hand and fine nozzle on your piping bag slowly pipe your chosen design directly onto the rings. Maybe throw some (edible) glitter on it as you go for extra pazzaz.

10. Stand back and admire your creativity.

11. If you can bear to eat your creation depending on how many people it needs to feed… You can either pull a ring off the stack with a knife or cut straight into it with a sharp knife.

Back to the top

Things I used to make Vanilla Shortbread Kransekake

  • 250g butter
  • 110g sugar
  • 360g plain flour
  • splash of vanilla extract

1. Beat the sugar and butter together until light and fluffy.

2. Beat in the flour and vanilla until the dough comes together into a shiny ball.

3. Roll into 18 thin sausages and arrange in the greased kransekake tins as before. Gently press the ends of the sausages together to seal the ends.

4. Bake in the oven at for 15 – 20 minutes at 190 degrees c until slightly golden brown. (Keep an eye as you don’t want the biscuits to take on too much colour as they will look burnt and be dry.
Back to the top

Royal Icing recipe

  • 250g icing sugar
  • 5g powdered egg white (one sachet of Dr Oekter’s powdered egg white)
  • 45 ml of cold water

*optional* you can add food colouring at this stage if you like but be gel or powdered colour would be best so it doesn’t add to much liquid. If using liquid colouring supplement some of the water with food colouring instead.

1. Beat the sugar powdered egg white and and water together for about 5 minutes on medium speed and then increase to high for 4- 5 minutes. The icing will be glossy and thick. If it is too wet or runny it will not set or be strong enough to support the weight of the kransekake.

Thick royal icing

Thick royal icing

2. Scoop your icing into and icing bag with a fine nozzle for piping your decoration. It’s handy to sit your piping bag inside a tall glass for this job to support the bag.

3. If using a plastic icing bag don’t forget to cut the end off the bag when you’re ready to start icing.

4. Put the largest Kransekake ring onto your plate/cakeboard first. Apply a thin layer (or pipe a ring) of royal icing on the under side of the biscuit to hold it in place on the board.

5. Pipe another ring of icing on to the top side of the biscuit so the next layer will stick to it. Repeat until you have assembled all of the biscuits in a tower, from the largest to the smallest. Don’t worry if any of the ring have break! You can sneakily glue them back together with a little icing. Once you stick the next ring on top no one will notice!

6. Apply even pressure to the bag with your hand and keep the nozzle about 1-2cm away from the biscuit. Squeeze the bag gently and with a steady hand pipe your chosen pattern directly on to the assembled Kransekake.

7. Whilst the icing it still wet sprinkle with a little edible glitter.

8. Allow the icing to harden and the Kransekake will become very sturdy and easier to transport. The biscuits will start to soften after a couple of days so cover it with tin foil if you’re making it in advance.

9. Impress all of your friends and family with the great reveal of your Kransekake. I liked using mine as a Christmas table centre piece before inviting everyone to removing a ring at a time to eat.

Back to the top

67. Peruvian Corn Cake

The imperfect yet delicious Peruvian Corn Cake

The imperfect yet delicious Peruvian Corn Cake

So not all cakes are perfect. Despite the rather rustic appearance this Peruvian Corn cake it is extremely delicious. It’s traditionally eaten in coffee shops with enormous amounts of whipped cream and adorned with cherries. As I was transporting this to Cake Club at The Cookhouse I had to make do with squirty cream in a can…

Squirty cream in a can masks all manner of sins

Squirty cream in a can masks all manner of sins

You’d think by now, 67 bakes in to my around the world in 80 bakes challenge I’d be getting pretty good at this baking malarkey. Alas I still have the odd disaster and ruin a cake or two.

Is it because I can’t resist tampering with the recipe?  Is it because I’m slap dash in the kitchen?  Or is it because the sultanas all sank to the bottom welding the cake to the tin meaning I had to hack at it with a sharp knife to prise the last half from it’s bundty prison?

Perhaps I was a bit too roough with the Peruvian Corn Cake?

Perhaps I was a bit too roough with the Peruvian Corn Cake?

I guess it’s a combination of all 3 to be honest. Nevertheless I took it to cake club to share with my friends and enjoyed an enormous slice of it smothered in whipped cream. Which hides a multitude of sins and disguises the broken bits.

Shhh no one will notice it's a cake of two halves

Shhh no one will notice it’s a cake of two halves

The Peruvian Corn Cake is infused with Star Anise and stuffed full with coconut and plump sultanas.  It’s a perfect crumbly cake to accompany a strong cup of coffee.

The stars of the show - Star Anise seeds and Pink Himalyan Salt ready for grinding

The stars of the show – Star Anise seeds and Pink Himalyan Salt ready for grinding

Cornmeal gives the cake a wonderful golden yellow hue and an interesting texture.  Light yet crumbly to the touch with bursts of sweet moisture from the sultanas.

I’m a big lover of fruit cake and bundt cake and coconut and spice so this is an absolute winner for me. I bet if you soaked the sultanas in a little rum beforehand it would be sublime.

If you’re not a dried fruit fan feel free to leave the sultanas out (and you might have more joy getting the cake out of its tin!)

Beat the butter and sugar together until light and fluffy

Beat the butter and sugar together until light and fluffy

Being lazy I whacked everything into my kitchenaid knowing full well that if you want to distribute your dried fruit evenly you should roll it in a little flour first and fold it into the batter. Alas I was hasty and missed this step so I had sunken sultanas.  Although the cake batter is very fluid so I doubt it would suspend sultanas throughout the cake. Gravity is inevitable.

The beaten batter

The beaten batter

I adapted this recipe from a wonderful book which could have literally been made for me. Cakes from Around the World.

wpid-img_20140901_182046.jpg

Things that I used to make my Peruvian Corn Cake

  • 200g caster sugar
  • 30g butter or margarine (butter would be better if you have it)

Step 1: Beat together the sugar and butter until fluffy

  •  3 eggs

Step 2: Then beat in the eggs one at a time adding a little of the flour if it starts to spilt.

  • 240g Fine milled corn meal (not to be mistaken for corn flour which is white not yellow). If you only have coarse corn meal blitz it in the blender to make it fine milled.
  • 20g (2tablespoons) Baking powder
  • 40g plain flour
  • Ground star anise (I used 6 seeds from whole star anise or you could use 1/2tsp of ground star anise powder)
  • 40g desiccated coconut

Step 3: Measure all of the flours and spices together. Beat in a third of the dry ingredients followed by a third of the oil.  Repeat until all of the flours and oil is incorporated into the batter. Don’t forget to scrape the sides of the bowl down too!

  • 80ml olive oil (it’s supposed to be corn oil which I didn’t have but sunflower oil would also be a good substitute)

Step 4: Roll the sultanas in a little flour and fold them gently into the batter. (or of you can’t be bothered to dirty another spoon beat them in gently with your mixer there’s so much baking prefer in this cake it’s bound to rise so you probably don’t need to treat it too delicately worrying about keeping the air in the batter. )

  • 220g sultanas (golden if possible but they’re more expensive so I just used normal ones)

Step 5: Pour your cake batter into a thoroughly greased bundt tin.  You could add a little flour too for good measure.

Step 6: Bake in the centre of the preheated oven for 45 minutes at 190 degrees Celsius (fan).

Step 7: Allow to cool before attempting to coax it from the tin. Slice and smear with whipped cream. Eat enormous wedges with strong coffee!


66. Finnish Apricot Cardamom and Pistachio Pulla

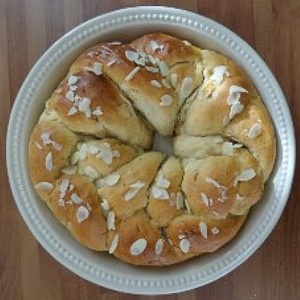
Braided Pulla infused with cardamom, orange, apricot and pistachio

Braided Pulla infused with cardamom, orange, apricot and pistachio

I realise that I’ve slowed down on the old blogging front in recent months sorry! Partly due to it being Summer and not feeling the need to have an extra cake layer to keep me warm and also due to breaking my phone (and camera) which meant I’ve lost quite a bit of data and worked my way through 5 faulty handsets in 2 months… Anyways I’ve salvaged enough to bring you my braided Pulla.

Apricot Cardamom  and Almond Pulla  recipe

Apricot Cardamom and Almond Pulla

I felt the urge to bake something delicious and not too sweet. This cardamom infused apricot and almond pulla braid is just what the phone doctor ordered.

Fluffy, fragrant, light and slightly sweet Pulla is an enriched dough that compliments a good strong coffee perfectly. Gently scented with cardamom and studded with dried apricots for extra pops of flavour. If you were in need of additional luxuriousness ribbons of water icing would transform this into an excellent iced bun too.

wpid-1405407895190.jpg

Traditionally Pulla is served with coffee in thin slices or as individual buns. Leftover Pulla (if you ever get that far!) can be twice baked to create a crisp biscotti type biscuit to dunk in your coffee.

Prove the dough until doubled in size

Prove the dough until doubled in size

As with all other yeasted doughs bring the ingredients together and knead for 10 minutes to allow the gluten to develop. Once the dough is shiny, stretchy and springs back when pressed it’s ready to place in a greased bowl, cover with greased cling film and prove.

pulla recipe

Proven pulla dough awaiting it’s cardamom and orange zest

Enriched Dough proves best in the fridge overnight, allowing the freshly kneaded supple dough, permeated with butter, sugar and an egg to slowly rise and firm up. Making it much easier to shape the following day. But if you’re in a rush to get it in your face feel free to prove at room temperature for an hour then shape and prove it again.

pulla recipe Now to knead in the pistachios and dried apricots

Now to knead in the pistachios and dried apricots

Once you’ve kneaded in the finely chopped nuts, and apricots along with the grated orange zest and ground cardamom into the dough so the flavours are fully incorporated, split the dough into 3 equally sized pieces.

3 little dough balls pulla plaiting bread dough

3 little dough balls

Roll the 3 pieces into long thin sausages (making sure you pop any little air bubbles that sneak there way in) and gather the strands together at one end.

The beginning of a plait

The beginning of a plait

Push the strands together so that they stick to each other and plait them together to form a braid. Once you reach the end, carefully join the two ends of the plait together to form a braided ring. Squish the ends together to form a join and tuck any loose bits underneath (no one will ever know after it rises.)

Plaiting the pulla

Plaiting the pulla

Place your braided Pulla crown into a semolina sprinkled baking sheet or dish. Cover with greased cling film and leave to prove a room temperature for an hour or two until doubled in size.

Ready to prove it's worth

Ready to prove it’s worth

Bake it at 190 degrees c for 30 minutes until it’s golden brown and sounds hollow when tapped underneath. Whilst still warm glaze your Pulla generously with runny honey. Whilst the honey is sticky sprinkle with flaked almonds to decorate. Or if you’re feeling extra indulgent feel free to use water/glace icing to make an extra rich white icing that would look oh so pretty against the plait.

The final baked Pulla braided Crown

The final baked Pulla braided Crown

This is such a gorgeous sweet treat. It’s fluffy and tender with an wonderful spicy warmth from the cardamom. Balanced against a chewy nugget of apricot and a crisp morsel of pistachio. I love this bake and enjoyed it au natural with coffee to bring out the exotic notes and subtle sweetness. Delicious! And perfect for a special breakfast.


Things I used to make my Apricot and Cardamom Pulla

Enriched dough

  • 350g strong white flour
  • 5g salt
  • 40g sugar
  • 7g yeast
  • 45g margarine/butter
  • 175ml milk

Flavours to infuse the dough with after the first prove

  • 31 cardamom pods (seeds taken out and ground to fine powder)
  • zest of 1 orange
  • 8 chopped dried apricots chopped into small chunks
  • 20g pistachios chopped roughly

Topping/decoration

  • A handful of flaked almonds for sprinkling on top
  • Honey to glaze the top whilst still warm
  • You could also whip up a thick sticky water icing with the juice of the orange and icing sugar to pipe on top of the pulla if you would prefer a sticky bun effect.

Method

  1. Knead the flour, yeast, salt, butter, sugar and milk together for 10 minutes to create a sticky dough
  2. Leave to prove overnight in the fridge (or until double din size at room temp)
  3. Knead in the flavours; ground cardamom, orange zest, chopped apricots and pistachios
  4. Split the dough into 3 equal pieces and roll out to long strands
  5. Join one end of the 3 strands together and plait it into a braid
  6. Join the two ends of the braid together to form a circle
  7. Cover with greased cling film and prove on a semolina lined baking tray/dish until doubled in size
  8. Bake at 190 degrees c for 30 minutes until it’s golden brown and sounds hollow when tapped underneath
  9. Whilst still warm glaze with runny honey and sprinkle with flaked almonds