

Vanilla Shortbread Kransekake
Traditionally Kransekake (Norwegian Ring Cake) is eaten at Christmas or on special occasions. It’s a stack of about 18 almond ring shaped biscuits held together with lashings of ornate royal icing.
Speculoos Kransekake
Now as I can never leave a recipe alone I had to switch this up and make it even more festive with a (Speculoos Kransekake (recipe below) and Vanilla Shortbread Kransekake (recipe below) instead. The sweet spices blended together makes a moreish fragrant biscuit. I loved it so much I kept going and for Christmas day made an enormous shortbread version, which is closer in colour to the traditional almond version.
Although I’m straying from the Norwegian almond tradition my Speculoos and shortbread versions are much cheaper to make and meant I didn’t have to make another trip to the shop for expensive ground almonds. You can buy Speculoos spice already mixed but I enjoy grinding and blending my own fresh spices for an extra punch.
I always have an abundance of spices in my cupboard so this is a perfect Christmas bake for me. And as we just put our tree up. The combination of pine needles and freshly baked Speculoos floating through our house is like a piece of Christmas Heaven.
The Kransekake is baked in a special set of tins, called Kransekake pans. I couldn’t get my head around how it would all fit together so ploughed on rolling out on the work top as many long Speculoos sausages by hand to press into the tin as i could eek out of the dough. You can make this without the special tin, if you feel like shaping the circles yourself and bake them directly on a baking sheet instead, but the tin makes it a bit easier. Each tin holds 3 biscuit rings.
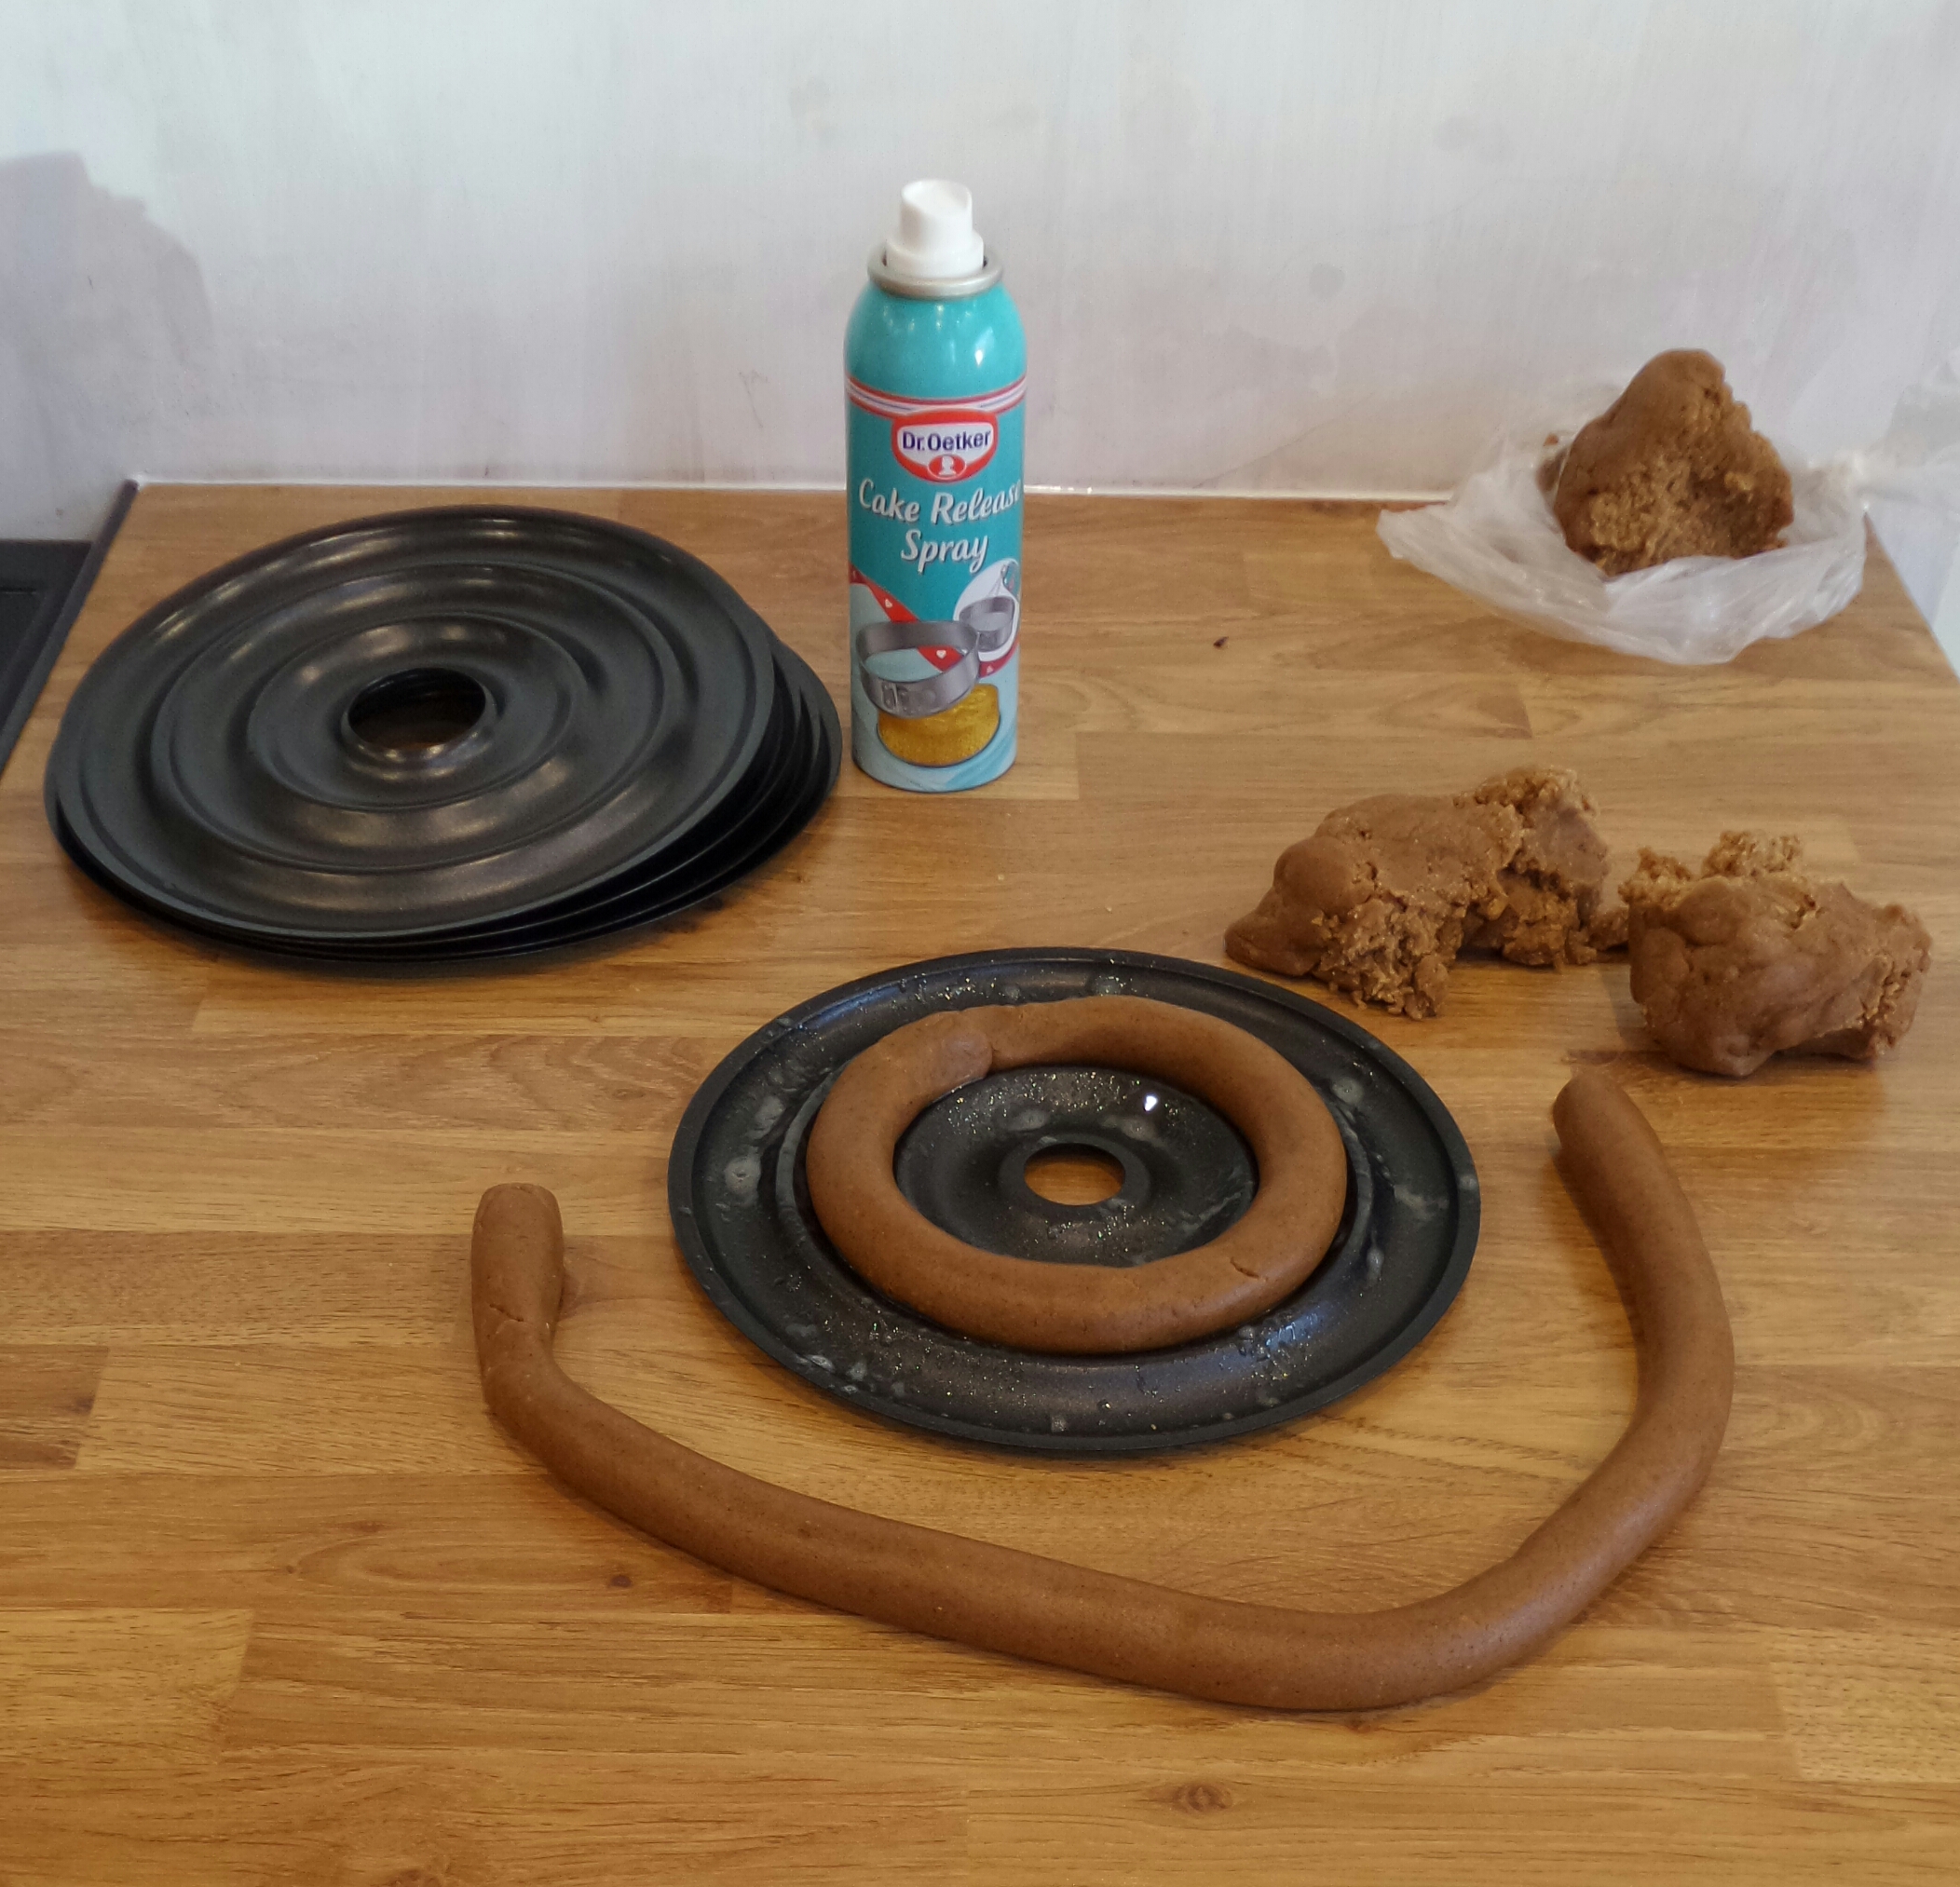
Roll the dough into smooth sausages and place carefully in to the pans. Press the ends together to seal the ring.
The dough is a little crumbly and took a bit of perseverance to roll it long enough to fill the larger rings, but it’s worth the effort. It’s best to make thin sausages to get more out of your dough and also the dough puffs up as it bakes. If the rings are too thick they will merge, making it difficult to get them out of the tins and also leaving you with rough dishevelled edges.

Kransekake pans hot from the oven
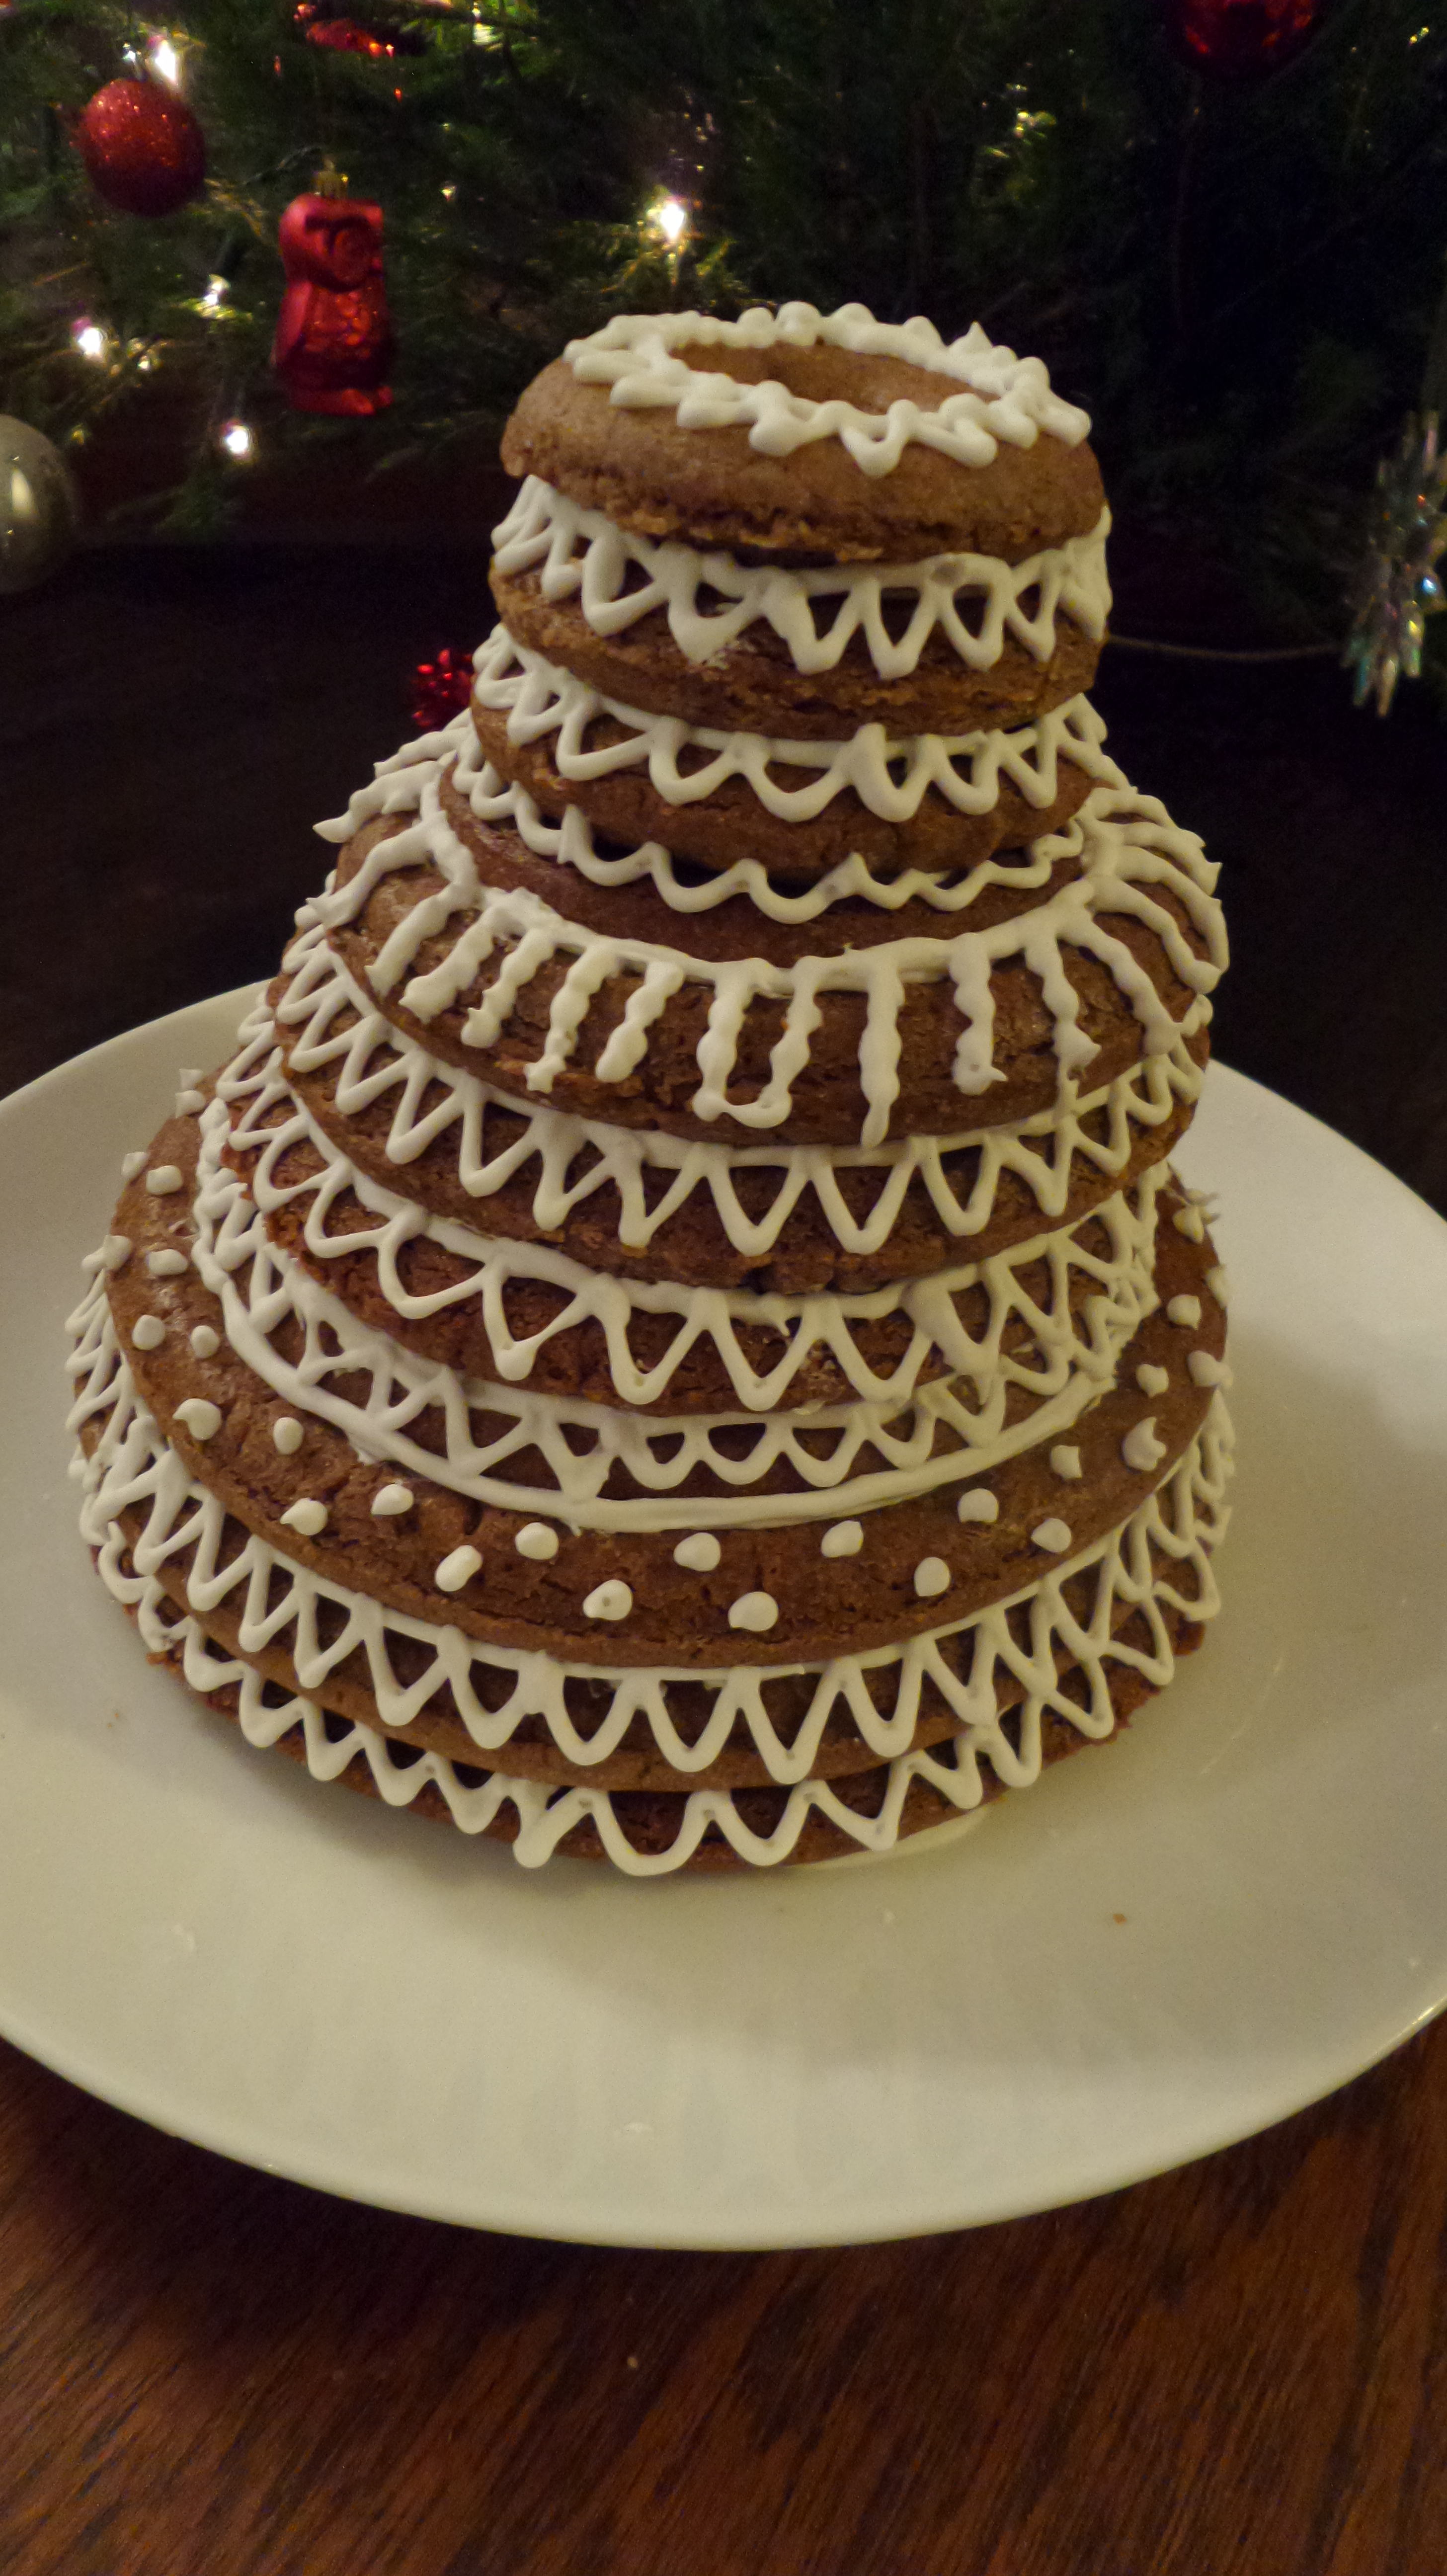
In hindsight I should have doubled the dough recipe as I ran out so had to make do with 11 rings rather than 18. This meant that the rings didn’t quite taper off in size as they should and I had to employ some clever royal icing layering to get the rings to fit together. So don’t look too closely at my piping skills please! (I’ve doubled the recipe for you at the bottom of this page so you’re good to go!)
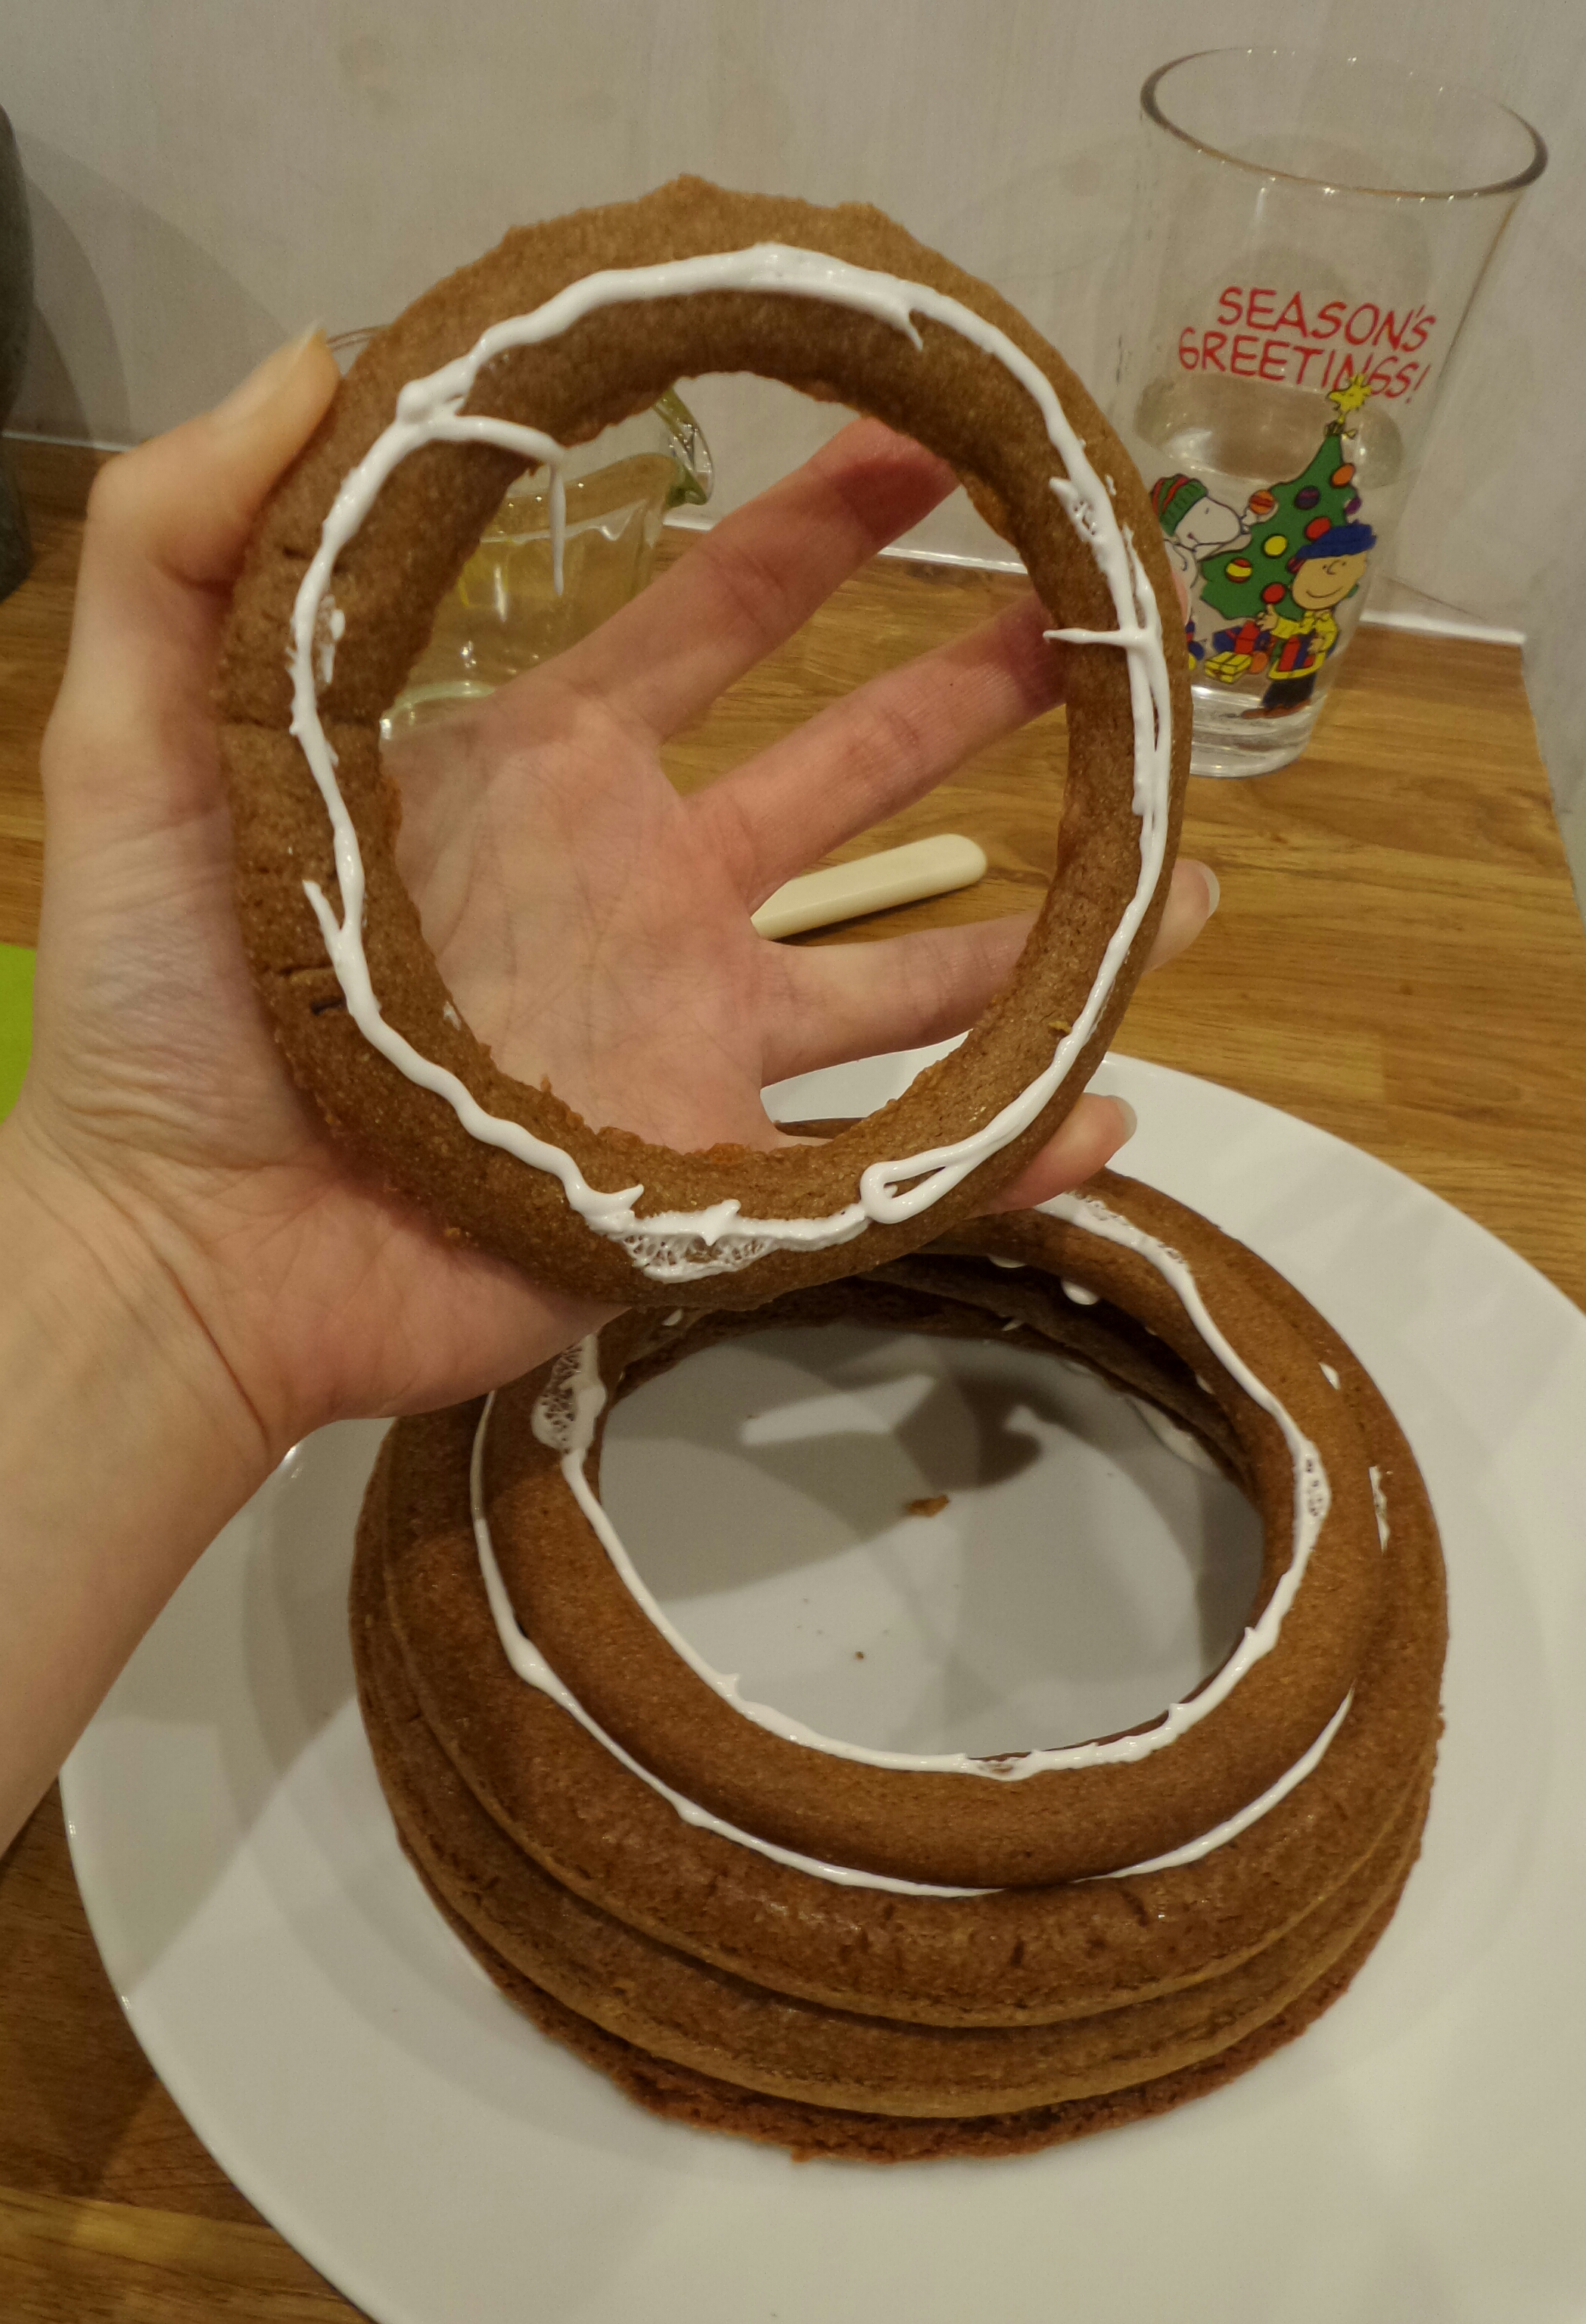
Glue the rings together (starting with the largest ring on the bottom!) with a good slick of royal icing
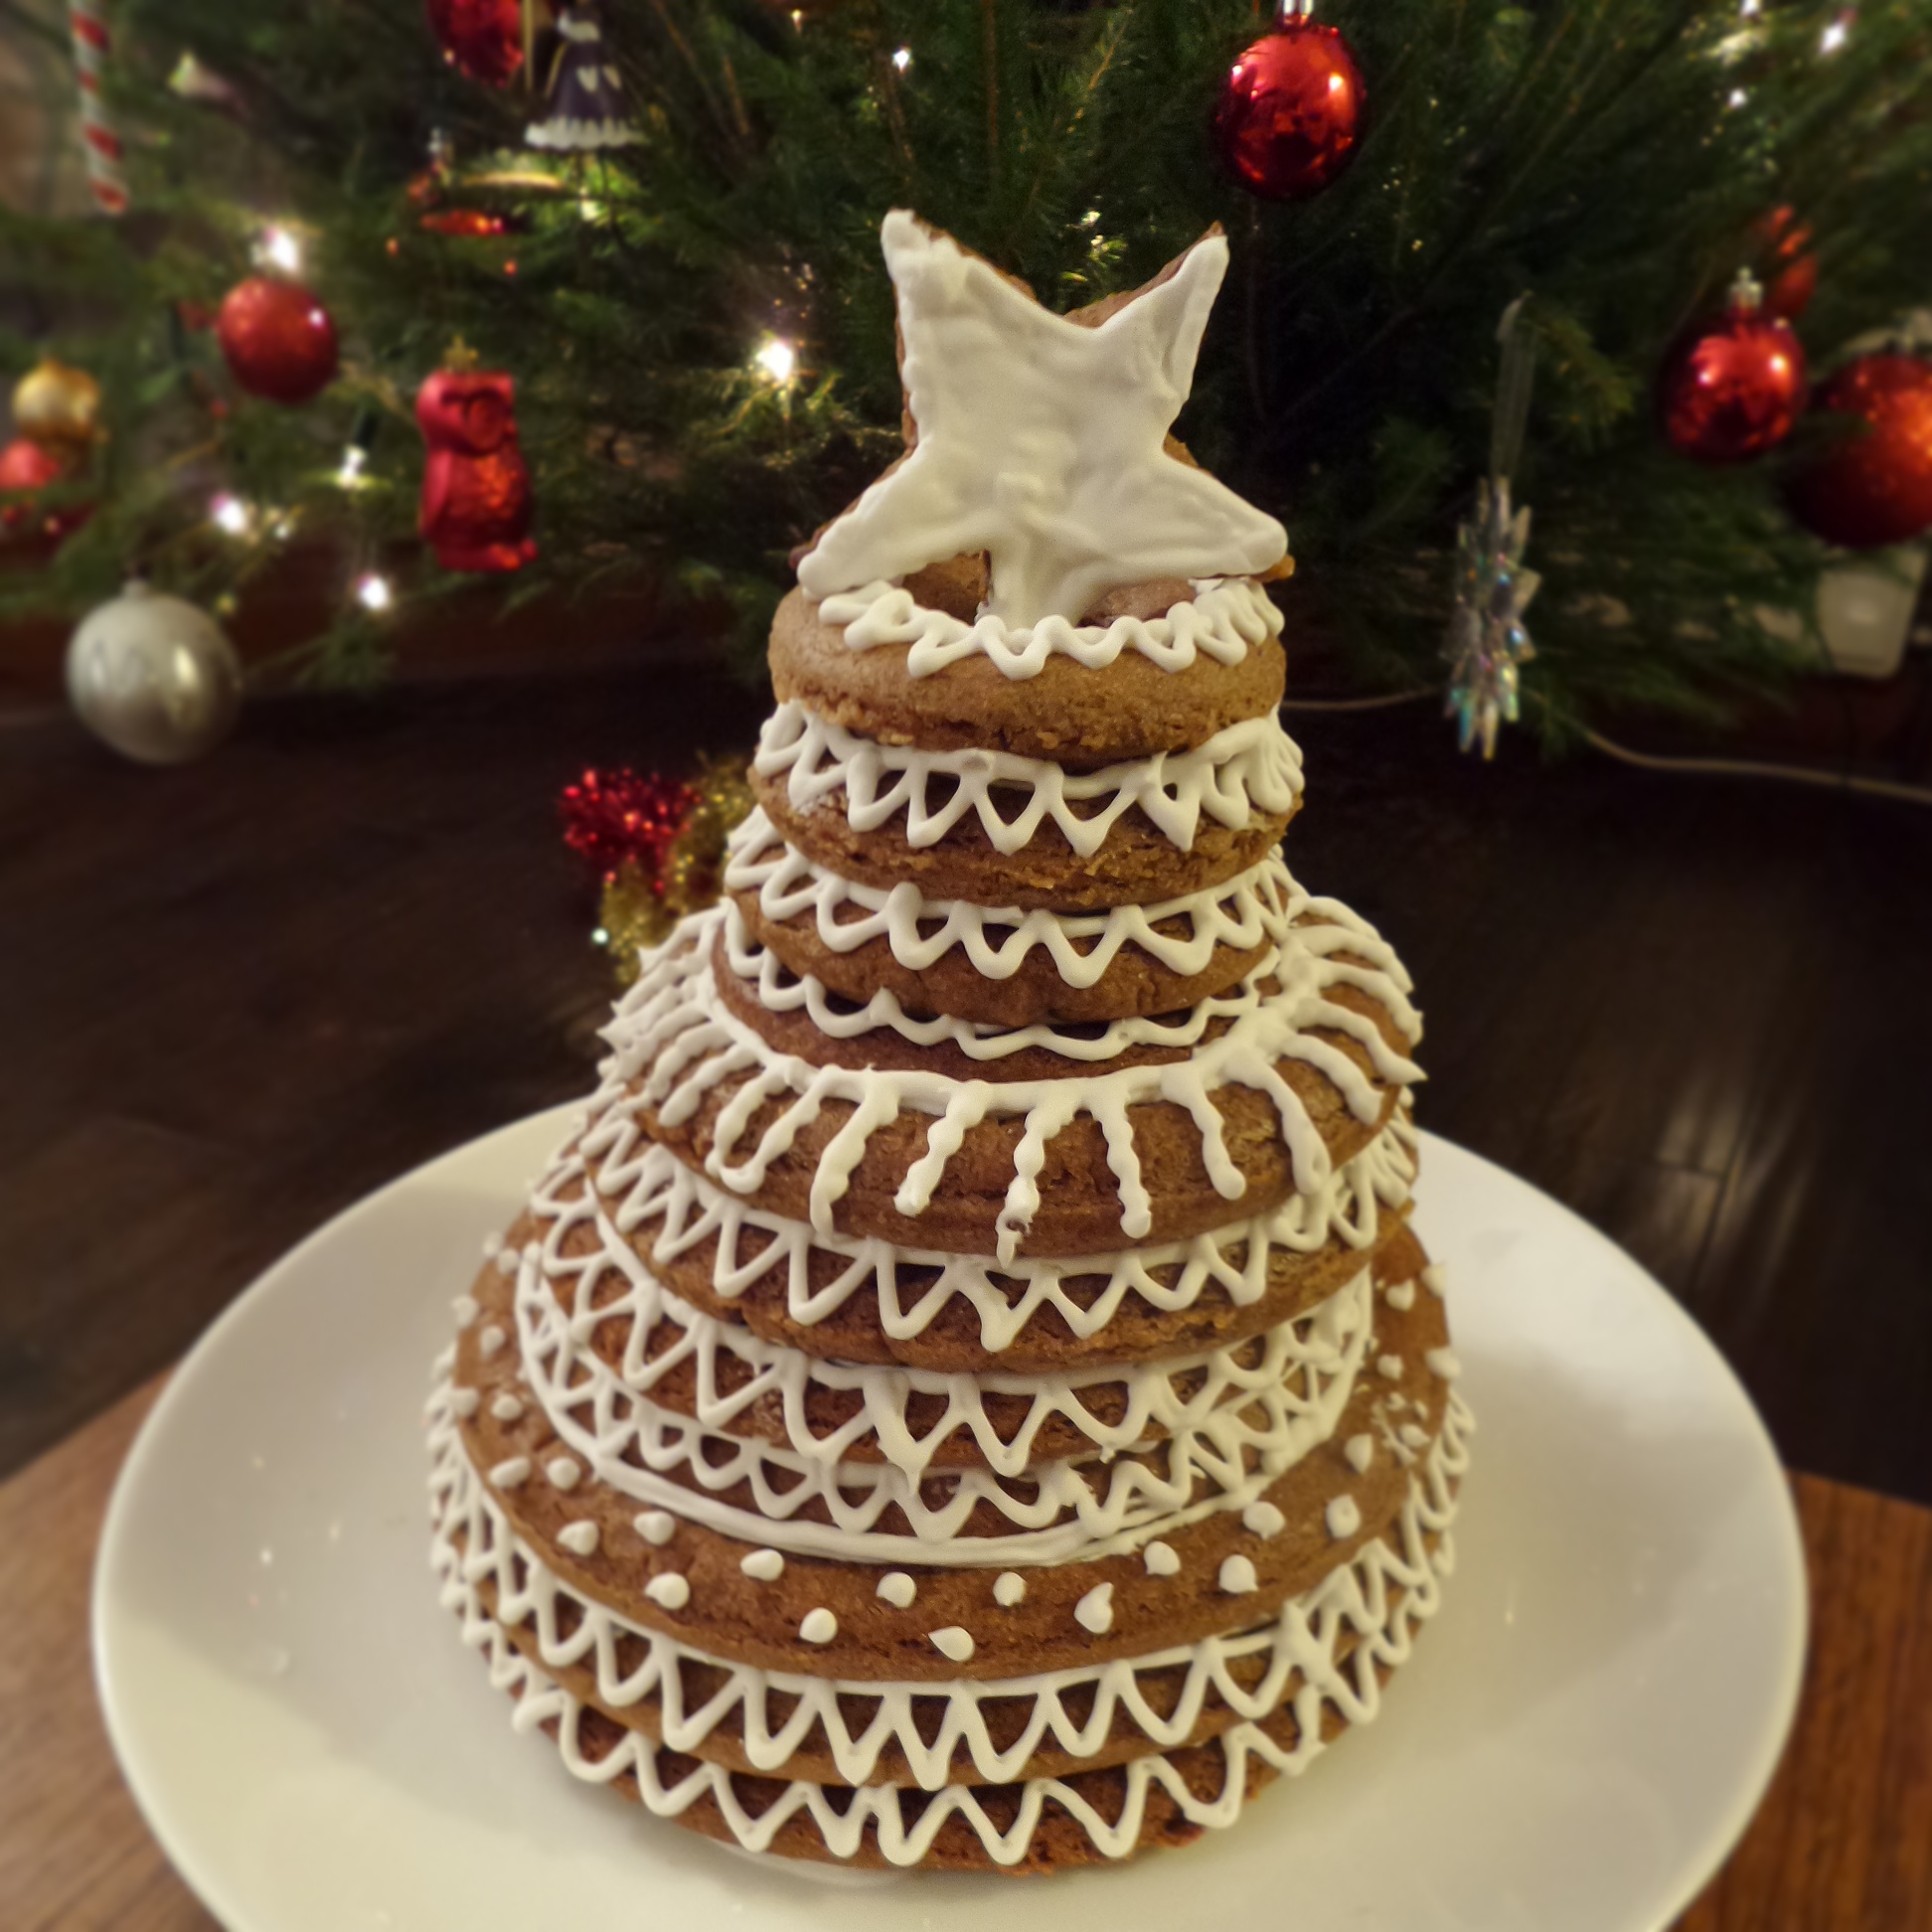
I also probably should have decided on my piping pattern before launching headlong into the design on the kransekake. But I got a bit carried away as per usual and ad libbed. I think my favourite pattern is the zig zags as I wanted to make it look like a Christmas tree. I love the contrast of the stark white snow icing against the brown Speculoos hues.
I got a bit carried away with the icing patterns… zig zags, stripes, and polka dots
My original plan was to use white chocolate to fuse the rings together to add to the decadence of the bake, however I forgot to buy any, so royal icing it had to be. Having only used royal icing to glue together the tiers of my wedding cake before (when I used the pre mixed merriwhite powder available from cake decorating shops) I wanted to try powdered egg whites to avoid using raw egg whites to bind the icing together. It worked really well, so well in fact I went on to ice a gingerbread house and my goddaughter’s christening biscuits with it too. (I used sachets of Dr Oekters powdered egg whites so pregnant ladies and children can eat as much icing as they like without the worry of salmonella.)
-

- Sugar Cookies for my beautiful niece all pretty in pink and white royal icing
-

- Gingerbread house smothered in royal icing and complete with santa stuck up the chimney
-
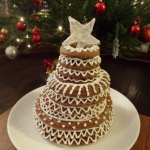
- Speculoos Kransekake
-
- 68. Vanilla Shortbread Kransekake
I also think dark chocolate icing would be stunning against the spiced biscuit. perhaps dusted with a little gold lustre powder/spray for extra festiveness.
When I made Speculoos last time I made a soft dough so it could be piped in shapes directly onto the baking sheet. This dough needed to be firm and malleable so it would hold it’s shape and support it’s own weight. I didn’t add any liquid to this dough and left out the treacle to make sure it wouldn’t spread too much during baking. Although a little treacle might help to roll it out as it is quite a dry dough and had a tendency to crumble when molding it.
To add to the depth of flavour and darkness of the biscuit I used a combination of light and brown sugars. Feel free to use your preferred sugar to reach the colour biscuit you prefer.
Things I used to make Speculoos Kransekake
Speculoos Spice Blend
- 4 TBS ground cassia (or cinnamon if you can’t get cassia)
- 4 TSP ground ginger
- 8 cardamom pods (discard the pods and grind the seeds)
- 2 star anise (grind the seeds only)
- 1/2 TSP white pepper
- 1/2 TSP pink Himalayan salt (or any salt will do)
- 1/2 TSP black pepper
- 6 cloves (ground)
- 1/2 TSP nutmeg
Speculoos Dough
This is double the quantity from my previous version of Speculoos biscuits so it should be enough to make 18 rings!
- 220g butter
- 400g light brown sugar
- 100g dark brown sugar
- Beat the butter and sugar together until light and fluffy. Bearing in mind you’re using brown sugars so the colour change won’t be as dramatic as when using white sugar. It looks more like a big lump of soft sugar…

Beaten brown sugars and butter
2. Then beat the rest of the dry ingredients and speculoos spice mix in until it comes together into a ball. It is a slightly dry crumbly dough so it will take some work to bring it together.
- 600g plain flour
- 1/2 tsp bicarbonate of soda
- 2 eggs
- splash of almond extract
- splash of vanilla extract

Slightly crumbly spicey speculoos biscuit dough
3. Chill in the fridge for an hour.
4. Roll the dough into 18 smooth sausages and arrange in the greased kransekake tins. Gently pressing the ends of the sausages together to seal the rings. If you have any dough left over you may want to cut a little star out and bake to adorn the top of your stack.
5. Bake for 10 -12 minutes at 190 degrees c until slightly puffed up and firm to touch.
6. While the biscuits are baking beat together the royal icing as described below.
7. Allow the biscuits to cool in the tin before coaxing gently out of the tin. You may need to separate some rings that have merged as they bake with a knife.
8. Starting with the biggest ring on the bottom apply a thin line of royal icing to the underside of each ring, gluing it in place. Stack the rings one on top of the other working your way from the largest to the the smallest ring.
Glue the rings together with a good slick of royal icing
9. Once the full stack is glued together and fully assembled take a deep breath and with a steady hand and fine nozzle on your piping bag slowly pipe your chosen design directly onto the rings. Maybe throw some (edible) glitter on it as you go for extra pazzaz.
10. Stand back and admire your creativity.
11. If you can bear to eat your creation depending on how many people it needs to feed… You can either pull a ring off the stack with a knife or cut straight into it with a sharp knife.
Things I used to make Vanilla Shortbread Kransekake
- 250g butter
- 110g sugar
- 360g plain flour
- splash of vanilla extract
1. Beat the sugar and butter together until light and fluffy.
2. Beat in the flour and vanilla until the dough comes together into a shiny ball.
3. Roll into 18 thin sausages and arrange in the greased kransekake tins as before. Gently press the ends of the sausages together to seal the ends.
4. Bake in the oven at for 15 – 20 minutes at 190 degrees c until slightly golden brown. (Keep an eye as you don’t want the biscuits to take on too much colour as they will look burnt and be dry.
Back to the top
Royal Icing recipe
- 250g icing sugar
- 5g powdered egg white (one sachet of Dr Oekter’s powdered egg white)
- 45 ml of cold water
*optional* you can add food colouring at this stage if you like but be gel or powdered colour would be best so it doesn’t add to much liquid. If using liquid colouring supplement some of the water with food colouring instead.
1. Beat the sugar powdered egg white and and water together for about 5 minutes on medium speed and then increase to high for 4- 5 minutes. The icing will be glossy and thick. If it is too wet or runny it will not set or be strong enough to support the weight of the kransekake.

Thick royal icing
2. Scoop your icing into and icing bag with a fine nozzle for piping your decoration. It’s handy to sit your piping bag inside a tall glass for this job to support the bag.
3. If using a plastic icing bag don’t forget to cut the end off the bag when you’re ready to start icing.
4. Put the largest Kransekake ring onto your plate/cakeboard first. Apply a thin layer (or pipe a ring) of royal icing on the under side of the biscuit to hold it in place on the board.
5. Pipe another ring of icing on to the top side of the biscuit so the next layer will stick to it. Repeat until you have assembled all of the biscuits in a tower, from the largest to the smallest. Don’t worry if any of the ring have break! You can sneakily glue them back together with a little icing. Once you stick the next ring on top no one will notice!
6. Apply even pressure to the bag with your hand and keep the nozzle about 1-2cm away from the biscuit. Squeeze the bag gently and with a steady hand pipe your chosen pattern directly on to the assembled Kransekake.
7. Whilst the icing it still wet sprinkle with a little edible glitter.
8. Allow the icing to harden and the Kransekake will become very sturdy and easier to transport. The biscuits will start to soften after a couple of days so cover it with tin foil if you’re making it in advance.
9. Impress all of your friends and family with the great reveal of your Kransekake. I liked using mine as a Christmas table centre piece before inviting everyone to removing a ring at a time to eat.
-
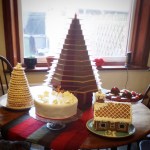
- Christmas morning cakes assembled
-
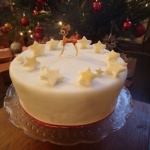
- My lazy Christmas Cake complete with a vintage glass deer
-
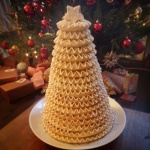
- 68. Vanilla Shortbread Kransekake
-

- The alternative Christmas Pudding – Triple chocolate and orange
-

- Oh Christmas Tree oh Christmas Tree (All 9 ft of you)
-
- Gingerbread house smothered in royal icing and complete with santa stuck up the chimney
-
- Speculoos Kransekake


