Simply having a jam (and chutney) filled Christmas time

Do you think I've made enough...

Do you think I’ve made enough…

I’ve been very lucky this year that the sun has shone and the plants have gone into overdrive. Our wild blackberry bush has offered a new batch of berries each day. Although it’s so tall I’ve had to resort to playing ‘Blackberry Bingo’ and dragging them off the tree with a rake and catching as many as I can. This often resulted in me rather over enthusiastically climbing into the the spiky bush and getting my curls and rake entangled. Once I managed to extract myself from the bush, mostly covered in scratches, I proudly produced my first batch of Summer Jam. Blackberry and Cinnamon.

The Great Blackberry Massacre of 2013

The Great Blackberry Massacre of 2013

Turning to the old faithful Marguerite Patten cookbook for endless jam flavour combinations and recipes I attempted to use my sugar thermometer to ensure I got a good set. Unfortunately the jam bubbled so vigorously it reached the top of the pot, so no temperatures could be read. I will continue to just follow my instincts when testing if it has set sufficiently. Does it coat the back of a spoon or crinkle when poured on a plate? How beautifully obscure these testing methods seem, until you have a pot of molten jam in front of you.

The only problem with blackberries, is the seeds. They must be removed from your jam. I only own a plastic sieve and forced the jam through it with a ladle, hoping the sieve wouldn’t melt or split. It was rather more robust than I expected and survived 2 rounds of blackberry jam, one with cranberries and one with cinnamon! Can you spot the mountain of candied blackberry seeds in the background? (Recipe at the bottom of the page).

Here come the plums

Here come the plums – the beginning of a plum clafoutis

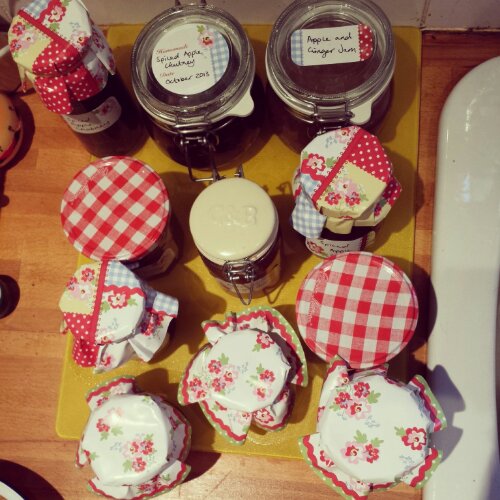
Once I exhausted my supply of blackberries and foraged far and wide, we were offered a huge bag of plums from a friend who’s tree was flourishing. Of course I said yes and made my first venture into chutney. Spiced Plum Christmas Chutney to be exact (recipe at the bottom of the page). I wanted to make something that I could give as presents to family and friends to eat with their leftover Christmas meats and cheeses. Chutney was surprisingly easy (yet eye wateringly pungent with all the red wine vinegar!) to make. I will definitely be making more.

Homemade Strawberry Jam (and a million Mickey Mouse waffles)

Homemade Strawberry Jam (and a million Mickey Mouse waffles)

So inspired by my jam efforts I spotted extremely cheap strawberries at our local market and thought I’d give Strawberry Jam a go too! Thankfully strawberry seeds are so small they don’t really have to be removed from the jam, so no arm aching sieving required for this quick and tasty jam! And it goes surprisingly well with Mickey Mouse waffles, espresso, creme fraiche and berries.

Looking Jammy

Looking Jammy

Another wonderful friend offered me as many apples as I could carry from his very successful tree. I trotted off very merrily with almost 7kg of apples! I spent one Saturday peeling and chopping (thank god for my food processor!) 5kg, transforming them into a double batch of my favourite Apple and Ginger Jam and a new Christmas Chutney, Spiced Apple. Which I can confirm does taste delicious with cold leftover meats. Pork works very well! (Recipe at the bottom of the page)

Spiced Apple Chutney

Spiced Apple Chutney

Not wanting to waste a single scrap of apple I peeled, sliced and dried thin slices in the oven on a low heat, to save for future healthy snacks and bakes. I even managed to peel, core, slice, soak in a watered down lime juice the final kg of apples to store in the freezer for a rainy day, of which I expect there will be many this Winter. I forsee a lot of apple crumble in my future.

Christmas is coming

Christmas is coming

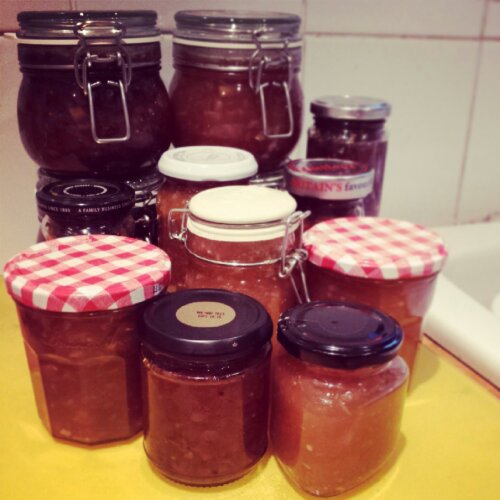
I hope I don’t spoil the surprise but I’m stock piling all my jams and chutneys to give to my favourite family and friends for Christmas. I hope they like it! I think I’m going to need a bigger cupboard and more jars!

Chutney Recipes

Spiced Plum Chutney Ingredients

  • 1kg plums, halved, stoned and finely chopped
  • 3 onions, finely chopped
  • 100g dried cranberries or raisins, roughly chopped with an oiled knife
  • 1 tbsp finely grated ginger
  • 1 tbsp black mustard seed
  • 1 tbsp ground cumin
  • 1 tbsp paprika
  • 1 tsp chilli powder
  • 2 tsp nigella seeds (onion seeds)
  • 750ml red wine vinegar
  • 500g light muscovado sugar

Chutney Making Method

  1. Chop up the onions and fruit
  2. Put everything in the biggest pot you have and heat
  3. Stir til all the sugar is dissolved
  4. Bring to the boil
  5. Simmer for 30 minutes (or so) until it’s thick and pulpy
  6. Decant into sterilised jars, seal with wax discs.
  7. Put the lids on whilst still hot to keep the jars sterile
  8. Clean up the outside of the jars and label.
  9. Store in a cool dark place.
  10. Chutney should keep for up to 6 months and will only taste better with age 🙂
  11. Once opened keep your jar in the fridge.

Spiced Apple Chutney Ingredients

  • 1½ kg cooking apples, peeled and diced
  • 750g light demarera sugar
  • 500g sultanas
  • 2 medium onions, finely chopped
  • 2 tsp mustard seeds
  • 2 tsp ground ginger
  • 2 tsp nigella seeds (black onion seeds)
  • 1 black of stem ginger sliced finely
  • 1 tsp salt
  • 350ml cider vinegar
  • 400ml white wine vinegar

Method as before

Eat with lashing of cold leftover meats, cheeses or whack it in a sandwich for a quick festive hit.

Jam Recipes

Some jam recipes suggest using jam sugar, but it’s so expensive I don’t bother. Instead I allow the fruit to stew first to release it’s own natural pectin to help it set. The basic rule of jam is for most fruit (depending on their levels of pectin) is to allow equal amounts of fruit to sugar, adding lemon juice if there’s a lack of pectin. Apples have a good amount of pectin in them so you can always add them to berries when making jam to help with the set too.

Apple and Ginger Jam – revisited and revised 

I previously made this recipe and followed Marguerite Patten’s recipe. You can see this post here.

  • 1000g diced apples
  • 2 Tbsp of ground ginger
  • 3 balls of stem ginger finely sliced
  • 1000g granulated sugar

Method

  1. Chop fruit up into small pieces
  2. Soak in ground spices
  3. Stew fruit slowly
  4. Add sugar and stir over low heat until dissolved
  5. Boil rapidly for 10-20 minutes (or so). The quicker the boil the better the set, but you must keep an eye on it, to stop it burning or going past it’s setting point.
  6. Jam is set when it reaches 105 degrees C (if using a sugar thermometer) or when it becomes thick enough to coat the back of a spoon – dripping slowly off it. Or if you drop a bit on a cold plate it crinkles when you push it with your finger.
  7. Decant the very hot jam when it reaches a good set, into the hot sterilised jars.
  8. Put on waxed paper circles and lids.
  9. Store in a cool dry place.
  10. It should keep well if no moisture gets in to the jars for at least 6 months.
  11. Once opened keep your jar in the fridge.

Strawberry Jam

  • 1kg strawberries
  • 1kg granulated sugar
  • 3 tbsp lemon juice (or half a lemon)

Method as above but with strawberries the fruit didn’t break down massively. You can leave your fruit whole in chunks if you prefer or if you prefer a smother jam, blitz it with a hand held blender, careful not to splash yourself with boiling hot jam though!

Blackberry and Apple Jam

  • 2 apples sliced and diced
  • 750g blackberries
  • 1kg granulated sugar
  • A splash of lemon juice

Method as above but strained the jam through the sieve to remove the seeds as I decanted it into the sterile jars.

Blackberry, Cranberry and Cinnamon Jam

  • 500g of frozen cranberries (defrosted)
  • 500g blackberries
  • 1000g of cinnamon (or in my case cassia bark) infused sugar – stick the bark in a jar of sugar and leave to infuse for a week or so

Method as above but I strained the jam through the sieve to remove the seeds as I decanted it into the sterile jars.

The Final Frontier – Decorating and Assembling my 5 Tier Wedding Cake

The decorated wedding cake in my kitchen

The decorated wedding cake in my kitchen

When I engaged in creating hundreds of Hydrangea blossoms to adorn the wedding cake with I didn’t really stop to think too hard about how I was going to get them on the cake… It can’t be that hard right? I purchased a pot of edible glue (amongst many other things from the lovely cake shop) and trotted off to carry on baking, pushing all thoughts to the back of mind about how edible glue works.

Some of the cakes resting nicely in my kitchen cupboards

Some of the cakes resting nicely in my kitchen cupboards

Fast forward 3 months to December 2012 and I have now 5 iced wedding cakes resting nicely in their cardboard cake boxes, up on some book shelves in our spare  room/wedding dumping ground. I have 1 extra iced cake just in case of any disasters and 2 naked fruit cakes leftover from the epic baking stage of this cake.

We were going to celebrate Christmas early this year, what with the wedding being on 30th December. So I started wrapping all of my presents very early. I was wrapping until 11 one night and popped everything under the tree only to look up and discover yellow stuff running down the walls, behind the tree. I showed Chris and he discovered that I had also placed all of my freshly wrapped presents into a quickly mounting pool of water gathering under the tree.

The wall was quickly turning into a water feature in our house. It also joins onto the spare room. A spot of investigating further revealed that the flood had started in the spare room, saturated the wall and then seeped into the living room and across the floor! Thank god my dress was at my parents house and thank god for Kate’s cake boxes! They were the perfect protection against any damp that was lingering in the air (there was a lot!). Luckily the shelves weren’t up against the soaked wall too and lucky that I had been wrapping presents to discover the leak as I wouldn’t have noticed it until we were swimming in our sitting room.

We're all having a dehumifier party

We’re all having a dehumidifier party

One emergency cake evacuation later and removal of everything out of my kitchen cupboards, the 8 cakes had a new dry home!  Our landlord delivered a dehumidifier to get rid of the damp and the stink and we were good to go. Although further calamities were awaiting me whilst Chris was away for his stag do and I had friends round for festive fizz, mulled cider and spare wedding cake tasters. The dehumidifier started to leak! I then flooded the toilet trying to mop it up and broke a handle off the door just before everyone arrived. I think it was best to get all the bad luck out of the way before the wedding.

Sticking a milliong sugar flowers in place

Sticking  millions of sugar flowers in place

To give myself plenty of time to glue the flowers on to the cakes I set aside a Saturday the week before Christmas to give them a chance to dry fully and me to repair any breakages/falling offs. This happened to coincide with the painter coming to repair our flooded flat. It made for an interesting 5 hours of glueing flowers whilst directing decorators to dust pans, brushes and keeping the cat at bay.

Edible glue takes a ridiculously long time to dry! In hindsight I think royal icing would have been a MUCH better idea… I used a cocktail stick to smear a little spot of glue onto the back of each flower (which had become really rigid and quite fragile so had to be handled extremely carefully). The moulded reverse of each flower results in grooves and ridges that the glue disappears into. It needs a bit more glue so that the it can actually touch the cake.

The glue should be tacky before attempting to apply it to the cake… If you try to stick it on while the glue is still runny you will have a happy game of chase the flowers as they fall off the cake leaving a trail of glue which has now taken on some of the blue food colouring all down the cake. Many of the flowers fell on the floor and smashed this way but I also realised that I have quick reflexes, almost a cake decorating ninja.

The painters were highly amused by my antics in the kitchen where I didn’t even stop for a cup of tea for 5 hours whilst contorting myself into all shapes to catch the falling flowers and hold 4 flowers in place with each hand until the glue dried enough to support their weight. Patience and flexibility were useful qualities to have a this stage in the cake decorating process. It’s a good job I do yoga.

Almost there but not quite yet...

Almost there but not quite yet… have a look at the varied blue hues in the hydrangea

Zoe Clark’s original design for this cake uses buttercream icing to cover all of the cakes. The sugar flowers can then simply just sit on the buttercream and be held in place. No glue required. The fondant icing that I used, had now hardened and had no give to it to help hold on to the flowers, so it really was the glue doing all of the hard work.

I realised after about an hour of catching and reapplying flowers that I needed to paint the flowers with glue, leave them for about 5 minutes and then the glue would be just about right to stick it onto the cake. Some flowers also had to be rejected as when they dried they hardened into such a curly shape that they lacked a flat area on the back where I could paint the glue on.

I wanted the flowers to appear as natural as possible cascading down the cake.  I chose a combination of hues of the blue hydrangea blooms and applied them randomly at different angles to the cake to give a more varied finish. Tapering off towards the bottom of the cake.

The decorated wedding cake in my kitchen

The decorated wedding cake in my kitchen

With most of the flowers stuck into place, reserving a gap down the back of the cake, so I had some space to pick each cake up and stack it back together later on. I retired for an essential lie down.

A couple of hours later the glue was really dry and the flowers were stable enough so the cakes could be returned to their boxes and shelf for safe keeping.

One Tier - complete with a full round of dowls - how to ice a wedding cake

Back in it’s box. One Boxed Tier – note the gap down the back – no flowers here yet so it can be handled without damaging the decoration.

I arranged to deposit and arrange the cake at Jesmond Dene House the day before the wedding. It was an exciting and cautious trip in the car trying to keep all the flowers on the cake and intact.

I hired a cake stand to add extra height to the cake and whipped up a batch of royal icing to glue the cakes together and popped it in a icing bag so pipe it easily into place in situ.

All together now in Jesmond Dene House. The day before the big day! (please excuse the lack of make up and scraped back hair it was a busy day! BUt the cake is almost as tall as me!)

All together now in Jesmond Dene House. The day before the big day! (please excuse the lack of make up and scraped back hair it was a busy day! But the cake is almost as tall as me!)

Each tier of the cake required a generous dose of royal icing to hold it in place but not too much so it oozes out the sides. When royal icing dries it’s rock solid. That cakes wasn’t going to be moving anywhere!

With all 5 tiers stacked and arranged with the floral cascade running down the front and the joins in the ribbons running down the back I could then add more flowers to fill in the gap that I left to pick the cake up down the back. Amazingly only 2 flowers fell off in the process! Royal icing was a perfect glue and each flower didn’t need to be held in place for hours!

The final result was everything that I had hoped for. The 5 tiers of fruit cake ontop of the cake stand made it almost as tall as me! Please excuse the lack of make up and scraped back hair.

Birds eye view of the cake in place in the great hall at Jesmond Dene House

Birds eye view of the cake in place in the great hall at Jesmond Dene House

I have no idea how the wonderful staff at Jesmond Dene House managed to manoeuvre the gargantuian cake upstairs. The 12 inch tier by itself was just about all I could carry!

The Final Result! The Wedding Cake

The Final Result! The Wedding Cake

When we arrived at JDH after the ceremony it was amazing to see everything all together. I loved it. The flowers, the cake, the vintage glass, the real fire, and the sweets and treats I’d made. It was a dream come true with all of my most favourite people in the world together in one room! It was the most perfect day.

Cutting the cake!

Cutting the cake!

And then we got to cut the cake and the dancing began. I didn’t sit down all night but I managed to squeeze in a sneaky slice of wedding cake and it was truly my best ever cake. Rich, extremely fruity and moist, with not too much of an alcoholic burn. The 3 months of maturing were a really good idea! I love the amaretto and cherries. I will definitely be using this recipe again in the future.

What an adventure. This is without doubt my most epic bake yet. Exciting and exhausting in equal measures. I daresn’t even think how much time and energy I spent on the whole cake process, in fact I’m not even going to consider it (or how much I spent on eveything along the way) as it would detract from the very happy memories. I’m so proud that I could make my own wedding cake. Who would have thought a year ago when I hadn’t even made pastry before that I’d be baking and icing a 5 tier wedding cake?  I’m very grateful for the help I’ve had along the way too. It was all the more special that I made it myself and that I could share with all of our family and friends. I even posted some to my Aunty Carol in Canada. Cutting the wedding cake is supposed to bring good luck to the marriage. I wonder if making it yourself gives you extra kudos in the luck stakes?

I’ve saved one naked cake for a special occasion and I still have enough cake left for one last slice. I’m saving that one for a rainy day. I’ll even get the wedding photos back out and relive it all just one more time…


This is part 4 of the 4 stages of wedding cake baking! You can read more about my epic wedding cake adventures here…

Part 1 – My 5 tiers of fruit wedding cake – My biggest booziest cake yet 

Part 2 – How many sugar flowers does it take to make a wedding cake?

Part 3 – Where to start icing a 5 tier wedding cake?

Part 4 -The Final Frontier – Decorating & assembling my 5 Tier wedding cake

35. Merry Christmas! Stollen – Germany

Ok, ok, this may have been a long time coming (or perhaps I’m just ultra organised for this coming  prepared for Christmas)  BUT now it’s Summer it makes perfect sense to stop by Germany for a spot of Christmas Stollen. My wonderful baking friend Julie over at Sweetgum Bakery sent me a copy of her Patisserie course workbook (all the way from Australia I may add) which had this delicious recipe. I love this  book. It teaches you the techniques to create beautiful ‘bakery products for Patissiers’ including pastries and breads. I have already had a good go at a few things like  pretty dinner rolls pretending to be a real Patissier. This Stollen recipe  encompasses everything that I love about Christmas. Marzipan, spice, RUM and dried fruit. What’s not to love??

Stollen is for life, not just for Christmas

A stollen is a sweet, rich yeast dough laced with almond paste (or marzipan) and studded with dried fruit. Perfect for your Christmas celebrations (or any tea table al year round! Why deny yourself something so gorgeous just because it’s not December?!)  I may start just eating this all year round. I bet you could also make smaller Stollen buns or a Stollen Crown loaf, or a Stollen plait, or Stollen cupcakes! I might be getting carried away but the possibilities are endless.

Stollen is a traditional European dish which originated in Germany. You can vary the filling depending on your mood (or what’s in your cupboards) with flaked almonds, poppyseeds, or sultanas and candied peel. Whatever you prefer! Apparently you can also purchase Stollen tins to help keep the traditional shape during baking, but I am yet to find one. Although I’m sure it would be a wise investment indeed as I think mine spread a little on the baking sheet, but this didn’t stop it tasting lovely.

It’s always a good idea to pre soak your sultanas in a generous slosh of rum overnight to plump them up and enhance their flavour. It also adds to the festivities.

As with any yeast based dough it requires some proving time so make sure you have some time to spend with your Stollen. The recipe calls for compressed yeast. I was using instant dried yeast so adapted the method to suit.

Yeasty flour

Mix the 20g of  flour, 7g instant yeast (normally when I make a loaf of bread 500g of flour requires 7g of instant yeast so I used 1 sachet of Hovis instant yeast) and milk (200g)  together. Mix together then leave to prove for 20 mins in a warm place.

Yeasty batter

Add the rest of the flour (380g) to the mix along with an egg, lemon zest, lemon extract and sugar (100g). Mix all of the ingredients together in a large mixing bowl and cover with a tea towel or cling film. Leave in a warm place to prove until it’s doubled in size

Buttery yeasty batter

Add the butter and mix it in until it becomes clear.

Proving time

Cover and leave the dough to prove again in a warm place, for an hour or so until it has doubled in size.

Dough has definitely doubled in size!

Knock back the dough and mix the sultanas, mixed peel (and optional nuts) in carefully, so as to not break the skins of the dried fruit.

Mixed Fruit

I used sultanas and cranberries (what I had in the cupboard!)

Fold in the fruit

Leave the dough to prove again for another half an hour, whilst you prepare the marzipan filling.

Making Marzipan Filling

Taking shop bought marzipan (120g) add the lemon zest and  an egg yolk and mix together to create a firm paste.

Marzipan paste

Divide the marzipan into 3 and roll into 3 long ‘logs’ (about 30cms long). I found my marzipan was a bit on the sticky side at this point so arranged it onto a sheet of cling film and rolled it inside the clingfilm. This made it a bit easier to move into the fridge to let it firm up a bit more.

Marzipan logs

Chilled Marzipan Logs

Take the dough and roll it out lightly with a rolling pin, into a rectangular shape. Aproximately 30cm long and 15 cms wide.

Flattened sticky fruity dough

Arrange the chilled marzipan logs in the centre of the flattened dough and fold the edges of the dough over to enclose the marzipan. Seal the edges of the dough.

Arranged Marzipan Logs

Place the dough, sealed edge down, onto a baking sheet greased and lined with greaseproof paper. Allow the dough to prove for the final time. Then bake for 25 minutes at 200 degrees C.

Sealed and shaped stollen

Once it’s baked place on a wire rack to cool. While it’s still warm pour the melted butter over the top of the loaf. This step may feel a bit on the odd side, as when pouring a cup of melted over the Herman the German Friendship Cake  but believe me it’s utterly delicious.

Straight out the oven Stollen

After a day the butter seeps into all  of the available sweet dough crevices and infuses the Stollen with a gorgeous buttery moisture. It also helps to stop it from going stale so it can keep for a week (if you can bear to hang on to it for that long).

Soaked in butter Stollen

When it has cooled completely dust the Stollen with a generous dose of icing sugar, for added Christmas magic and sweetness. (It also helps to keep your fingers from getting all buttery and greasy.

Snowy Stollen

One of my friends told me this was her favourite bake so far in the aroundtheworldin80bakes challenge. I have to agree. I love the gooey marzipan layer sandwiched into the dough and I love the plump and juicy sultanas.

Snowy sliced Stollen

Although I think my dough didn’t rise quite as much as it should have, as it spread out on the baking sheet, it was most definitely worth the effort. To help spread the Stollen love and festive cheer I chopped it up into Stollen bites and took a batch to work and it quickly disappeared. A good sign indeed!

Stollen Bites

Does it feel like Christmas yet??

Extreme Stollen Close Up

yum yum yum

Just in case you would like to have a go here’s what I used to create this German Stollen

To make the initial yeast paste

  • Strong plain flour (20g) –
  • Instant yeast (7g)
  • Milk at 30 degrees C (200g)

Yeast Dough (add the yeast paste to)

  • Sugar (100g)
  • Lemon zest (1/4 tsp)
  • Lemon extract (1g)
  • Butter (100g)
  • Strong Plain Flour (380g)
  • 1 egg
  • salt 3g

The Fruity Filling

  • Sultanas (pre soaked in a slosh of rum) (120g)
  • Mixed peel (25g)

The Marzipan Filling

  • Marzipan (120g)
  • 1/2 egg yolk
  • Lemon zest (1/4 tsp)

The Final Topping

  • Butter (melted) 40g
  • Icing Sugar (40g)