

Haupai Hawaiian Coconut Pie
Having never visited Hawaii I have absolutely no idea what the traditional cake Hawaiian cake would be until I discovered Haupai Pie. I’ll never look back from this tropical chocolate, coconut cream dream pie.

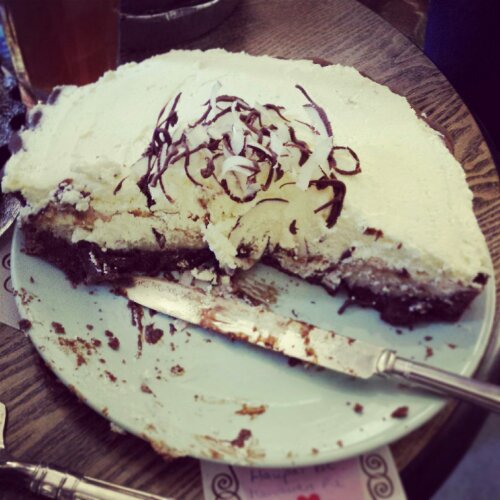
The first slice of Haupai Pie
Trying to decide on a birthday cake for my sister I put a call out for inspiration on twitter and Haupai Pie was suggested by the lovely @FoodandFrets. I knew instantly that this was the pie for me especially with my upcoming trip to @private_pie club which was to be held the amazing Quilliam Bros Teahouse (which is incidentally also my favourite shop to visit with their millions of teas brewed to perfection and spectacular peanut brownies). The theme of Private Pie club this month was ‘free from’. I interpreted this to mean free from meat but not free from calories.

The sweet pie table at Private Pie. Gorgeous Raw Chocolate Vegan Pie, Shoofly Pie and my Hapuai Pie
Recipes vary for Haupai pie. Many require just an unspecified ‘pie crust’. Which is helpfully vague but also means I can do what I like best in the kitchen, and make it up as I go along. Sweet chocolate pastry pie crust it is then for me!
Pastry is not my forte. It’s no secret. I have heard that chocolate pastry is particularly difficult and delicate but who cares what the worriers tell you. Just plough on through and it’ll be fine. If I can make it I’m sure anyone can.

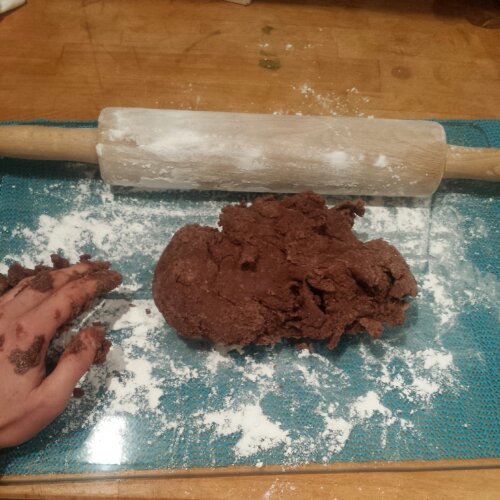
Butter me up
Infused with confidence, having churned my own butter recently, I set to work using my Homemade butter to make this challenging crust.

Rub rub run your flour
Rubbing together the flour, cocoa powder, icing sugar and homemade butter by hand means you’re more in control of the pastry and less likely to overwork it. (Not that I could honestly tell the difference between over our under worked pastry as they all taste pretty good to me.) I chose to use icing sugar rather than caster sugar to achieve a smoother pastry. Caster sugar, although finely ground, could be a little too course for this pastry (Another helpful tip brought to you from the wisdom of Mary Berry!) It’s definitely not because I had ran out of caster sugar and only had icing sugar to hand…

Pastry starting to come together
An egg is used to enrich the pastry and bring the dry mixture together. I also added a splash of milk to get the pastry to a good rollable consistency. Once it starts to come together, tip it onto an icing sugared dusted surface and knead it lightly and pat it into a round.
A dark chocolate pastry ready for rolling
Moving the pastry as little as possible is apparently the key to good pastry (and cold hands, which I have even in summer). Lightly rolling the pastry away from you, in one direction, turn the pastry 90 degrees clockwise, roll again and turn. Keep repeating until it’s about 5mm thin and big enough to line your tin.

A thin pastry rectangle
The best tip I have is to trim off the excess pastry, making more of a round shape as you roll to help keep it all under control. It makes life much easier when trying to fling the pastry into your tin too. Also as the pastry has a high butter content, there’s no need to grease your tin. Hurrah! Another job saved.

Pastry envelope
My method is to fold the pastry like an envelope, into thirds and lift it into the middle of the tin. Then all you have to do is unfold the pastry and gently press it into all of the nooks and crannies of your tin (I chose a tart tin with a wavy edge for my main pie). If your pastry is extremely delicate you can press it using a piece of cut off pastry instead of your fingers to stop yourself from poking a hole in it.

Unfold your pastry into the tin
Once the pastry has relaxed and is pressed tightly into the tin you can trim off the extra and save it for later. This recipe made enough pastry for 2 pies! So I made a bonus practice Haupai pie. You could freeze the raw pastry for another day if you prefer or make some tasty biscuits instead.
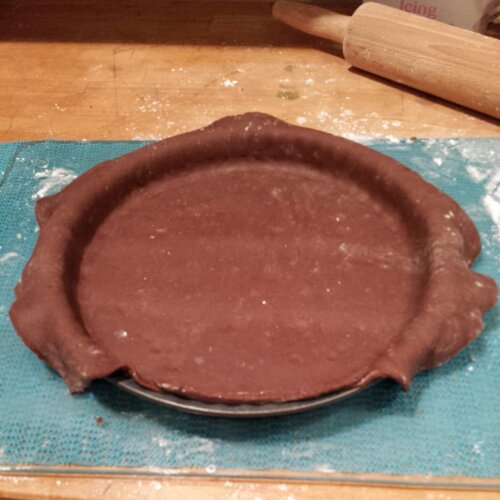
Trim your edges
The pastry needs to chill in the fridge for at least 10 minutes before blind baking the case.

Trimmed and chilled pie case
Before baking the chocolate pastry case prick the pastry all over with a fork to stop it bubbling up allowing you to fill it evenly later on.
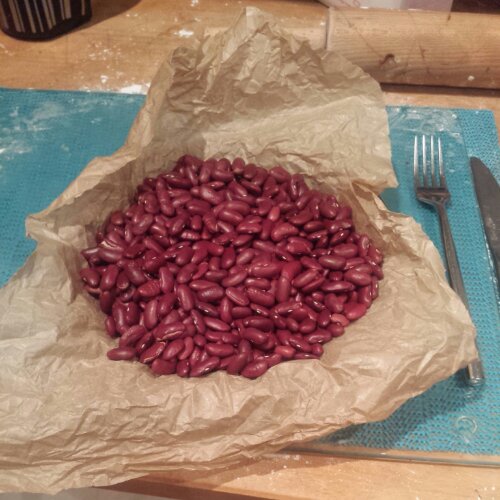
Blind baking with kidney beans
I like to use crumpled up greaseproof paper to line the case and kidney beans to hold the pastry down during the blind bake. With my extra pastry I decided to attempt a fancy twisted pie crust…

Fancy twisted pie crust
However in reality the fancy pie crust was a bit over ambitious. It melted in the oven during the blind bake and collapsed into the case giving some lucky people an extra thick chocolate crust! To make sure the pie crust bakes evenly I pop the pie onto a preheated baking sheet. The pie needs to be blind baked for 15 minutes and then baked uncovered for a final 5 minutes until it’s fully cooked in the middle. Some of the crust did stick to the greaseproof paper but hey it doesn’t need to look pretty on the inside, it’s going to be covered in luscious chocolate and coconut pudding. (Please ignore the twisted pastry mess on the outside too.)

Not so fancy pie crust
Whilst the pie crust is cooling you can then make the coconut custard/pudding mixture. This recipe seemed worryingly liquid filled to me. I couldn’t imagine it ever thickening up to a custard consistency. I had visions of the runny custard seeping into the pastry and ruining the crisp base. No one wants a soggy bottomed tart. The recipe called for a lot of coconut milk, milk and sugar to be boiled together and allowed to thicken. I had some homemade dulce de leche that needed to be used up so I substituted half of the milk for this instead, which also helped to thicken the mixture. (But you could just use normal milk or condensed milk for an extra sugary kick if you prefer…)
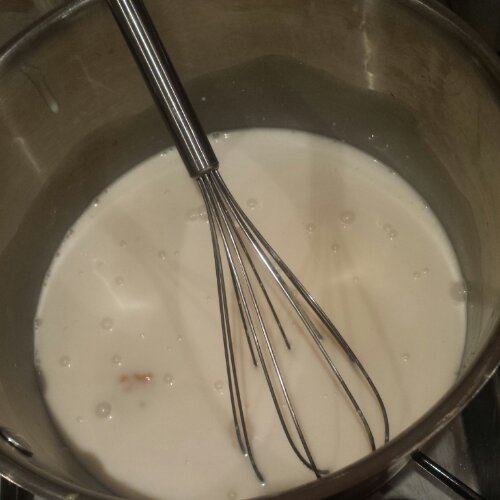
Simmering and whisking coconut milk, dulce de leche
I’ve never made a custard without eggs before, relying solely on corn flour to thicken the mixture. This seemed the perfect opportunity to use up the box of cornflour I had carefully carried through customs all the way back from Berlin recently too, believing it to be a German cake mix. Google translate revealed later that it’s just plain old cornflour that I could buy in any shop here…
This custard/pudding recipe screamed against all my baking instincts, which I had to suppress with all my might to stop myself throwing in the odd egg yolk or two. I’m pleased I ignored my supposed baking instincts and put my faith in the recipe. Pouring the full volume of water mixed with cornflour into the coconut milk, I held my breath and whisked like mad…

This seems like a lot of water and cornflour to me…
Miraculously the custard thickened immediately after I poured to full amount of cornflour into the mix! Producing a gloriously thick and glossy custard.

Beautifully thick and glossy coconut custard
The custard then needs to be divided in half to whisk chocolate into one half and dessicated coconut to the other, until you get a beautifully shiny chocolate custard and a wonderfully textured coconut pudding custard.

Chocolate custard

Coconut custard
With your cooled chocolate and coconut custards at the ready, the rest of the Haupai Pie assembly is pretty straight forward. Pour the chocolate layer in first and spread evenly over the base, followed by a layer of coconut custard. As I was making two pies, I ran out of coconut custard for my second pie, but you get the gist of it… You could just make one really full pie instead if you prefer or have a much more chocolatey second pie, like me.

Chocolate custard filled chocolate pastry cases
Whilst this is setting in the fridge, take the opportunity to whip up your double cream with a little caster sugar, until fluffy and light.

Followed by a generous layer of Coconut custard
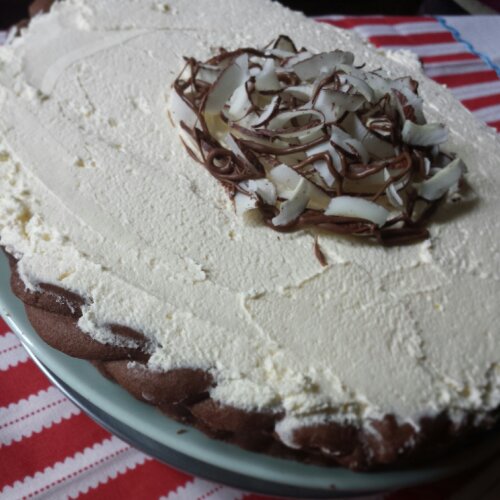
Spread a final thick layer of whipped cream evenly all over your pie and decorate with chocolate, or coconut or a combination of the two! With two pies to decorate I made one with chocolate buttons and another with homemade coconut curls and a milk chocolate drizzle.
The first slice of Haupai Pie – chocolate buttons make a quick decoration
I absolutely love Haupai Pie! I love the triple layered effect, with the dark chocolate pastry and custard contrasting with the mellow coconut custard and the white whipped cream! You can probably tell I have a bit of a coconut fascination, so this pie is right up my street.
Haupai Hawaiian Coconut Pie
The crisp chocolate base is the perfect partner to the smooth and creamy filling. Adding the extra dessicated coconut to the custard gives an added texture and interest to the pie too. And despite my crust slipping into the pie, I quite enjoyed the extra thick crust. I could quite happily eat chocolate pastry every day. Who would have thought that this time last year I thought that I didn’t really like pastry or cream?! I’m so pleased I persevered and not only do I now like pastry and cream I can now say I really do LOVE it.
Coconut curls and chocolate drizzle. Haupai Pie part deux
I was worried that I had prepared the pies too early as I made them on Monday to be served on Wednesday. I feared that the custard would make the pastry too wet. But lo and behold it was still perfectly crisp after 2 days. This pie definitely needs to be kept in the fridge and is probably eaten as soon as possible but rest assured it keeps very well for at least 3 days (if it lasts that long in your house!).
Haupai Pie mid devouring at Private Pie Club
Things That I used to make me Haupai Pie
Chocolate Pastry Recipe
- 90g icing sugar
- 30g cocoa powder
- 250g plain flour
- 140g butter
- 1 egg
- a splash of milk
- Rub together ingredients dry ingredients and butter
- Add the egg (and milk if needed) to bring the pastry together
- Roll out to 5mm thickness and press into tin
- Cut to shape and prick with a fork all over
- Blind bake for 15 minutes at 180 degrees c.
- Bake uncovered for a further 5 minutes, until evenly baked.
- Allow to cool
Coconut and Chocolate Custard Fillings
- 235ml milk (or 175ml dulce de leche and 50ml milk) (or 235ml condensed milk)
- 1 can of coconut milk (400ml)
- 200g white sugar
Heat milk and sugar until boiling and simmer for 5 minutes to thicken.
- 235ml water
- 65g cornflour
- Mix the cornflour and water until dissolved.
- Pour cornflour into the coconut milk
- Whisk over the heat until thickened (about 3 minutes)
- Take off the heat and divide the mixture in half
- 210g chocolate (100g milk and 110g dark)
- 40g dessicated coconut
- Whisk the chocolate into one half of the custard
- Whisk the dessicated coconut into the other half of the custard
- Allow to cool
- 400ml Double cream
- 40g caster sugar
- Whisk the double cream and sugar together until fluffy
- Pour chocolate custard into the pastry case
- Pour coconut custard into the pastry case
- Top with whipped cream
- Decorate with chocolate/coconut (or anything else you like)
- Enjoy!

Eat with a big spoon

This pie looks ridiculously moreish. I was just about to ask how you manage to stop your pastry from shrinking! The next photo answered the question. Brilliant job though none the less. I like the way you made two!
Thanks so much for reading and commenting. I really appreciate it. Haupai Pie is rather moreish and possibly my new favourite pie! One to be baked again again in my house I think
So pleased it turned out well, sigh of relief for me! Pity your pastry work melted, it looked fantastic! Do you think that’s because of the icing sugar melting quicker than caster sugar would? Anyway, well done it looks delicious!
Hello! Thank you so much for the suggestion! So sorry you didn’t get to sample it. What a pie this is!! I think the crust melted as it may have needed a little longer in the fridge before baking it. The cases were chilling whilst I shaped the pastry… Also maybe I should have held it in place with more kidney beans to stop it falling in? But an extra thick crust is lovely too! 🙂
Who cares as long as it tastes good! Gutted I missed it, might just have to make it myself!
There’s always next month. Definitely make it! It’s quite a quick pie to make! And if you do please share photos!! X